Are you looking to connect external applications to your WooCommerce store or create extensions using asynchronous UI frameworks like React? With WooCommerce’s REST API, you can create, read, update, and delete your data through HTTP requests.
The possibilities are endless with the WooCommerce REST API. You can seamlessly integrate your online store with other applications and automate your workflow. Imagine the time and effort you could save by streamlining your processes.
In this blog post, I’ll tell you everything about WooCommerce REST API and how it can help take your online business to the next level. It opens up new possibilities, from integrating external applications to building powerful extensions. Keep reading to learn more!
What Is REST API, and How Does It Work?
A REST API is a way for software applications to communicate with each other over the internet. It stands for Representational State Transfer and follows a set of guidelines to make integrations simple and scalable.
When a client requests information from a server using a REST API, the server sends back the current state of the requested resource in a standardized format. REST APIs use HTTP requests to perform standard database functions like CRUD records within a resource.
REST is preferred over other technologies like SOAP because it uses less bandwidth and is more suitable for internet usage.
Difference Between REST API vs SOAP API
Here is a comparison table between REST API and SOAP API:
| REST API | SOAP API |
| Architectural style | Protocol |
| Uses URIs to expose business logic | Uses service interface to expose business logic |
| Flexible and less defined | Structured and standardized |
| Lightweight, suitable for internet usage | More robust |
| Can transfer data in a variety of formats | Encodes data in XML |
| Ideal for newer contexts like IoT, mobile app development, and serverless computing | Works well in distributed enterprise environments |
Advantages of Using REST API in WooCommerce
REST API provides several advantages when used in WooCommerce. Some of the benefits include:
- REST API allows for interoperability between multiple platforms.
- It provides flexibility in application development.
- It enables streamlined connectivity with different devices.
- REST API allows for effortless data synchronization.
- It makes it easy to access third-party content.
Requirements for WooCommerce REST API
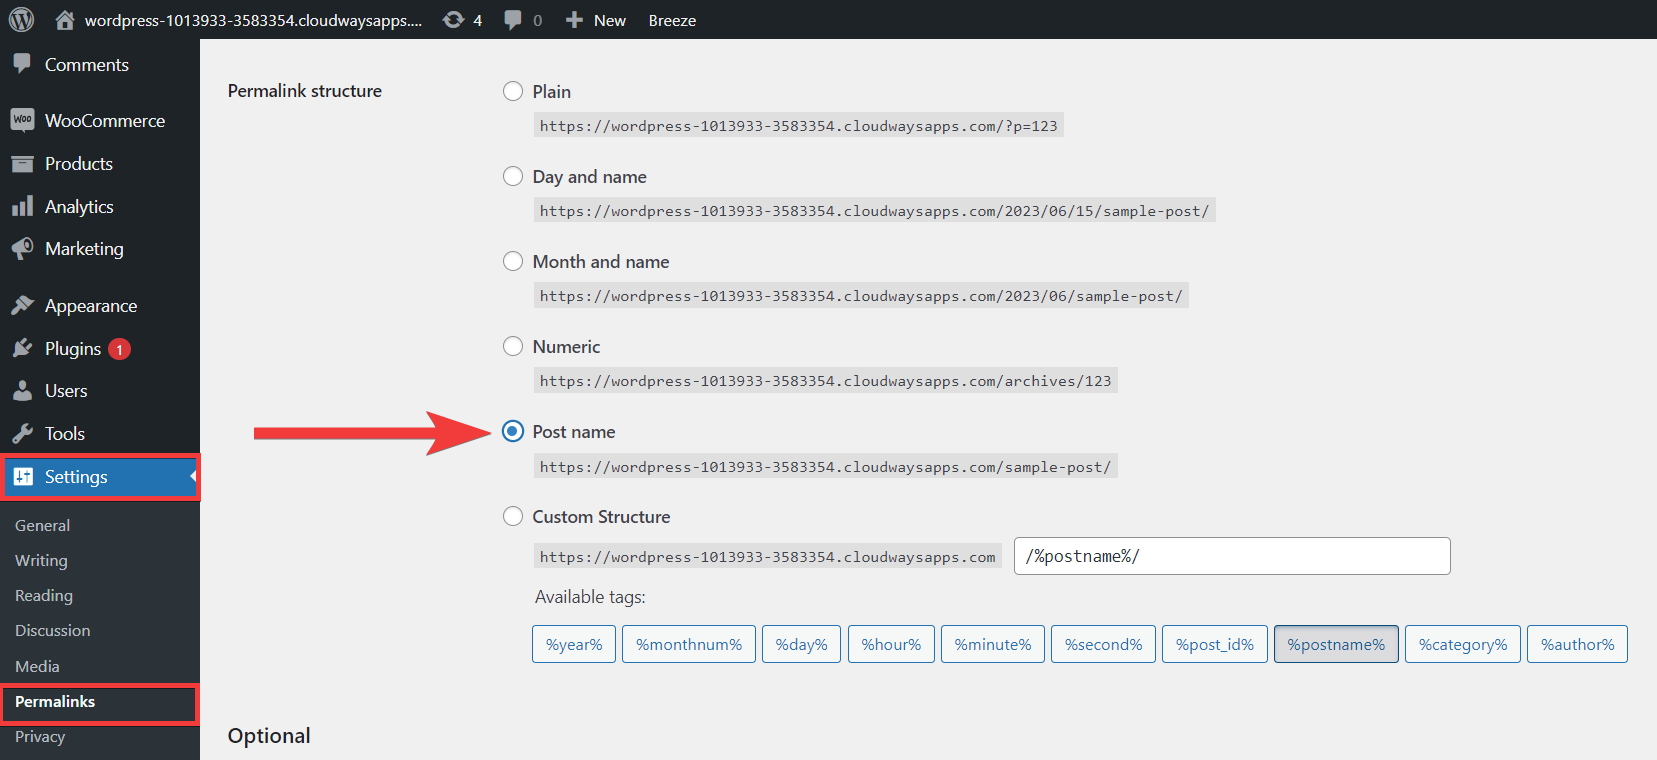
WordPress permalinks should be humanly readable. The permalink is the URL of your blog, landing page, and for your products. There are multiple options for permalinks, such as Plain, Post Name, Numeric, and more.
Plain Name is the option that I use. You can use any option, but anything aside from Plain should work.
- Go to Dashboard → Settings → Permalinks.
- Select the Post Name option, and click the Save button.
Getting Started With WooCommerce API
WooCommerce is an open-source e-commerce platform built on WordPress. The WooCommerce API allows developers to interact with the WooCommerce store data programmatically.
Ready to take your online business to the next level?
From integrating external applications to building powerful extensions, the WooCommerce REST API on Cloudways has got you covered.
To start using the WooCommerce API, follow these steps:
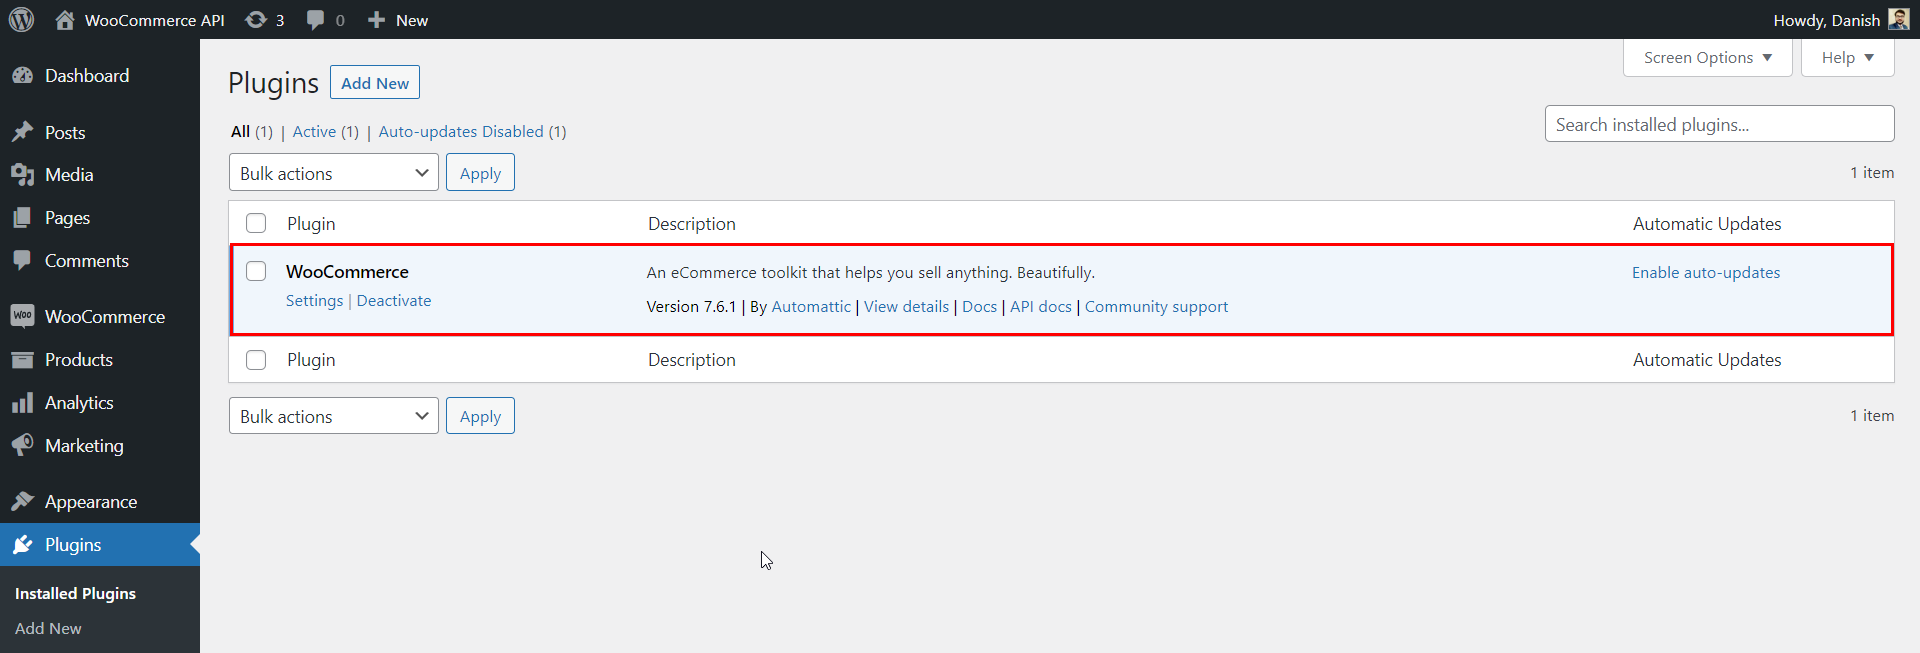
1. Install and set up WooCommerce: Before you can start using the WooCommerce API, you need to have WooCommerce installed and set up on your website.
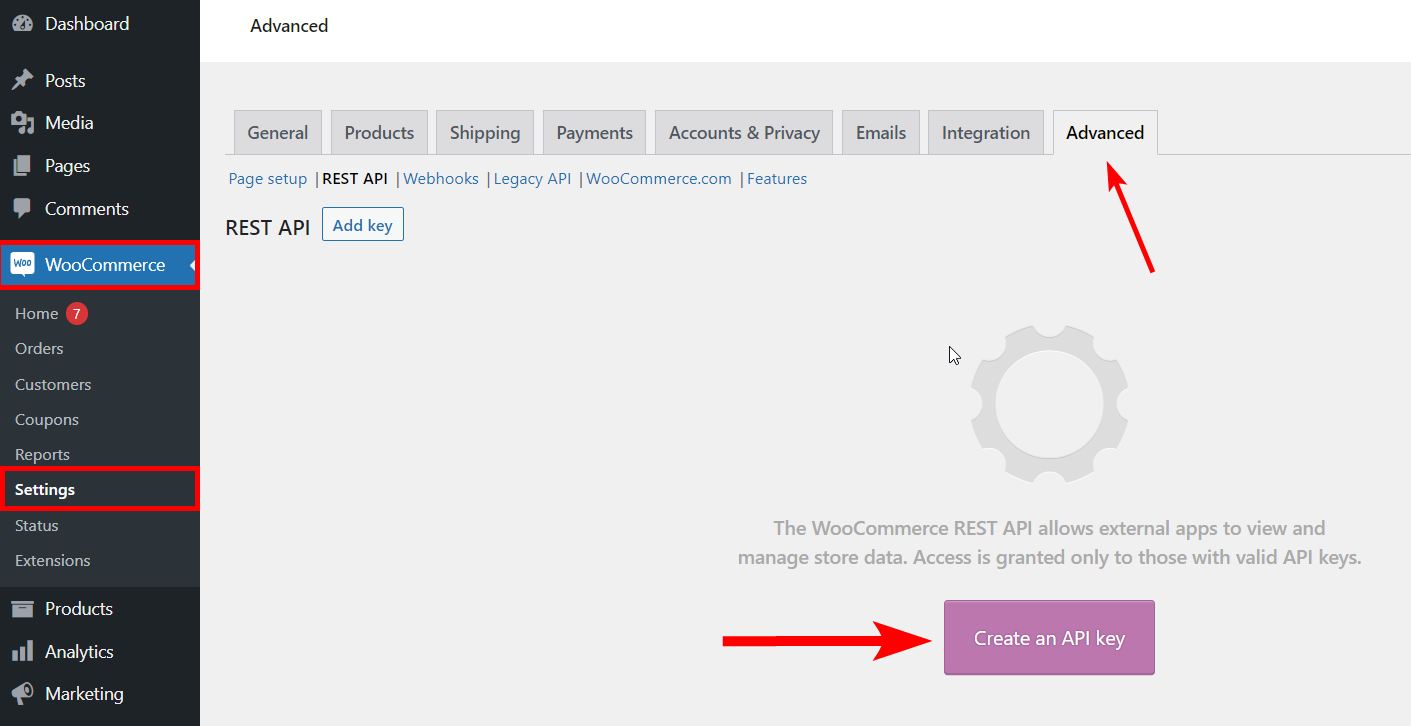
2. Generate API Keys: To authenticate requests to the API, you need to generate API keys. You can do this by navigating to the WooCommerce settings and clicking the Advanced tab, followed by REST API. From here, you can generate keys for each user needing API access.
3. Choose an API endpoint: WooCommerce provides several endpoints for accessing different data types, such as orders, products, customers, and more. Choose the endpoint that corresponds to the data you want to access.
4. Make an API request: To make a request to the API, you can use any programming language that can send HTTP requests. You must include your API key in the request headers to authenticate the request.
5. Process the API response: The API will return data in a JSON format. You can parse this data and use it in your application as needed.
Creating API Keys in WooCommerce
Creating API keys in WooCommerce is a simple process that involves just a few steps. Here’s a step-by-step guide to creating API keys in WooCommerce:
- Log in to your WordPress dashboard and navigate to WooCommerce → Settings.
- Click on the Advanced tab and then click on the REST API tab.
- Click the Add Key/Create an API Key button to create a new API key.
- Enter a description for the API key in the Description field.
- Select the user from the User dropdown list to associate with the API key. You may need to create a new user if you don’t see the user you want to use.
- Choose the permissions you want to grant the API key from the Permissions dropdown list. You can choose between Read/Write, Read-only, and Write-only permissions.
- Click the Generate API Key button to generate the API key.
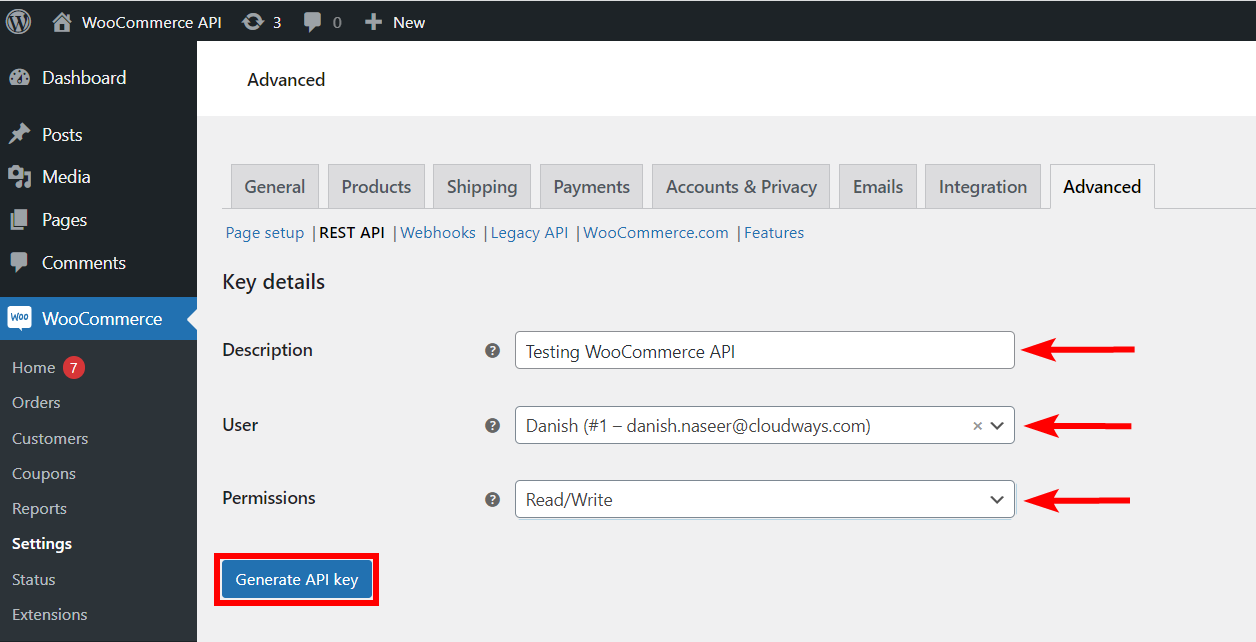
- Make sure to copy the Consumer Key and Consumer Secret values and save them somewhere secure, as you won’t be able to view them again.
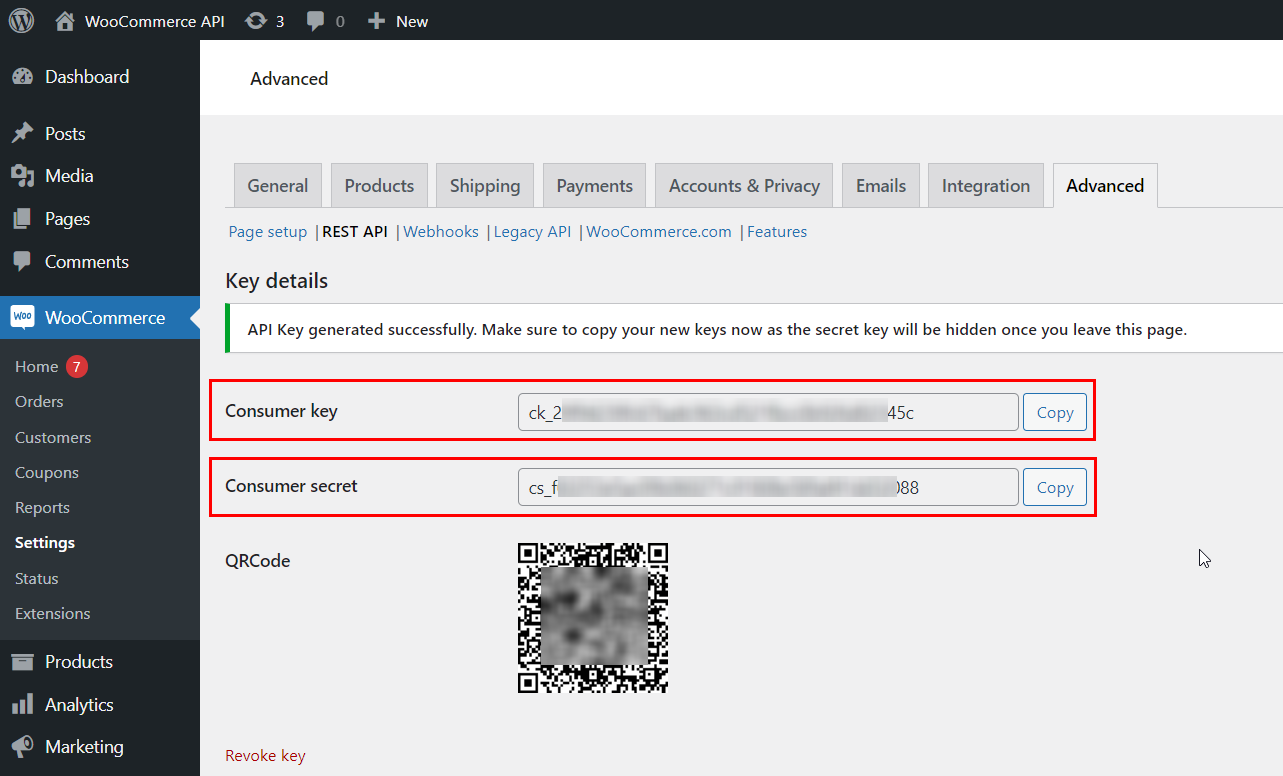
And that’s it! You’ve now created API keys for your WooCommerce store, which can be used to programmatically access and interact with your store’s data.
Testing If REST API Works in WooCommerce
Ensuring their proper functionality and integration with your application is essential when working with RESTful APIs. By following these steps, you can validate your REST API endpoints’ functionality, performance, and reliability and ensure a seamless user experience.
Enable the Legacy Rest API
The first step is enabling the legacy REST API; to do this, you must follow the below steps.
- Go to WooCommerce → Settings → Advance.
- Click on the Legacy API option.
- Check mark the Enable the legacy REST API option.
- Click on the Save Changes button to implement the changes.
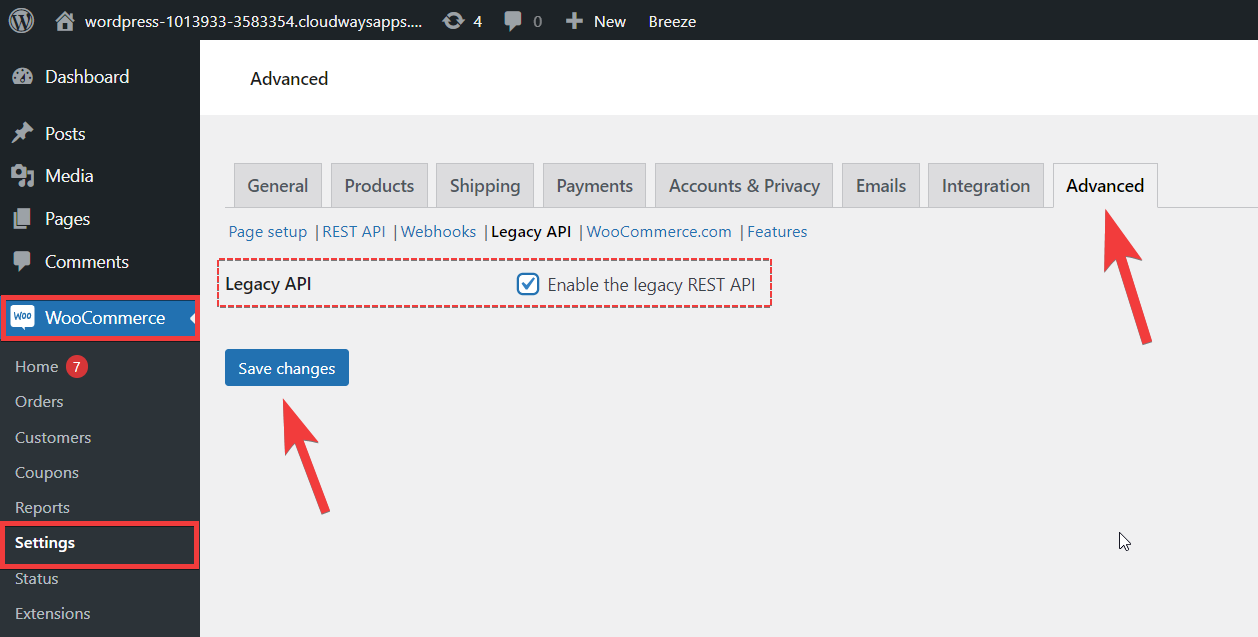
The Legacy REST API is enabled now. The next step is to test it on the API Platform. I’ll test the REST API on two API testing platforms; Postman and Insomnia.
Test WooCommerce REST API on Postman
Postman is an API platform for building and using APIs. First, you need to sign up to test the API on Postman.
The requested URL we’ll test is wp-json/wc/v3/orders. For my website, the full URL looks something like this:
https://wordpress-1013933-3583354.cloudwaysapps.com//wp-json/wc/v3/orders
Modify this to use your own site URL.
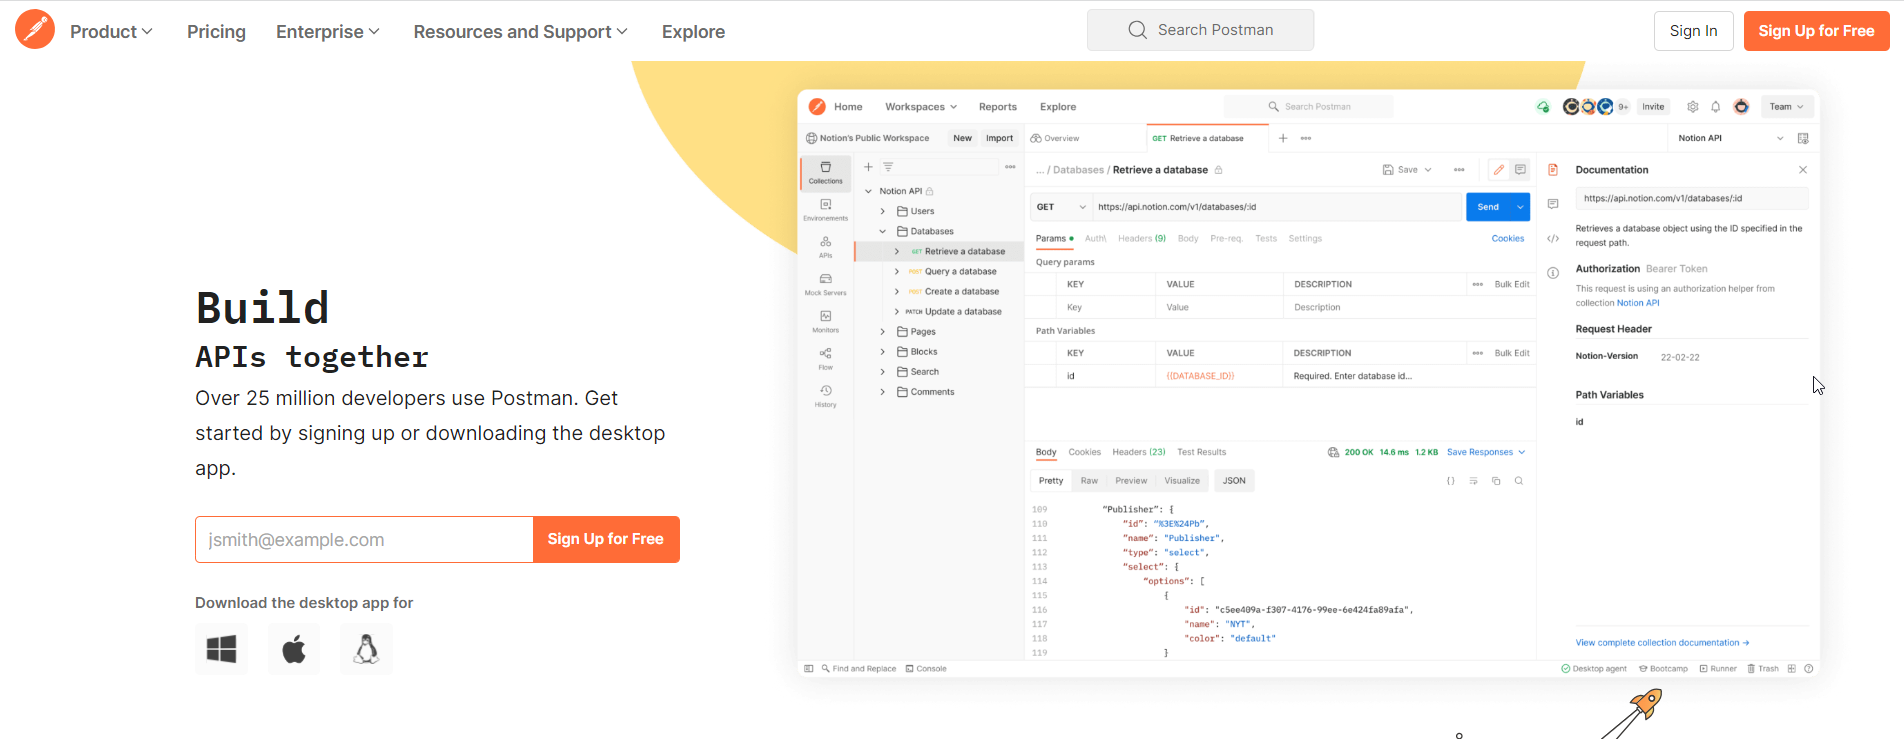
Once you successfully log in to Postman, follow the steps below to perform the REST API testing.
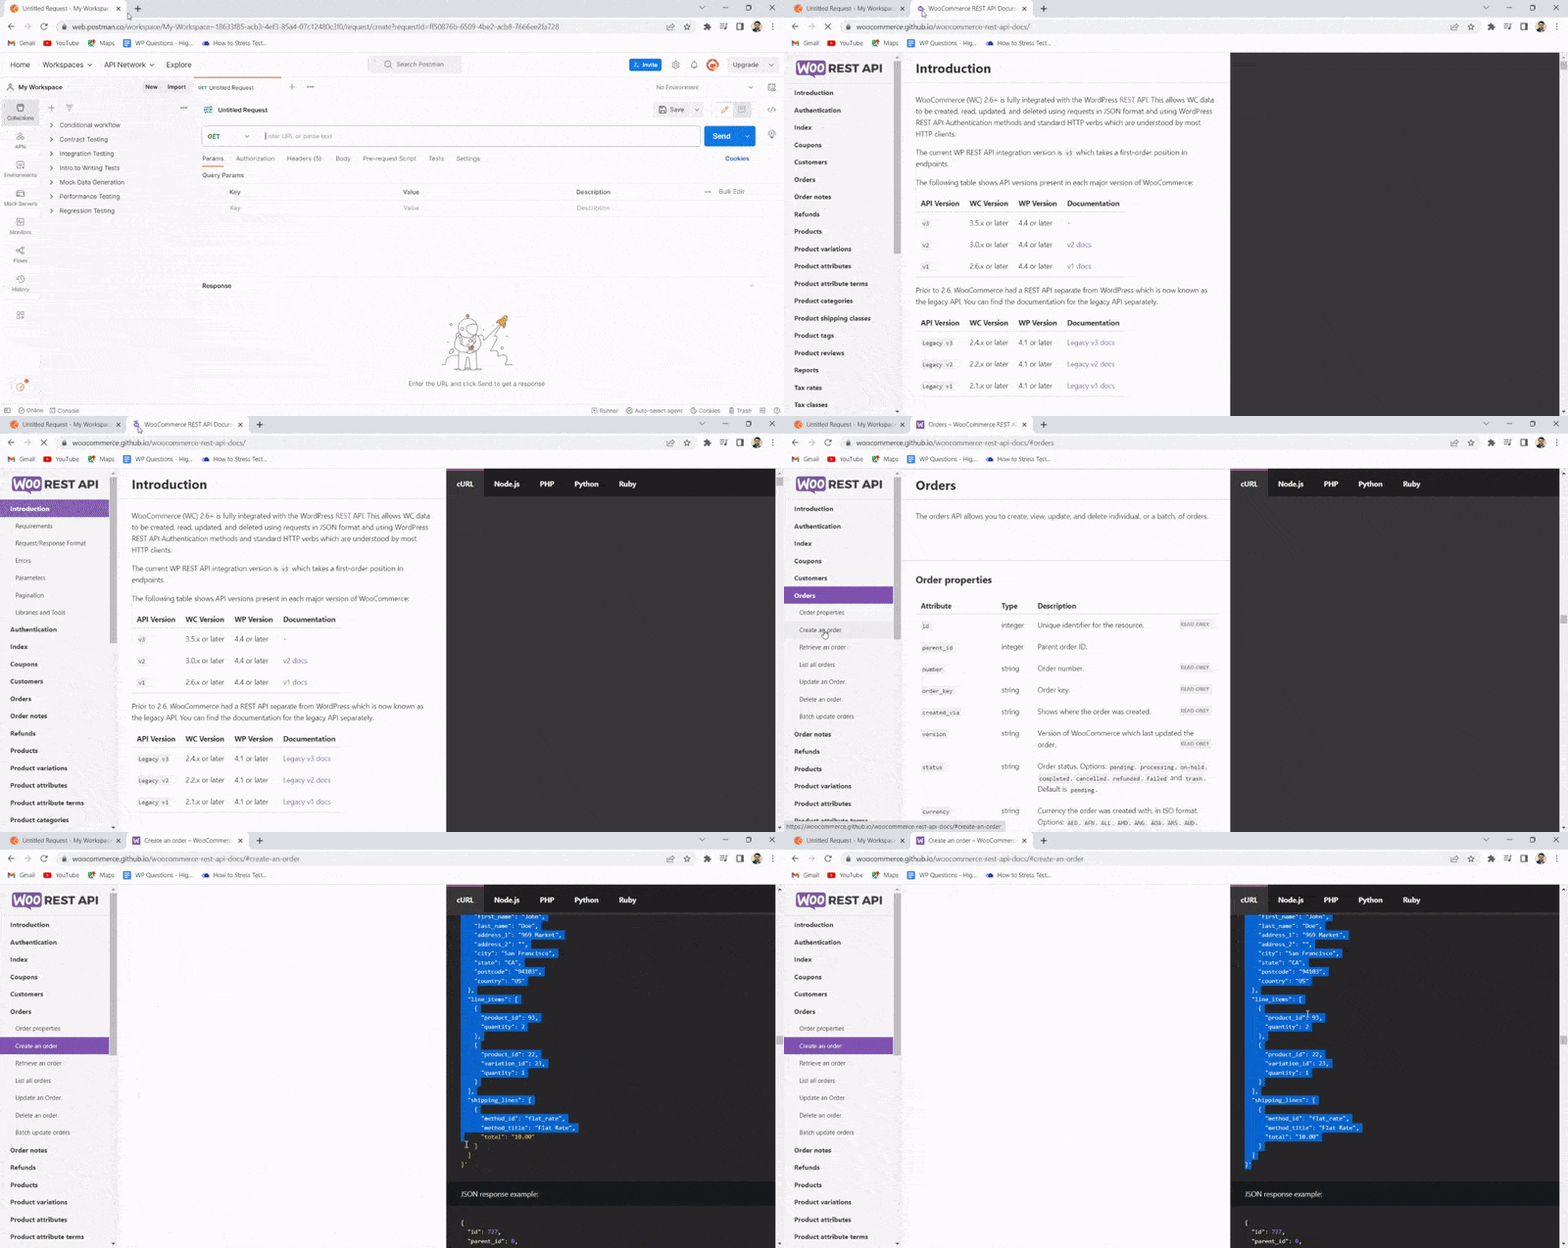
- First, open the WooCommerce REST API document on the new tab.
- Second, open the Postman on the other tab on your browser.
- Go to your WooCommerce REST API document and search for the Orders.
- Copy the code from the right side panel.
- Now, redirect to the Postman tab.
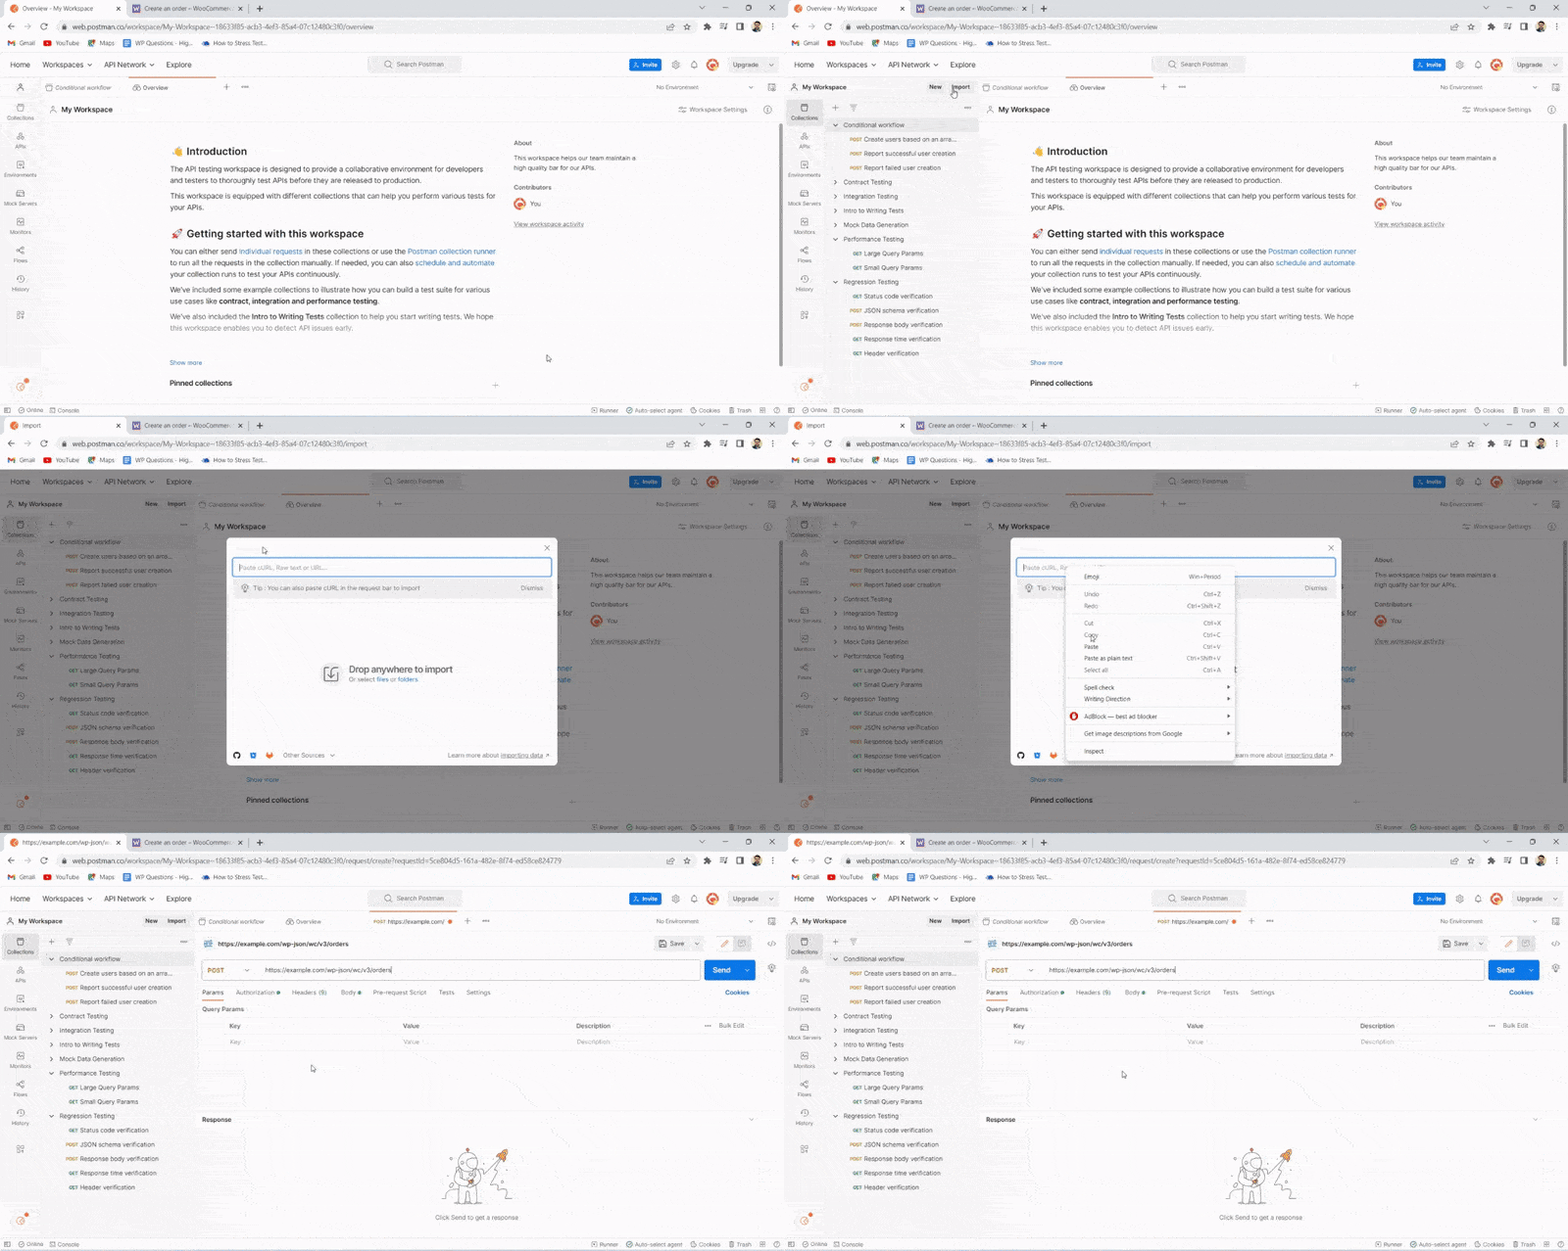
- Click on the Collections.
- Click on the Import.
- Paste the order code that you copied from the WooCommerce REST API document.
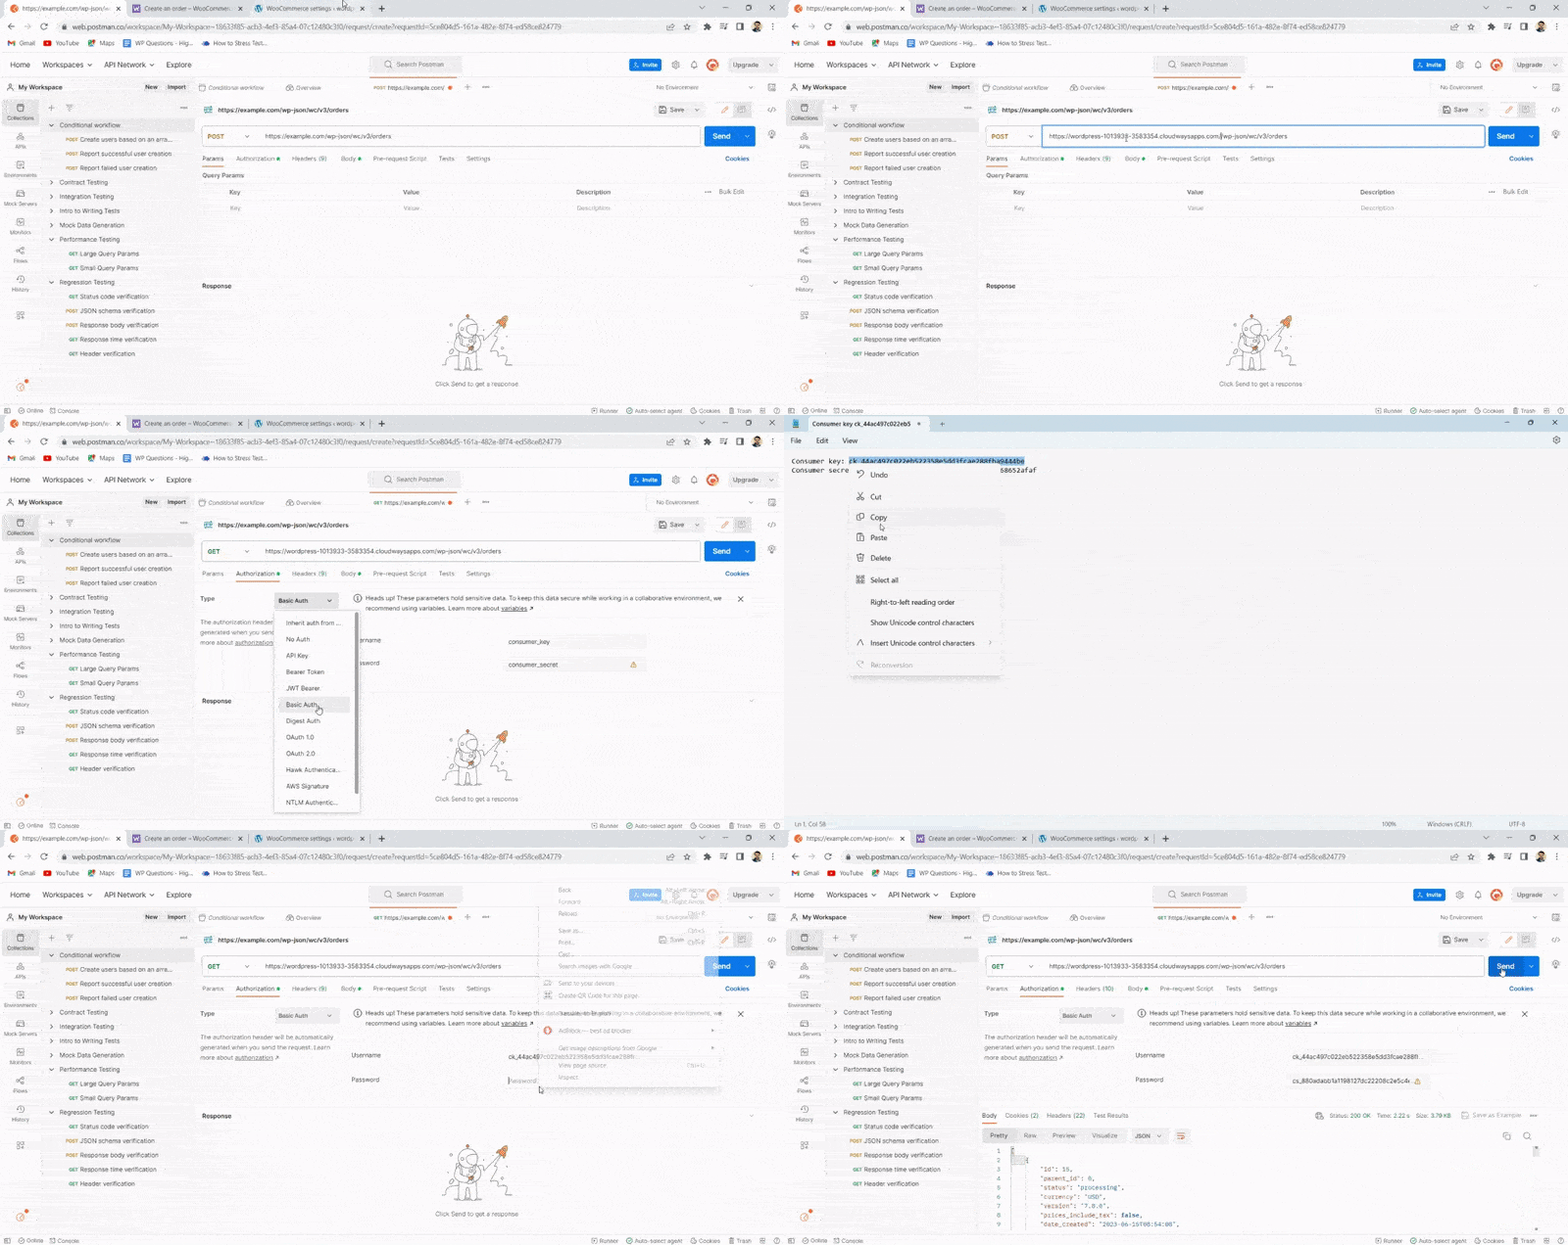
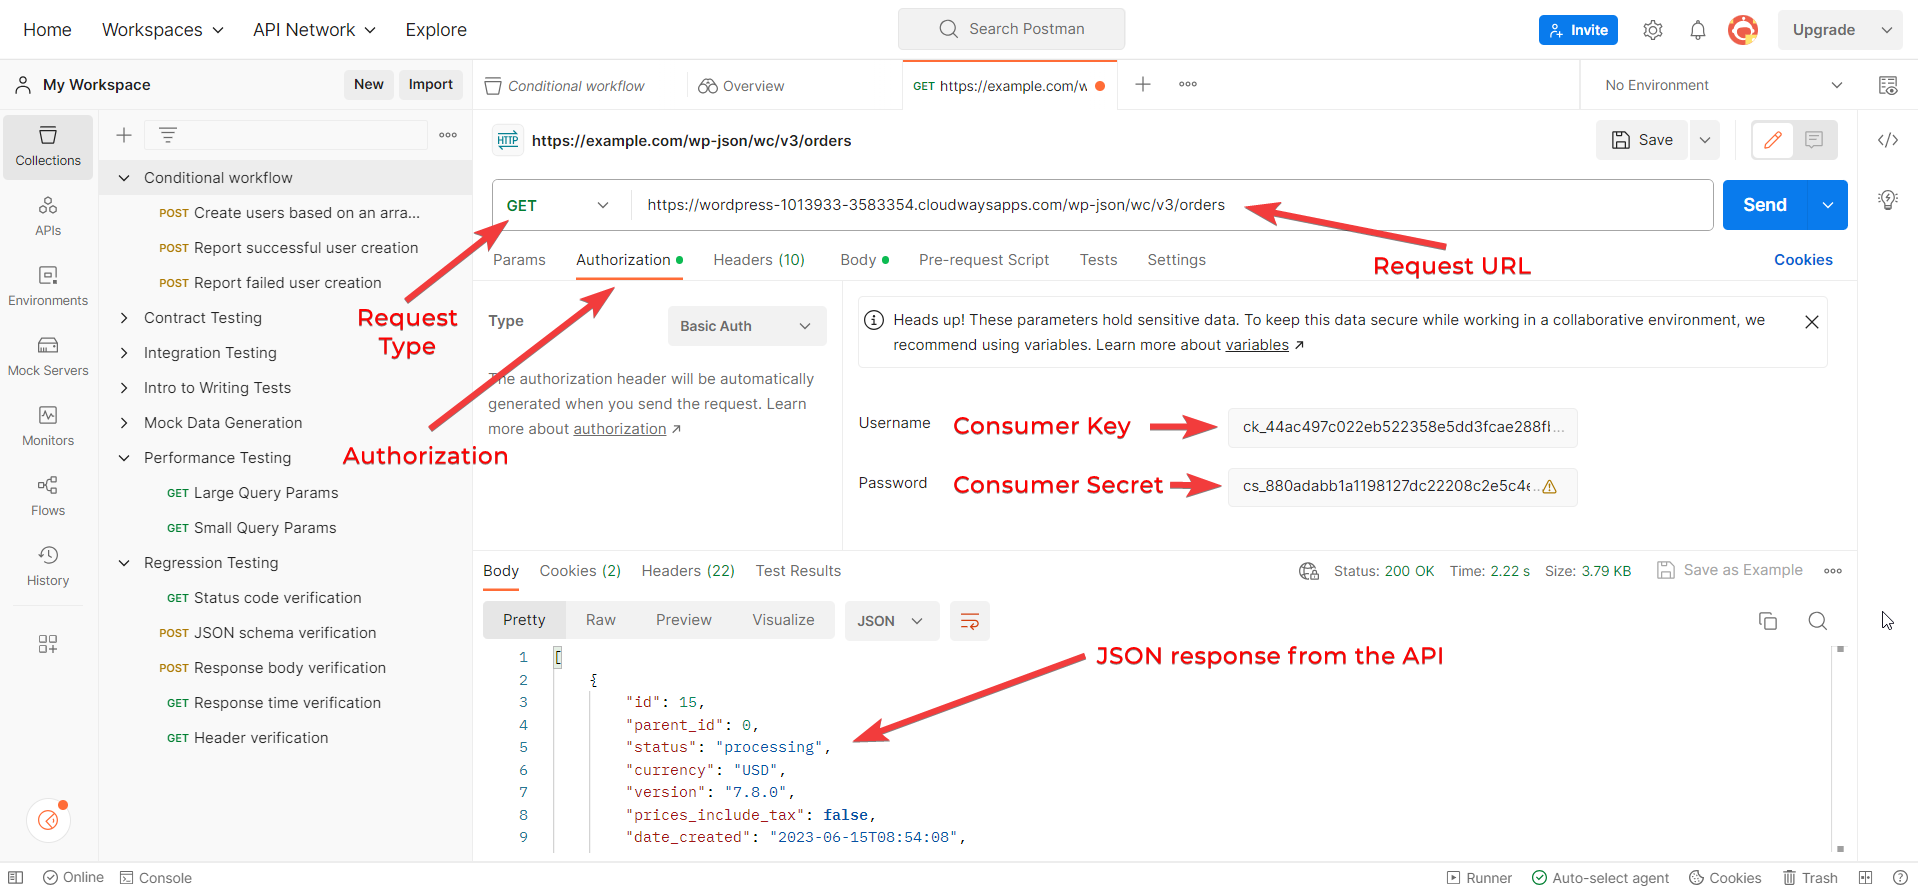
- Select the Request Type as GET.
- Edit the Request URL to use your own site URL.
- Now do the settings on the authorization tab.
- For Authorization, choose Basic Auth.
- Enter your Consumer Key and Consumer Secret Key from WooCommerce into the Username and Password fields.
- If you have set up your WooCommerce store properly and have enabled the REST API and generated API keys, you should see a JSON response that contains a list of products in your store. The response should look something like this:
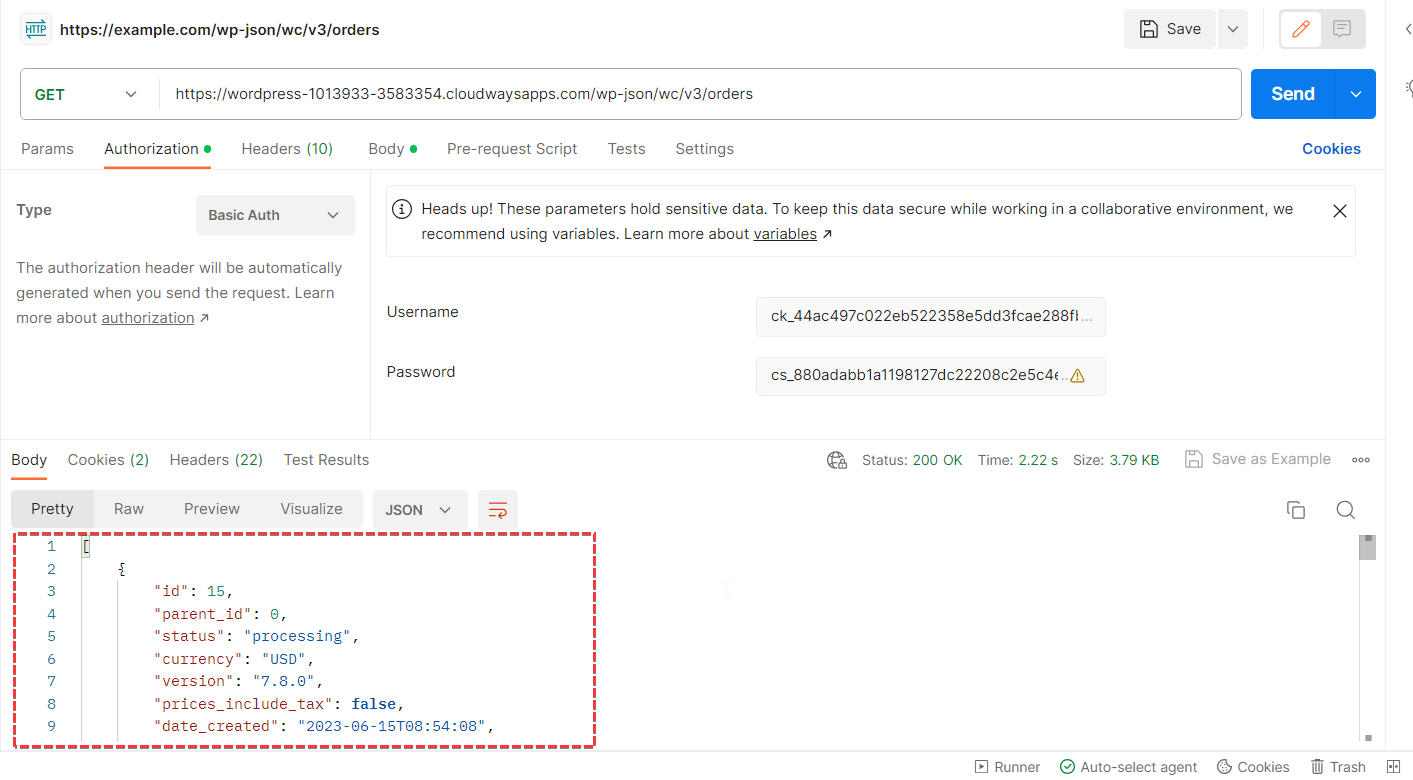
- Here is the Postman platform guide with the marking that can help you understand where you need to make changes.
Test WooCommerce REST API on Insomnia
The second platform that we use to test REST API is Insomnia. If you want to design, debug, and test APIs, Insomnia is a tool where you can Build better APIs faster and collaboratively with a dev-friendly interface.
First, you need to install Insomnia on your system. Once it is installed, then you have to follow the below steps to perform REST API testing.
- Select the Request Type as GET.
- Edit the Request URL to use your own site URL.
- For Authorization, choose Basic Auth.
- Enter your Consumer Key and Consumer Secret Key from WooCommerce into the Username and Password fields.
- Click on the Send button. See the results in the JSON format at the right panel.
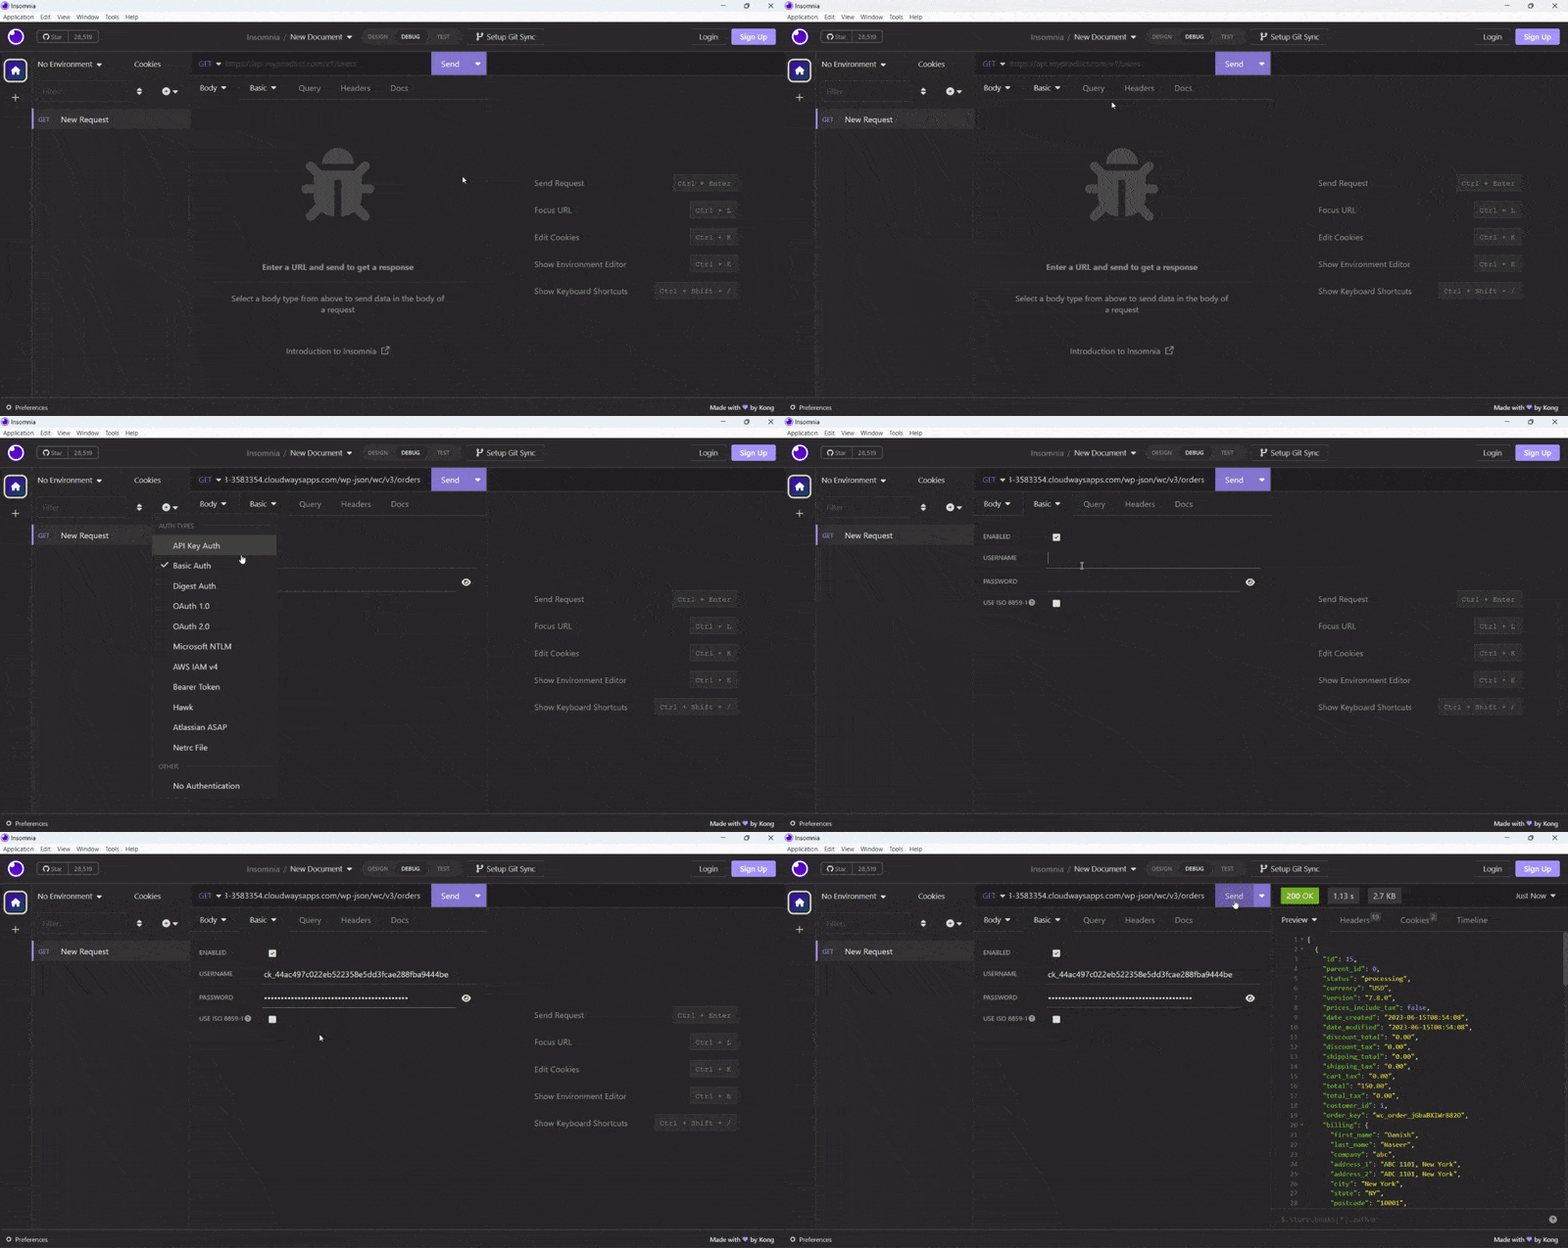
- Here is the Insomnia platform guide with the marking that can help you understand where you need to make changes.
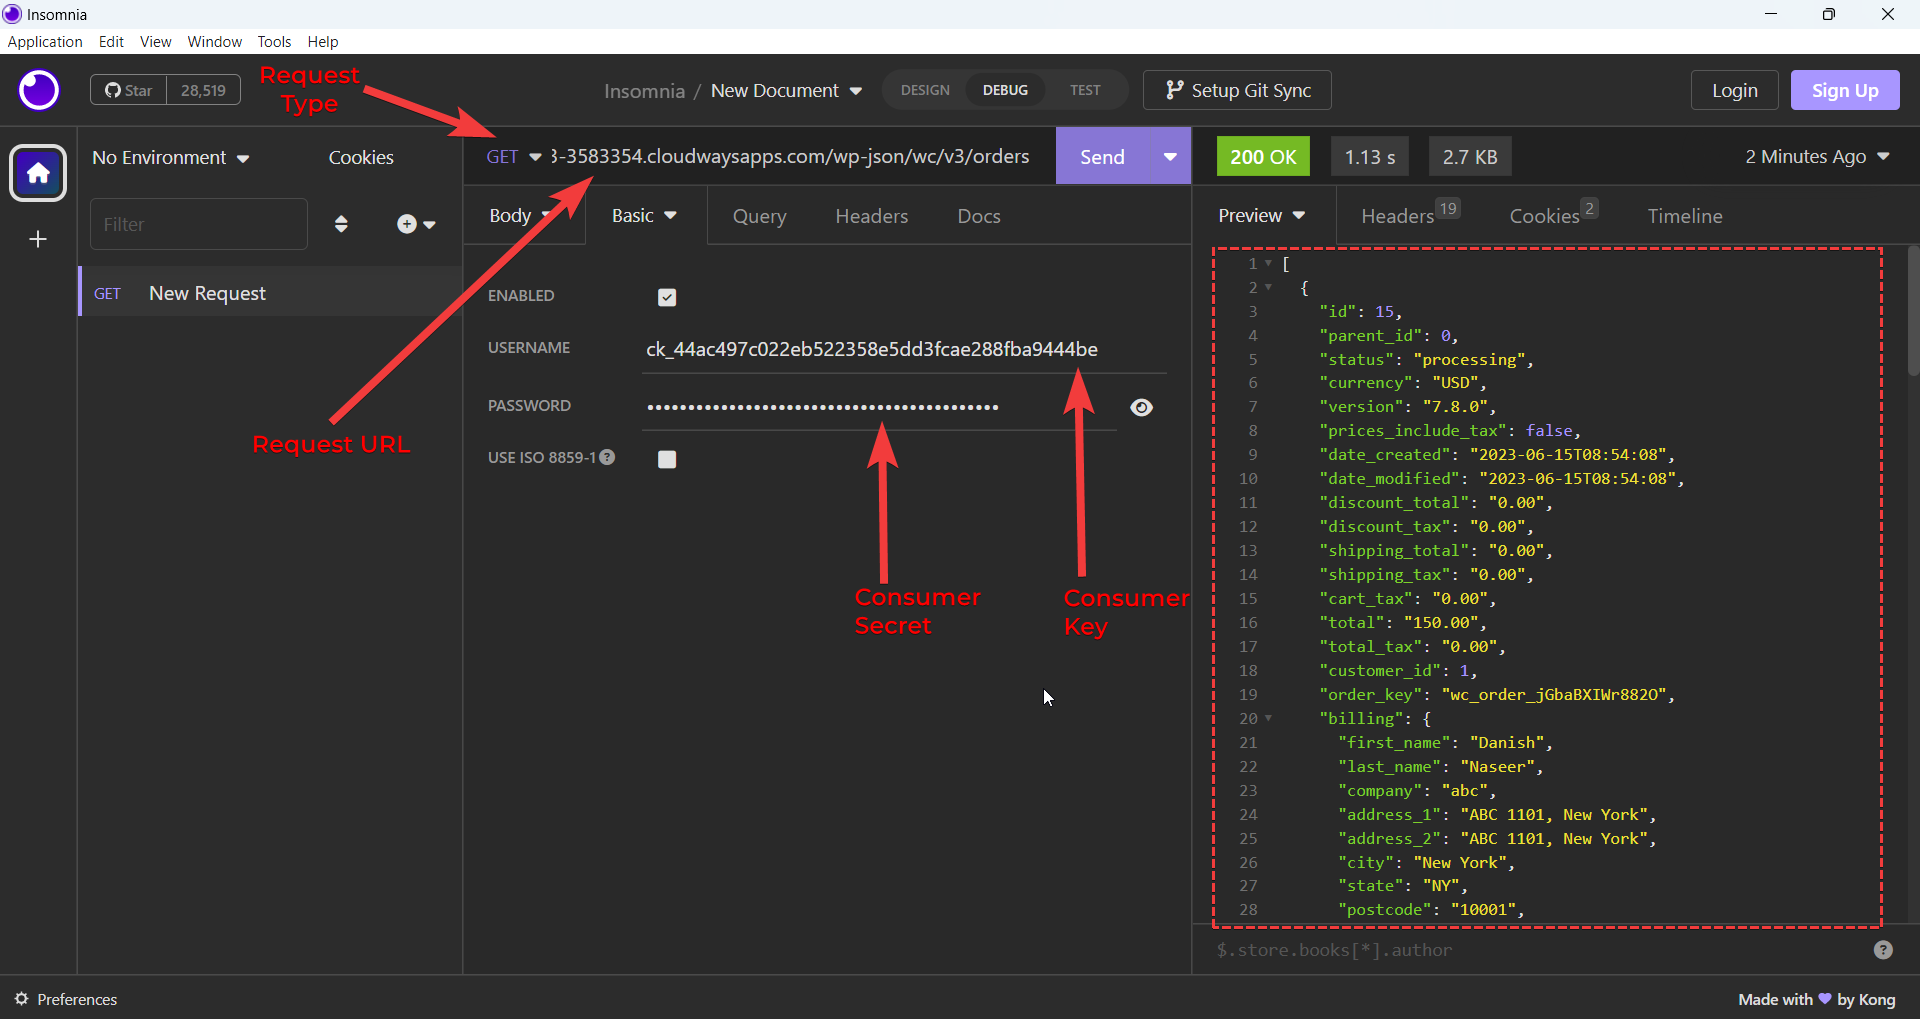
If you get a response like this, congratulations! Your REST API is working properly. If you encounter an error, make sure to double-check your API credentials and that you have properly enabled the REST API in WooCommerce.
Fixing Common Issues of REST API
While REST API is a powerful tool for building robust and scalable applications, it has challenges.
1. SSL Verification
If you get connecting errors like Could not get any response on your localhost, you must disable SSL Verification. You can disable it from Postman platform settings.
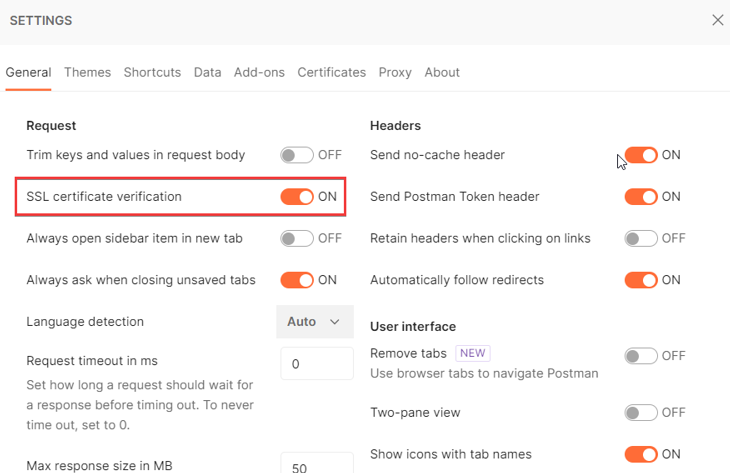
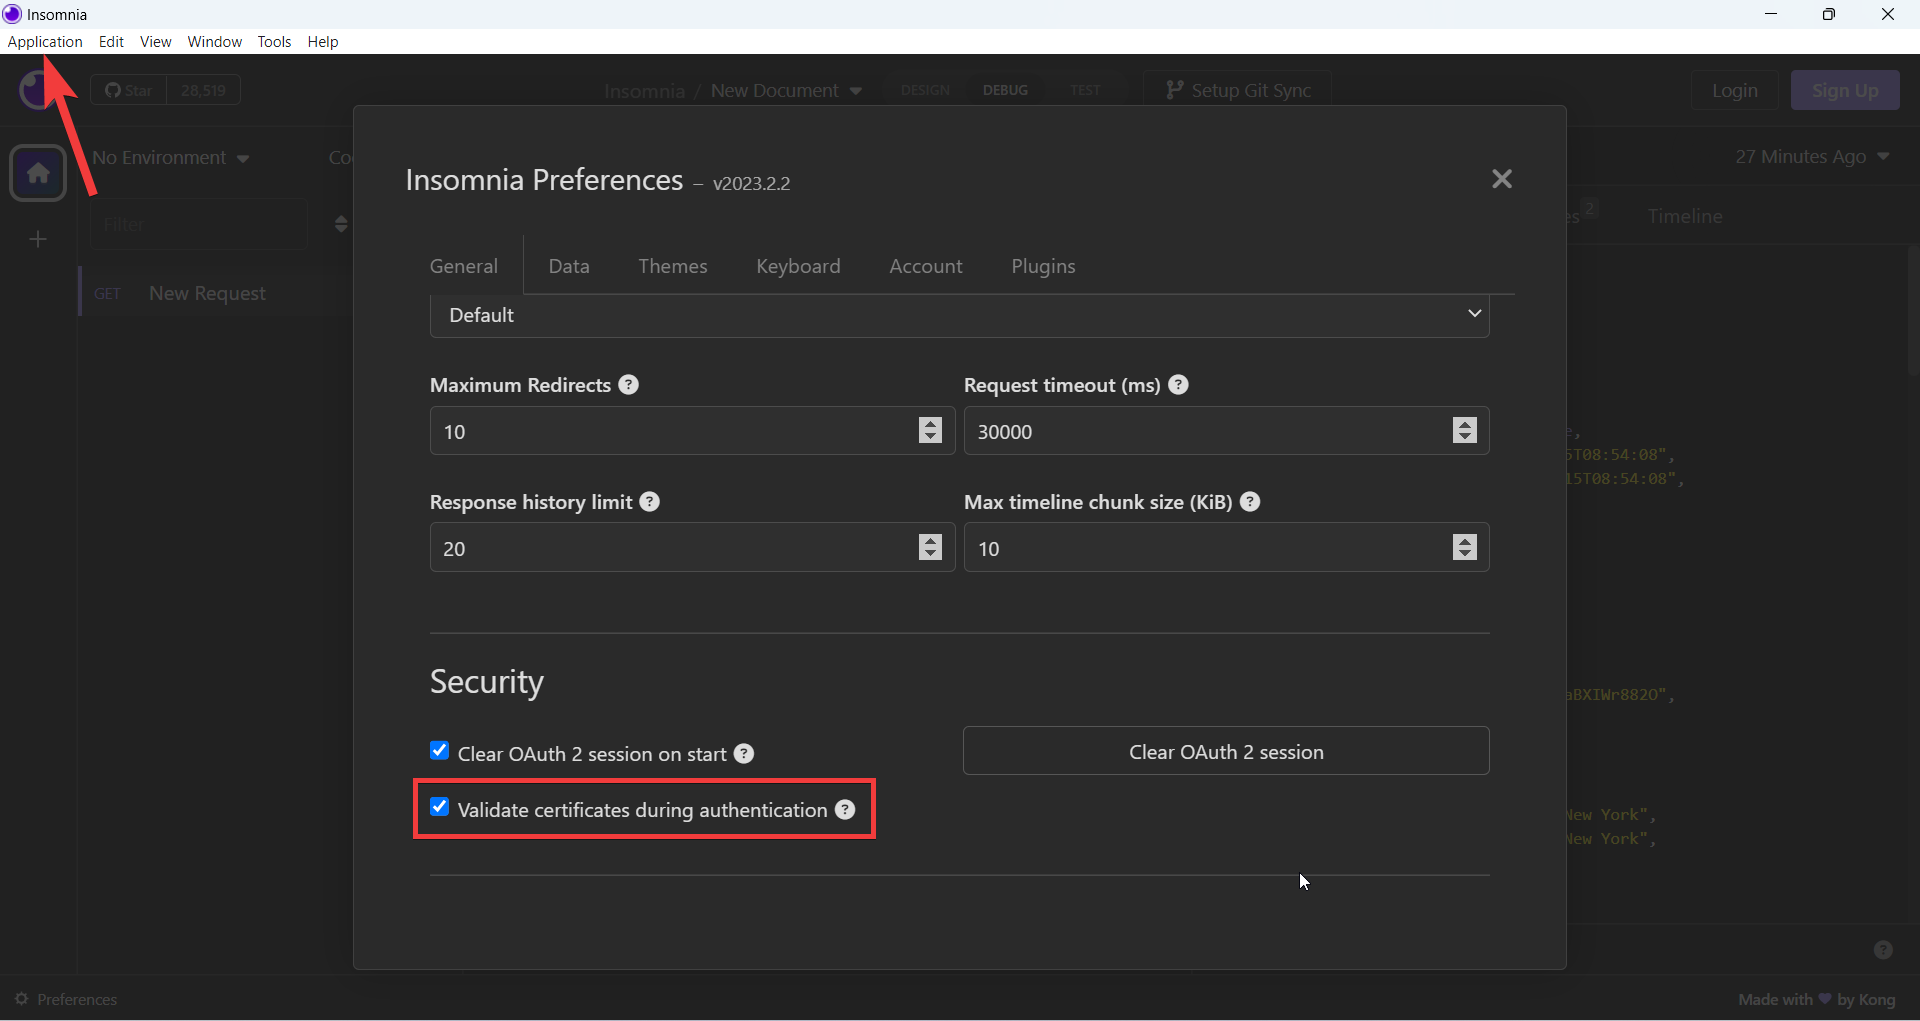
Go to Application → Preferences in Insomnia and uncheck the validate certificates during authentication.
2. 401 Unauthorized Error
401 Unauthorized response status codes are server-related errors. Make sure that the URL is typed correctly. Make sure to place the Consumer Key and Consumer Secret properly.
The reason can be your API keys, or signature needs to be corrected. Reach out to the service provider of the endpoint you are trying to call.
3. Consumer Key Missing
Sometimes, servers may not properly pass the Authorization header, leading to an error message stating, “Consumer key is missing”, especially when authenticating over SSL.
If you encounter this issue, an alternative solution is to provide the consumer key and secret as query string parameters instead.
For example, you can include them in the URL like this:
https://example.com/wp-json/wc/v2/orders?consumer_key=XXXX&consumer_secret=XXXX.
Summary
To sum it up, the WooCommerce REST API is a great tool for anyone who wants to improve their online business. It lets you connect your store to other applications and automate your workflow. This means you can save time and effort by streamlining your processes.
Before you start, ensure you meet the requirements and generate your API keys. This will give you access to the REST API and all its features. I hope this blog post has helped you understand the WooCommerce REST API and how it can benefit your online business.
Customer Review at 
“Beautifully optimized hosting for WordPress and Magento”
Arda Burak [Agency Owner]
Danish Naseer
Danish Naseer is a WordPress Community Manager at Cloudways. He is passionate about designing, developing, and engaging with people to help them. He also actively participates in the community to share his knowledge. Besides that, he loves to watch documentaries, traveling and spending time with family. You can contact him at [email protected]
