In today’s fast-paced digital world, we rely heavily on our internet connections for work, entertainment, and everything in between. However, encountering an error message like “ERR_CONNECTION_TIMED_OUT” can be a frustrating experience for both website owners and regular internet users.
This error message can occur due to network connectivity or server overload issues, whether trying to access your website or simply browsing the web.
In this article, I’ll dive deep into the “ERR_CONNECTION_TIMED_OUT” error and provide practical solutions to help you quickly diagnose and fix the problem, so you can get back to browsing the web or running your website without any interruptions.
What Is ERR_CONNECTION_TIMED_OUT Error?
ERR_CONNECTION_TIMED_OUT appears in web browsers when a website fails to load due to connectivity issues. When a user encounters this error, it means that their browser cannot establish a connection with the server that hosts the website they are trying to access.
If you don’t know, the request sent by your system to the server for website access must be verified, and if it takes longer than the countdown timer, which typically lasts for about 30 seconds, the “ERR_CONNECTION_TIMED_OUT” error occurs.
This error can be caused by various reasons, such as a slow or unstable internet connection, a misconfigured firewall or router, or an overloaded server. Sometimes, the error can be caused by user device issues, such as outdated software or malware infections. It is crucial to diagnose and address these issues to ensure smooth website performance.
In addition to the ERR_CONNECTION_TIMED_OUT error, there are other common errors that can affect WordPress sites, such as the 500 Internal Server Error. Troubleshooting this error is also important for maintaining a seamless user experience.
You can find detailed guidance on how to fix the 500 Internal Server Error in our blog post: How to Fix the 500 Internal Server Error in WordPress.
Why Does ERR_CONNECTION_TIMED_OUT Occur?
There are a few different reasons why this error may occur.
It can be caused by network connectivity issues, such as problems with your local network connection. Alternatively, it may indicate that the website is trying to do more than the server can handle, especially on shared hosting, where memory limits are restricted.
Different web browsers, operating systems, and servers may present the error differently, but they generally have the same meaning as a communication problem.
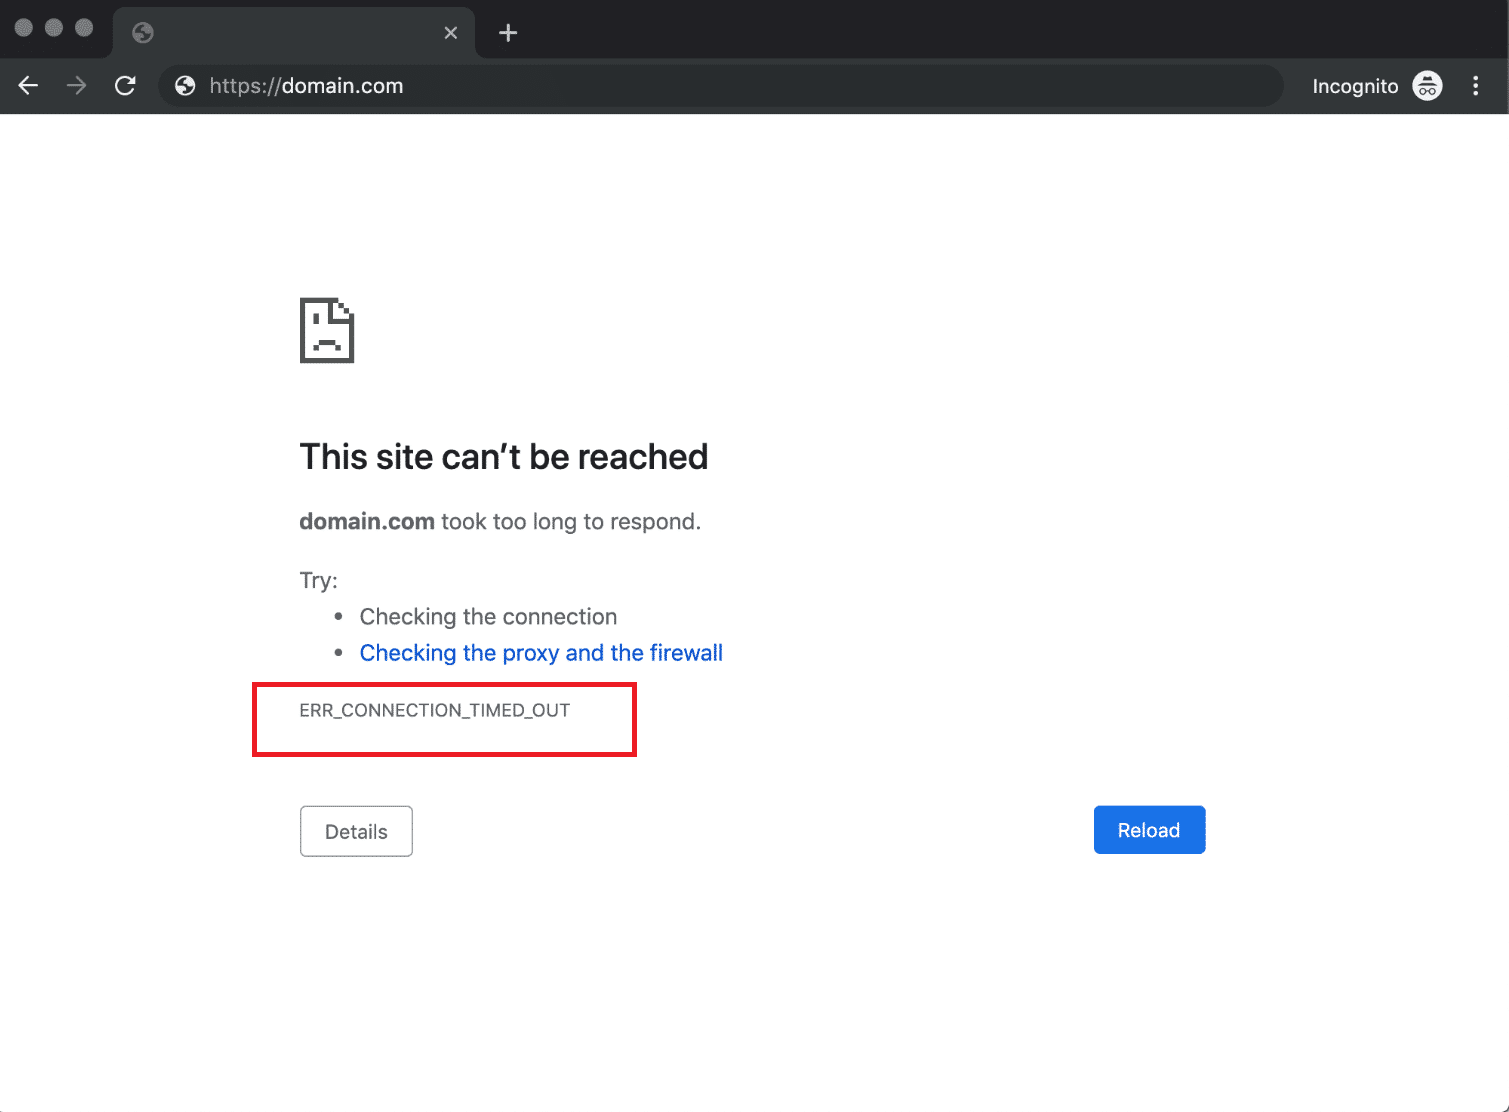
For example, the error would look like this on Chrome: “This site can’t be reached. Domain.com took too long to respond.”
On other popular browsers, errors can look like this:
- ERR_CONNECTION_TIMED_OUT error in Firefox
“The connection has timed out.” The server at domain.com is taking too long to respond.”
- ERR_CONNECTION_TIMED_OUT error in Edge
“Hmmm… can’t reach this page. Domain.com took too long to respond.”
- ERR_CONNECTION_TIMED_OUT error in Safari
“Safari Can’t Open the Page. Safari can’t open the domain.com page because the server where this page is located isn’t responding.”
Other related errors you may see include “ERR_NETWORK_CHANGED,” “ERR_CONNECTION_REFUSED,” and “DNS_PROBE_FINISHED_NXDOMAIN.” The “DNS_PROBE_FINISHED_NXDOMAIN” error typically means that the requested domain does not exist.
To summarize, the “ERR_CONNECTION_TIMED_OUT” error can occur due to different factors, including server, network connection, device, or network equipment issues.
Understanding and resolving these errors is essential for maintaining a smooth user experience on your WordPress site. For more information on troubleshooting common WordPress errors, you can refer to our A Detailed Guide on Troubleshooting Common WordPress Errors.
Elevate Your WordPress Site with Cloudways Hosting
Unlock the true power of your WordPress website. Experience top-notch performance and reliability with Cloudways, the leading managed WordPress hosting provider.
Fix ERR_CONNECTION_TIMED_OUT Error
Let’s explore some solutions to fix the “ERR_CONNECTION_TIMED_OUT” error. In this section, we’ll focus on methods to resolve the issue if you encounter this error message while trying to load a website.
1. Erase Browsing History
Browser data such as cache files, saved logins, and cookies can optimize your browsing experience but may also slow down your browser’s performance, leading to timeout errors.
To avoid this, it’s recommended to periodically clear your browsing data. The method to clear browsing data varies depending on your browser application.
For Google Chrome users, follow these steps:
- Click on the three-dot menu located at the top right corner.
- Select More tools and then Clear browsing data.
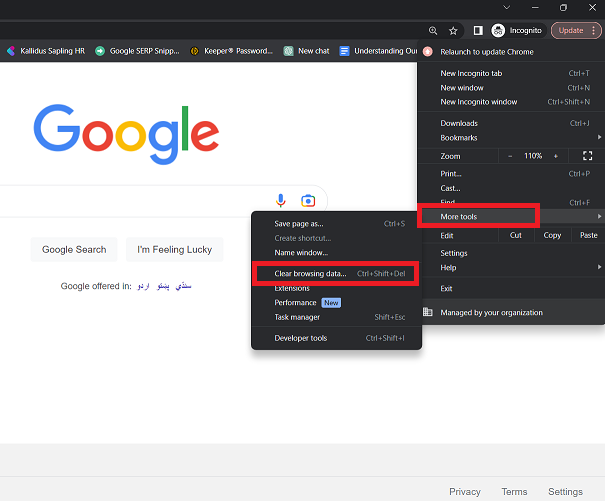
- Check all cache files from Browsing history to Hosted app data in the Advanced tab.
- Set the time range to All time.
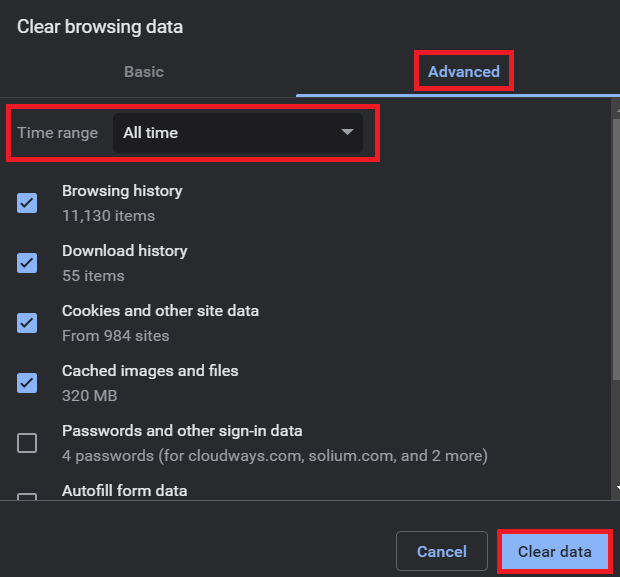
- Click Clear data to remove all browsing data from Chrome.
If you don’t wanna go through all these steps, you can simply hit this command (Ctrl + Shift + Del) to clear your browser history or directly visit this link on Chrome: chrome://settings/clearBrowserData
For other popular browsers:
- Clear cache in Mozilla Firefox: Click Hamburger icon → History → Clear Recent History → Select Everything → Click Clear Now.
- Clear cache in Internet Explorer: Click the Settings button → Safety → Erase browsing history → Check Temporary Internet files and Website files → Click the delete button.
- Clear cache in Microsoft Edge: Go to the 3 Dots icon → Settings → Choose what to clear under Privacy, search, and Services tab → Check Cached images and files → Click the Clear button.
2. Refresh DNS and Renew IP Address
If clearing your browser history doesn’t fix the error, try refreshing your DNS and renewing your IP address.
Flushing DNS refers to resetting the DNS caches saved on your computer. These caches contain information about the IP addresses of websites you visit, enabling your computer to quickly retrieve the IP address without translating the domain name each time you visit the site.
However, like browser data, DNS caches can become outdated and cause website access problems. Clearing outdated DNS caches can help you avoid timeout errors when accessing websites.
Windows
Windows 11 users can flush DNS by following these steps:
- Press the Windows logo and R keys to open the Run command.
- Type cmd in the dialog box and click OK to open the Command Prompt window.
- Type ipconfig /flushdns and press Enter to reset the DNS cache.
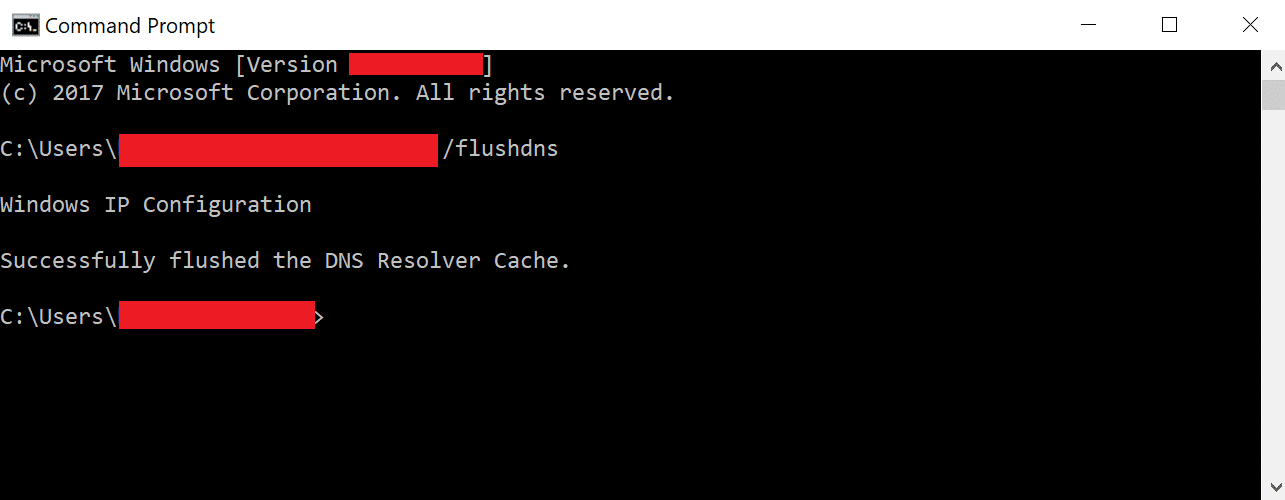
To troubleshoot the network and renew the IP address, add the following commands one by one, hitting Enter after each command:
- ipconfig /registerdns
- ipconfig /release
- ipconfig /renew
- netsh winsock reset
Restart your computer and open the browser to check if the commands were successful.
Mac
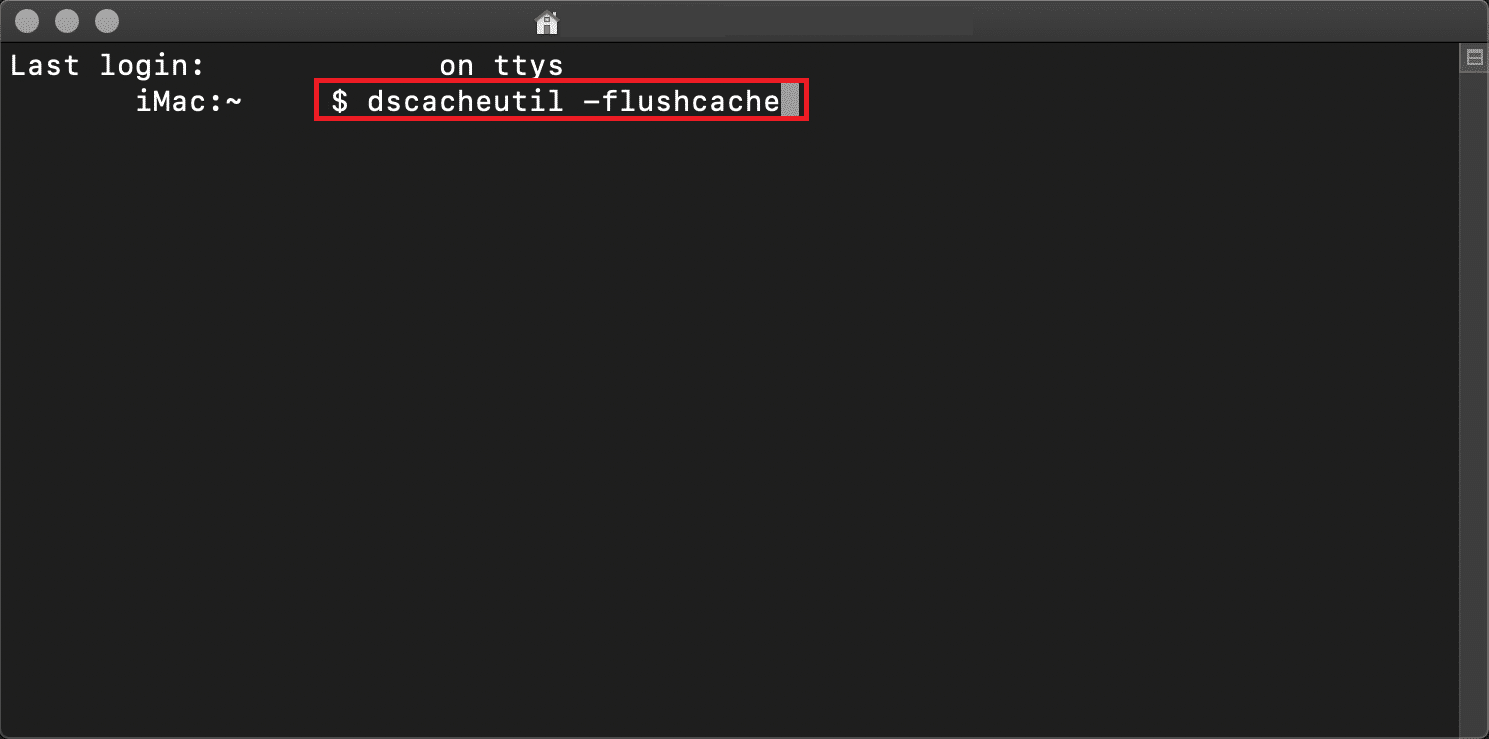
For macOS users, open the Terminal application and enter the dscacheutil -flushcache command to flush DNS.
3. Upgrade Network Adapter Drivers
Network adapter drivers allow your computer to connect to the local area network and access the internet. Outdated or improperly installed drivers can cause issues that result in the “ERR_CONNECTION_TIMED_OUT” error.
To update your network adapter driver software on Windows 11, follow these steps:
- Click the Start button in the screen’s bottom left-hand corner and type Device Manager in the search bar.
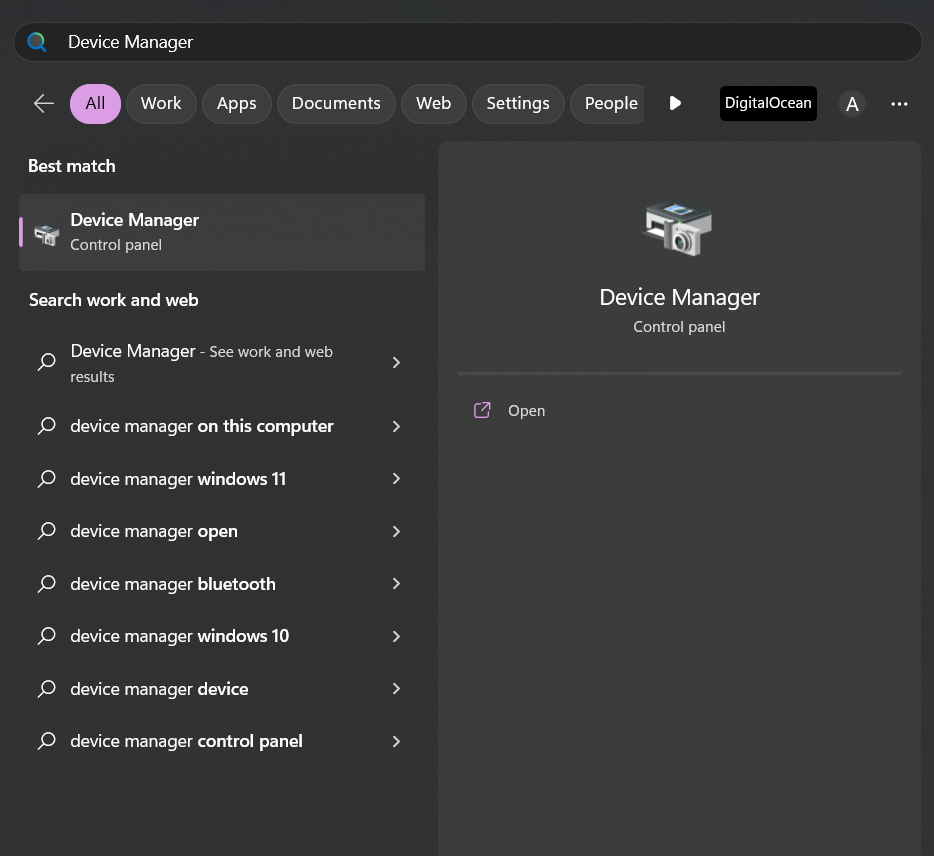
- Select Device Manager from the search results, and the Device Manager window will appear.
- Locate the Network adapters drop-down menu and choose your network adapter.
- Right-click on the adapter and select Update Driver Software from the drop-down menu.
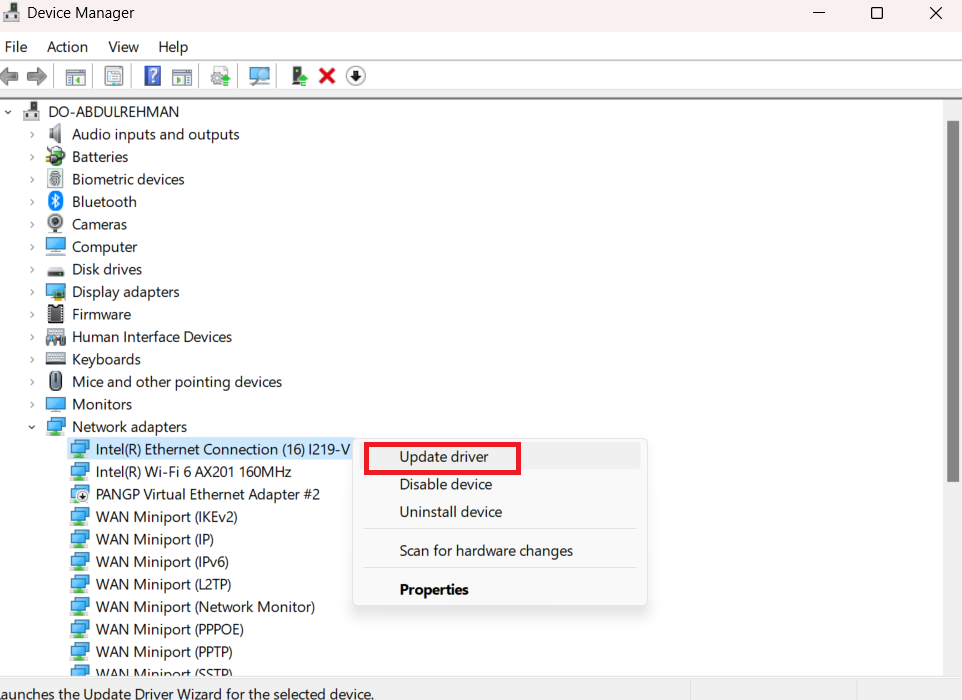
- When a dialog box appears, click Search Automatically for Updated Driver Software to search for the latest driver software.
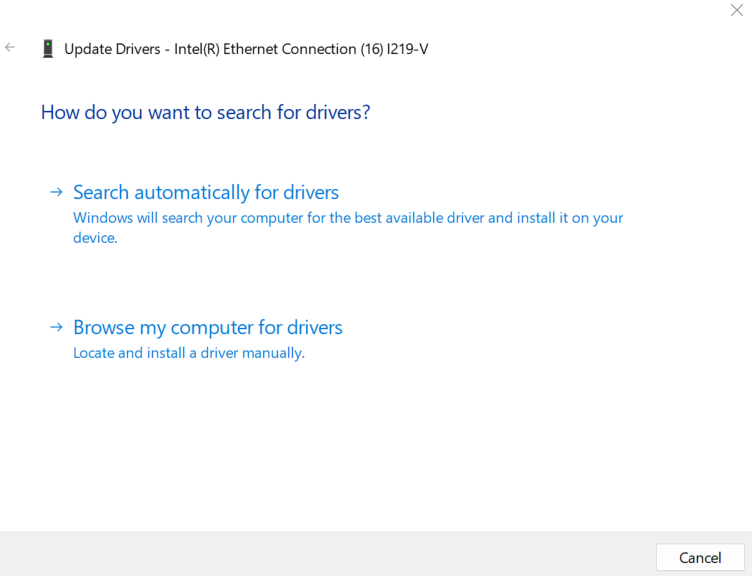
- Follow the instructions on the screen to complete the update process.
- Once finished, restart your computer to apply the changes.
If you’re using macOS, follow these steps to update your network adapter drivers:
- Click on the Apple logo in the screen’s top left corner.
- Select System Preferences from the drop-down menu.
- In the System Preferences window, click on Software Updates.
- Click on the Update now button to initiate the update process.
Regular software updates for macOS usually include updates for network adapter drivers. By ensuring that your macOS is up to date, you can potentially resolve issues that result in the “ERR_CONNECTION_TIMED_OUT” error.
4. Examine the Hosts File
Every computer uses a document called the hosts’ file to match the IP address of a website’s domain. Sometimes this file accidentally blocks a specific IP address or URL, causing the website to be inaccessible.
To check if the hosts’ file has blacklisted the website you want to visit, for example, Cloudways.com, follow these steps:
Windows
- Open Notepad by searching for it in the taskbar and right-clicking to select Run as administrator.
- Go to File and select Open.
- Type C:\Windows\System32\drivers\etc in the File name bar and select the hosts’ file.
- Scroll to the bottom of the file and see if there are any entries related to the Cloudways website, such as 127.0.0.1 cloudways.com or 0.0.0.0 www.cloudways.com.
- If you find any such entries, delete them and save the changes by pressing Ctrl + S.
Mac
- Open Terminal on your Mac.
- Type sudo nano /private/etc/hosts and press Enter.
- Use the arrow keys to scroll down and see if there are any entries related to the Cloudways website, such as 127.0.0.1 cloudways.com or 0.0.0.0 www.cloudways.com.
- If you find any such entries, delete them.
- Save your changes by pressing Ctrl + X, Y, and Enter.
5. Turn off Firewall/Antivirus Temporarily
To keep your computer secure, firewalls and antivirus software are essential. However, sometimes they can mistakenly identify secure websites as unsafe, causing the “ERR_CONNECTION_TIMED_OUT” error.
One solution to this problem is temporarily disabling your firewall or antivirus software to see if it resolves the issue.
Windows
Here’s how to disable Windows Defender antivirus and firewall protection on Windows 11:
- Locate the Windows Defender icon in the System Tray, which is located in the lower-right corner of the desktop. It looks like a blue shield with four sections. If you don’t see the icon, click the arrow button to expand the Tray and display all the icons.
- Right-click the icon and select View security dashboard
- Now, select the Virus & threat protection option.
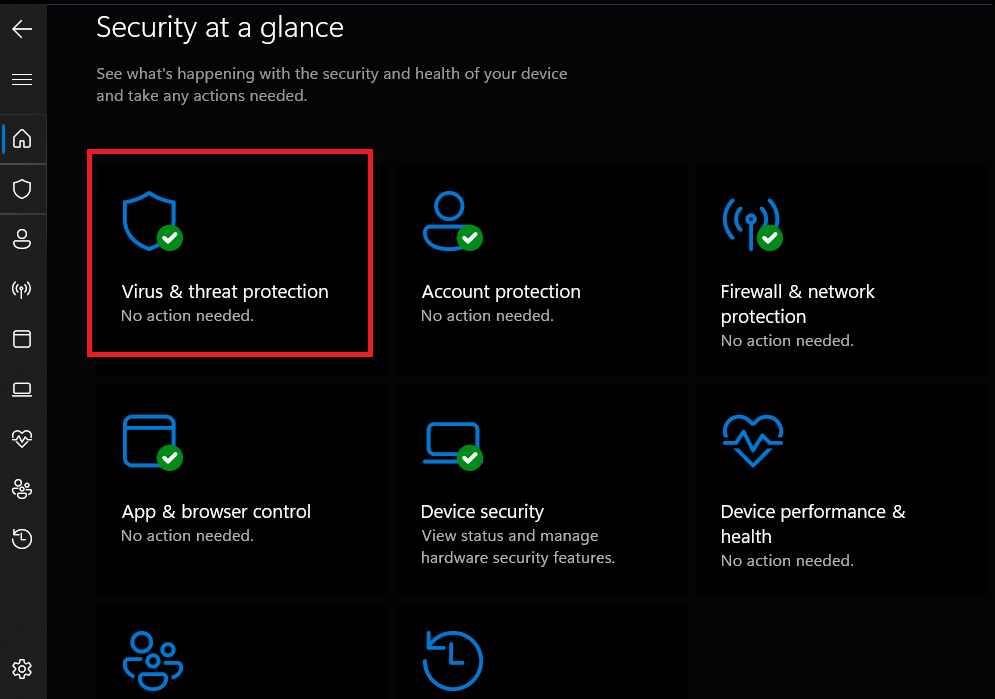
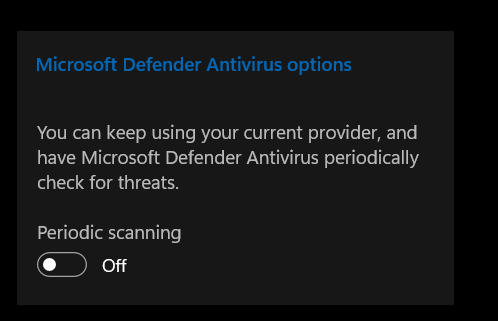
- Next, click on Microsoft Defender Antivirus options.
- Slide the knob to the left to turn off the antivirus protection.
- Select Firewall & network protection.
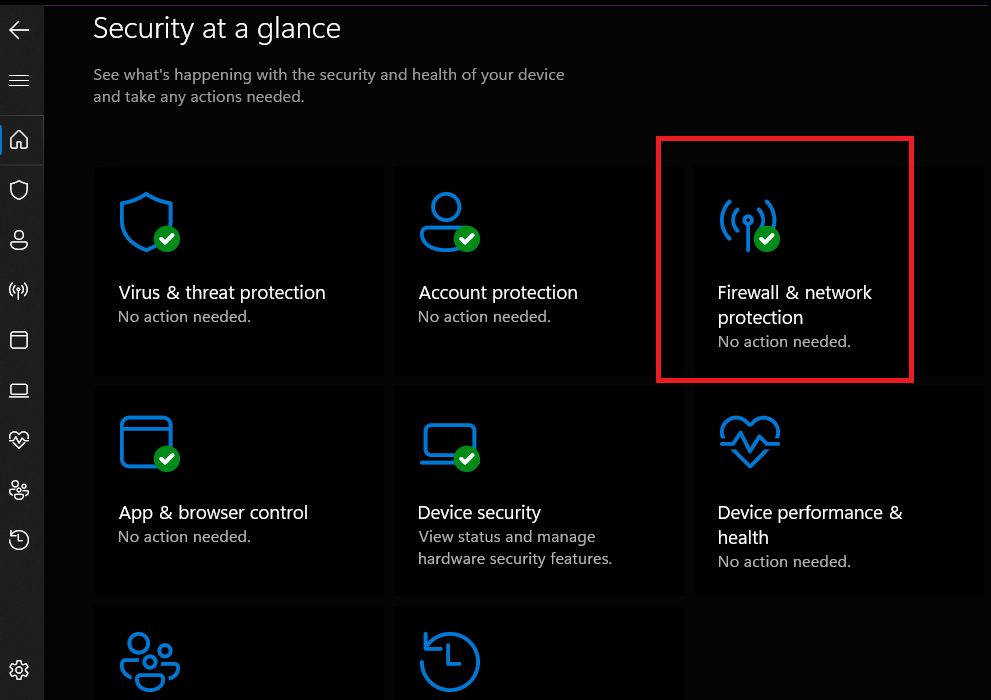
- Select Domain network.
- Slide the knob to the left to turn off the firewall protection.
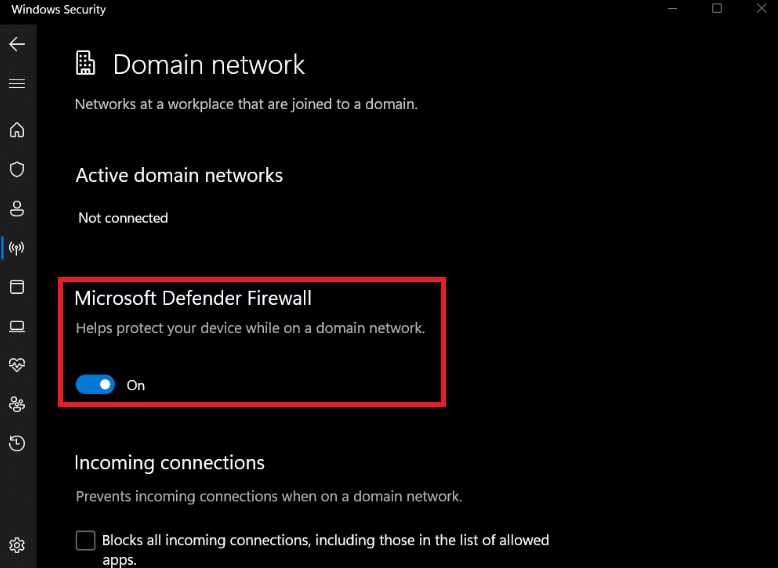
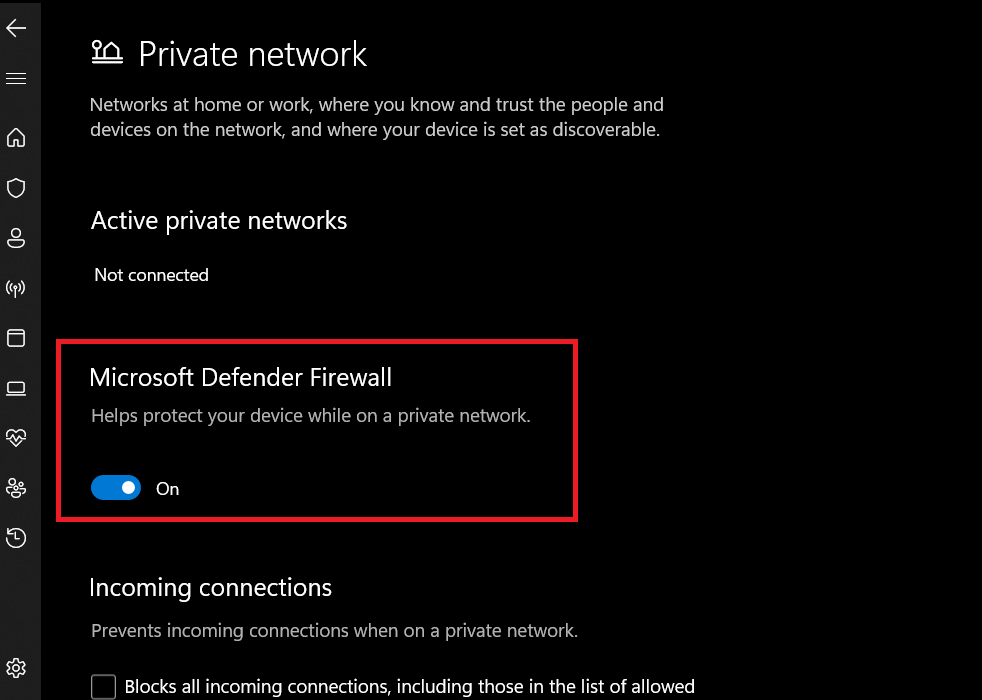
- Go back and select Private network.
- Slide the knob to the left to turn off the firewall protection.
Mac
If you are a macOS user, you can disable your firewall by following these steps:
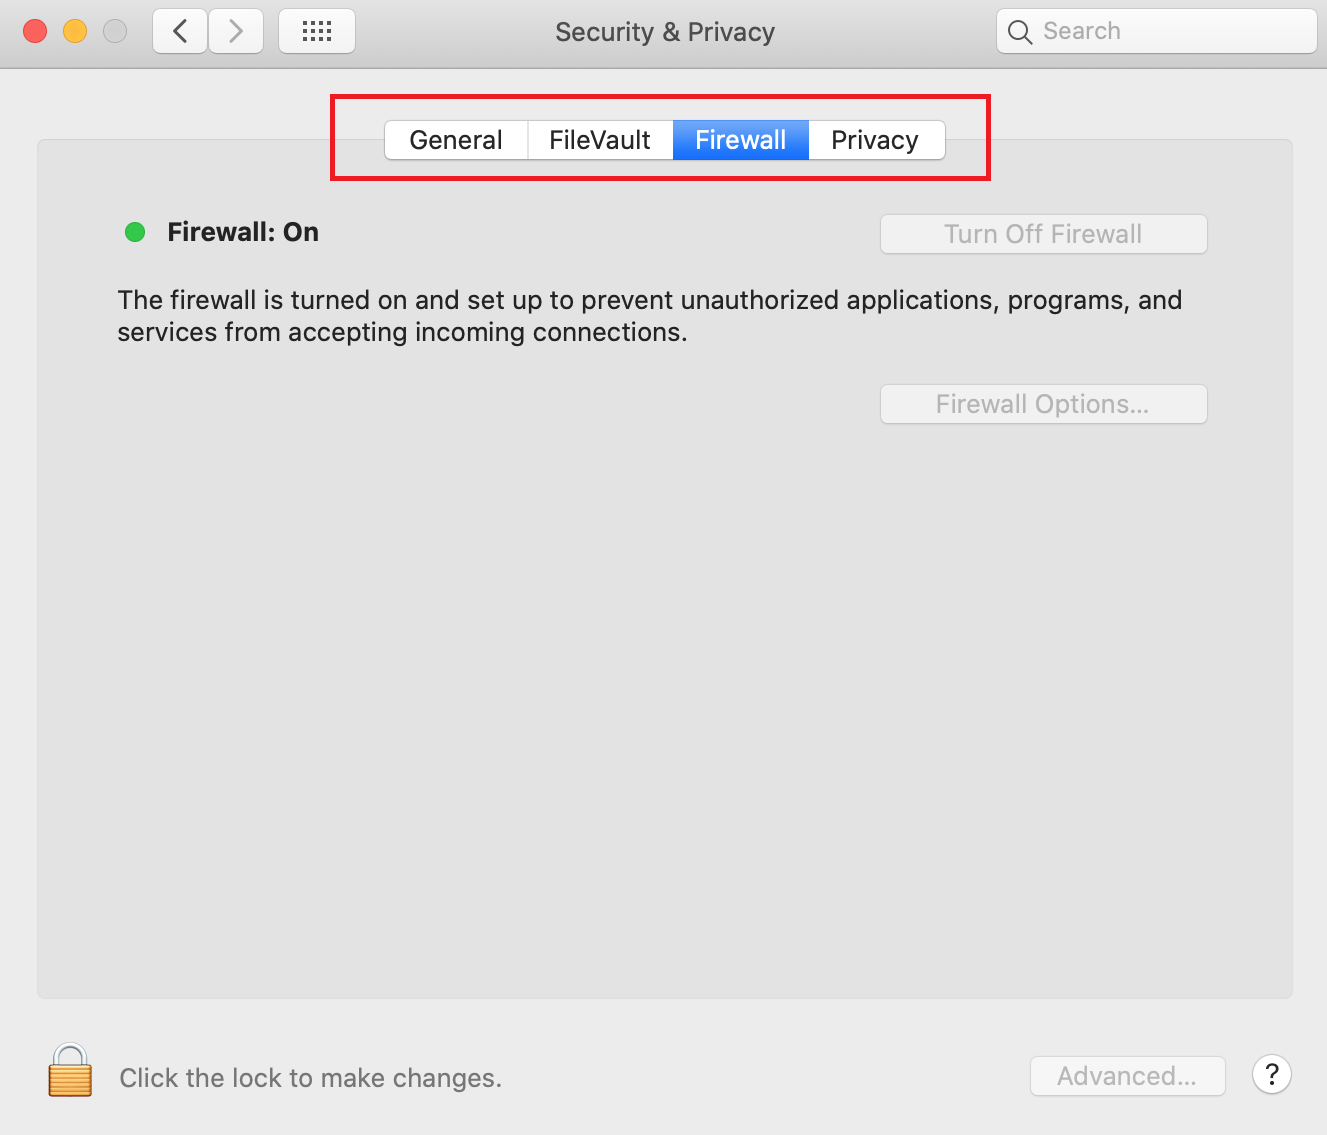
- Click on the Apple logo in the top left corner of your screen and select System Preferences.
- Click on Security & Privacy.
- Select the Firewall tab.
- Click on Turn Off Firewall.
After you’ve disabled your firewall or antivirus software, try reaccessing the website to see if the “ERR_CONNECTION_TIMED_OUT” error has been resolved. It’s important to remember to re-enable your firewall and antivirus software after troubleshooting to keep your computer secure.
6. Verify Internet Connectivity
When encountering the ERR_CONNECTION_TIMED_OUT error, it’s essential to check your network connection first, as it is often the root cause of the problem. Major web browsers such as Google Chrome, Firefox, and Edge all suggest checking your connection as a first step in troubleshooting this error.
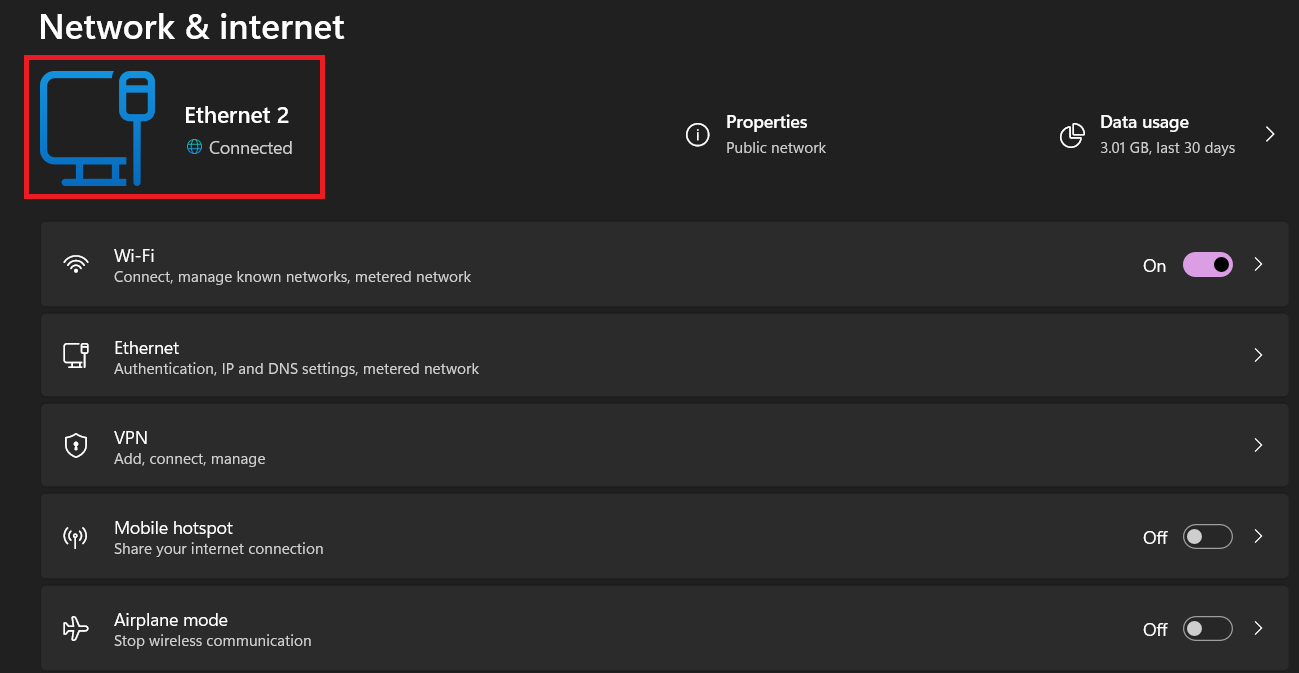
If you’re using Windows 11, you can easily check your network connection status by following these steps:
- Select the Start button.
- Type “settings” and select Settings from the search results.
- Click on Network & internet.
The status of your network connection will be displayed at the top of the page.
To check the status of your network connection on a Mac:
- Click on the Apple menu in the top left corner of your screen.
- Select System Preferences from the dropdown menu.
- Click on Network in the System Preferences window.
- On the right, you can view the status of your network connection, including Wi-Fi or Ethernet.
The status of your network connection is indicated by a status indicator next to the connection. A green indicator means the service is active and connected, while a yellow indicator means the service is active but not connected. A red indicator means that the service has not been set up.
7. Deactivate Proxy Server Settings/VPNs
One potential solution to the ERR_CONNECTION_TIMED_OUT error is to check the proxy server settings.
Proxy servers act as intermediaries between your computer and the website you are accessing, helping to secure your IP address, regulate website access, and cache site data for faster loading times. However, these servers may inadvertently block the website you are trying to reach, leading to the error message.
To troubleshoot this issue:
Windows
- Access the Control Panel by pressing the Windows logo key.
- Select Network and Internet, then Internet Options.

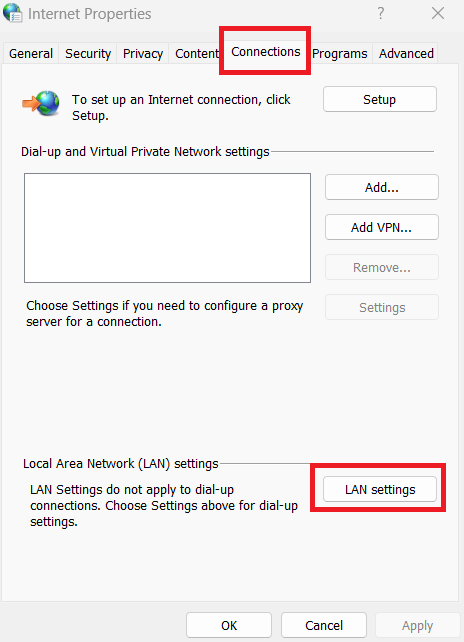
- Open the Connections tab and select LAN settings in the Internet Properties window.
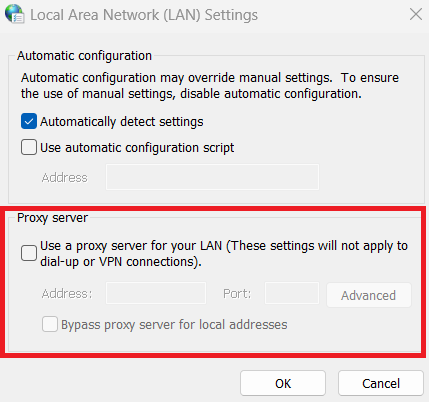
- Ensure that all proxy settings are unchecked.
Mac
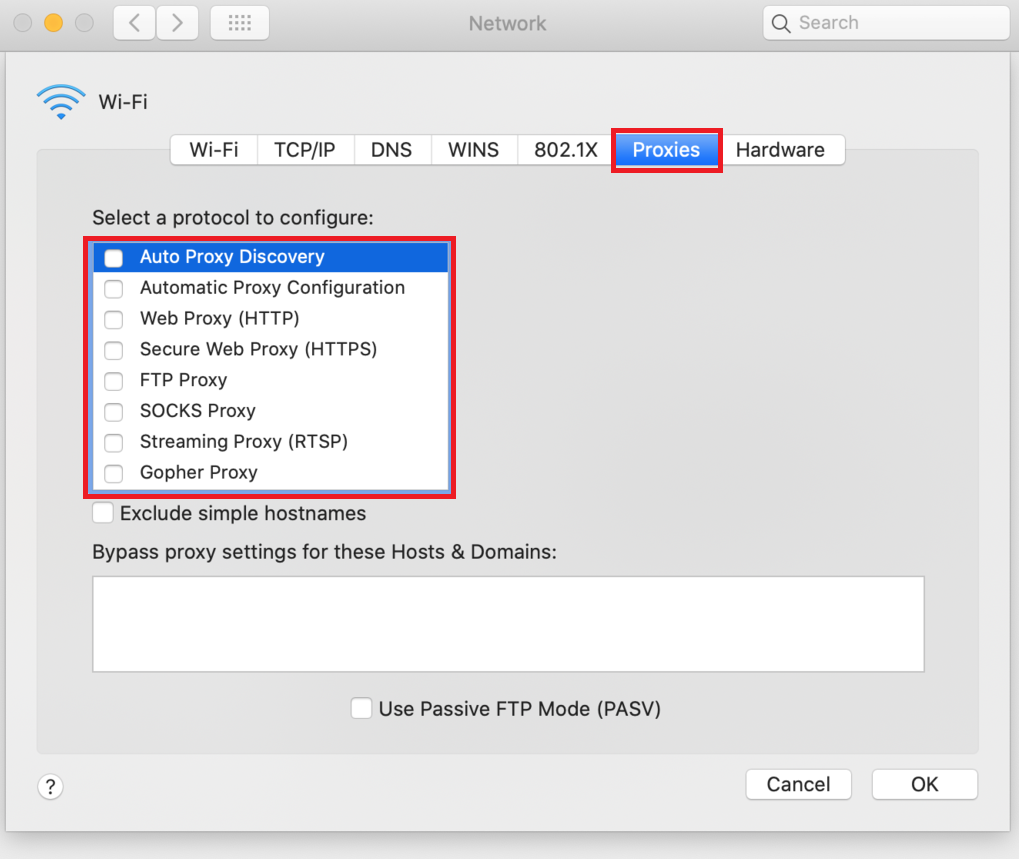
- In System Preferences, select Network and click the Advanced button.
- On the Proxies tab, uncheck each item and click OK.
- Refresh the page to see if the error has been resolved.
If you still need to use a proxy server, you can reconfigure the settings or consider switching to a different hosting provider.
Additionally, if you use a VPN service and encounter the ERR_CONNECTION_TIMED_OUT error, try switching VPN protocols or temporarily disabling the application, as your ISP or firewall may have blocked the current protocol.
8. Modify DNS Servers
DNS servers are responsible for converting domain names to IP addresses, making it easier for browsers to locate the websites you want to visit.
Your ISP typically provides in-house DNS servers for your internet connection settings, but they may not always provide the best performance. Switching to third-party DNS servers from Google or Cloudflare may be helpful in such cases. These servers are free and reliable for the average user.
If you suspect DNS servers are causing the ERR_CONNECTION_TIMED_OUT error, consider replacing them.
Windows
Here are the steps to change DNS settings in Windows:
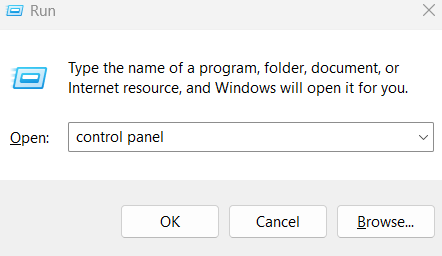
- Press the Windows logo key and R together to open the Run dialog box. Type “control panel” and press Enter.
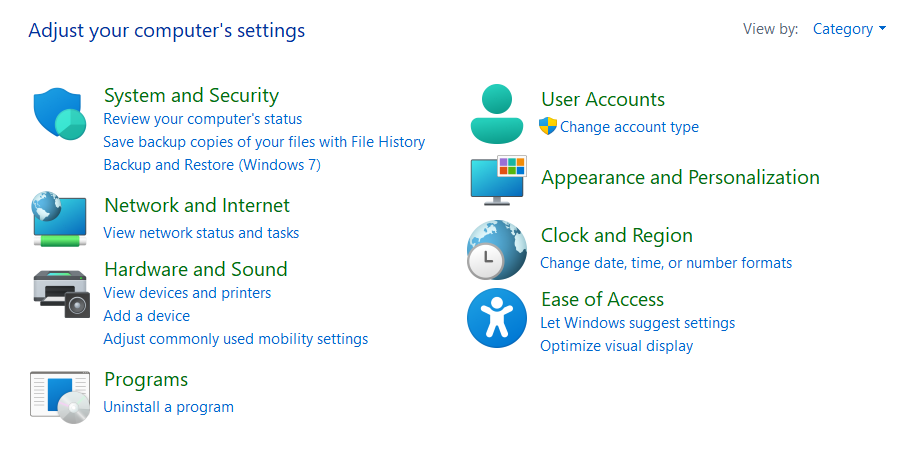
- Click Network and Internet, then Network and Sharing Center.
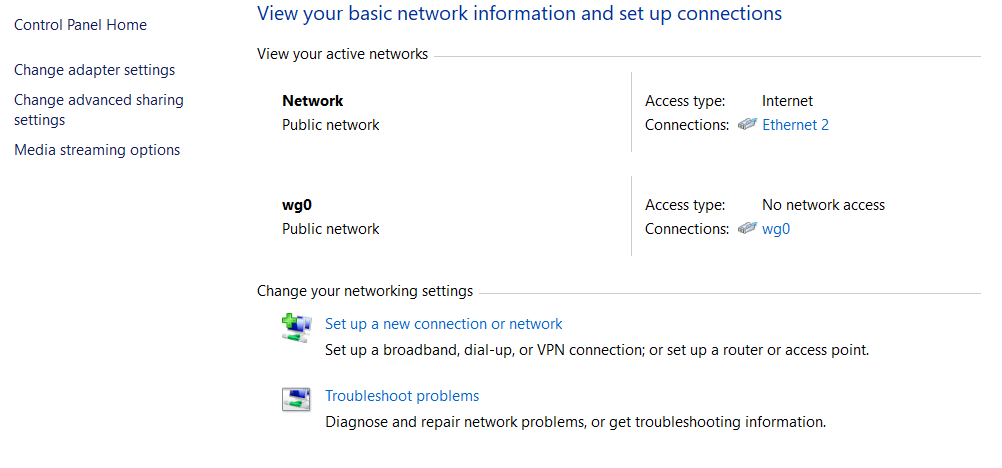
- On the left-hand side, click on Change Adapter Settings.
- Right-click on your current connection, which may be Local Area Connection or Wireless Network Connection, depending on your setup, and click Properties.
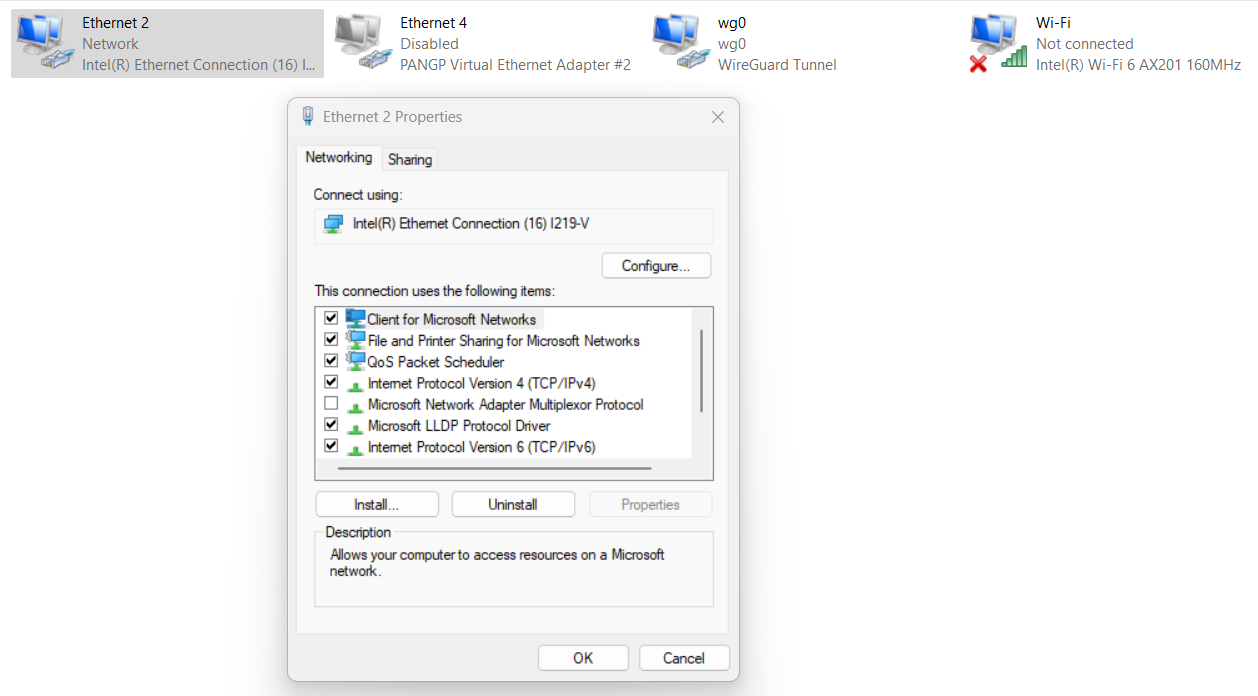
- Select Internet Protocol Version 4 (or Version 6, if desired) and click on Properties.
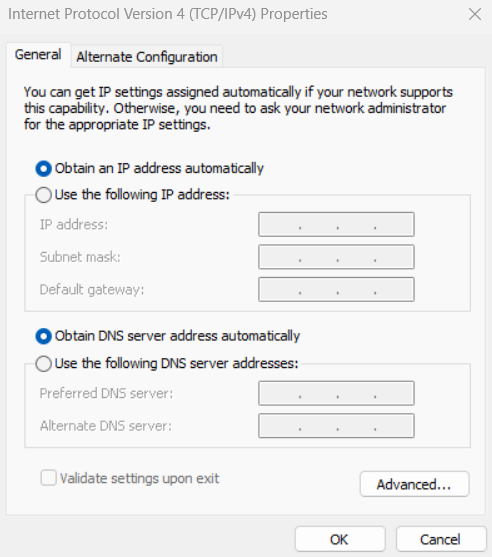
- Take note of any existing settings in case you need to revert back. Click Use the following DNS server addresses and enter “1.1.1.1 and 1.0.0.1” for IPv4 or “2606:4700:4700::1111 and 2606:4700:4700::1001” for IPv6.
- Click OK, then Close. Restart your browser.
Mac
- Open System Preferences on your Mac.
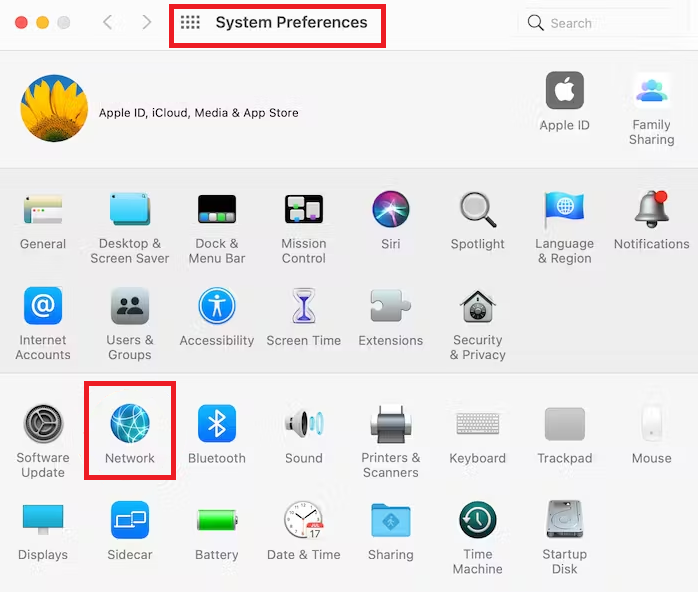
- Click on the Network icon, then click the Advanced button.
- Go to the DNS tab.
- Add the DNS server addresses provided by Cloudflare: 1.1.1.1 and 1.0.0.1 for IPv4 and 2606:4700:4700::1111 and 2606:4700:4700::1001 for IPv6. To use Google DNS, use the following:
- 8.8.8.8, 8.8.4.4, 2001:4860:4860::8888 or 2001:4860:4860::8844.
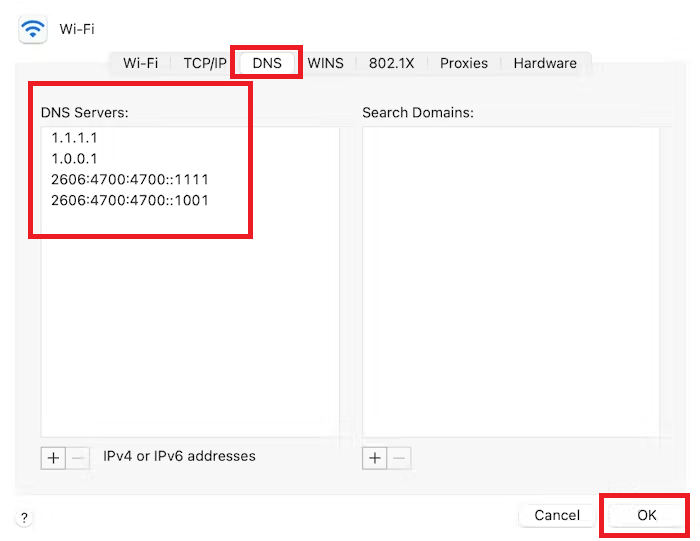
- Click OK to save the changes, then close the window.
- You can now restart your browser to apply the new DNS settings.
9. Verify Extensions for Interference
Extensions installed in your browser can sometimes cause the error mentioned earlier. Specifically, adblockers and media downloader extensions are common culprits as they directly affect the content of web pages.
To troubleshoot this, you can try disabling your extensions individually and observe if disabling a specific extension resolves the issue. By disabling extensions one at a time, you can identify which one might interfere with the webpage and cause the error.
10. Test Using Chrome’s Incognito
When dealing with browser-related problems, it is advisable to start by testing the webpage in an Incognito window. To launch the Incognito window, locate and click on the three vertical dots in your browser’s top-right corner, and then select “New Incognito window.”
If the webpage loads correctly in Incognito mode, it suggests that the issue is associated with your browser. In such cases, you can proceed to apply browser-level solutions to address the problem at hand.
Take Your WordPress Site to the Next Level
Supercharge your WordPress site with Cloudways hosting. Enjoy lightning-fast speed and exceptional support.
Fix ERR_CONNECTION_TIMED_OUT Error on WordPress
Previously, we have discussed different solutions for resolving the ERR_CONNECTION_TIMED_OUT error that an internet user can perform. Now, we will focus on the methods that can be implemented by WordPress website owners to fix the issue if it occurs on their own website.
1. Check Maximum Execution Time
The maximum execution time refers to the time limit for PHP scripts to run on a website, usually set by the hosting provider at 30 seconds. Exceeding this limit can lead to ERR_CONNECTION_TIMED_OUT errors.
Fortunately, it’s possible to increase the limit, and some hosting providers offer this option through the user’s control panel or upon request.
For Cloudways users, the Execution Limit can be increased under Server Management → Settings & Packages.
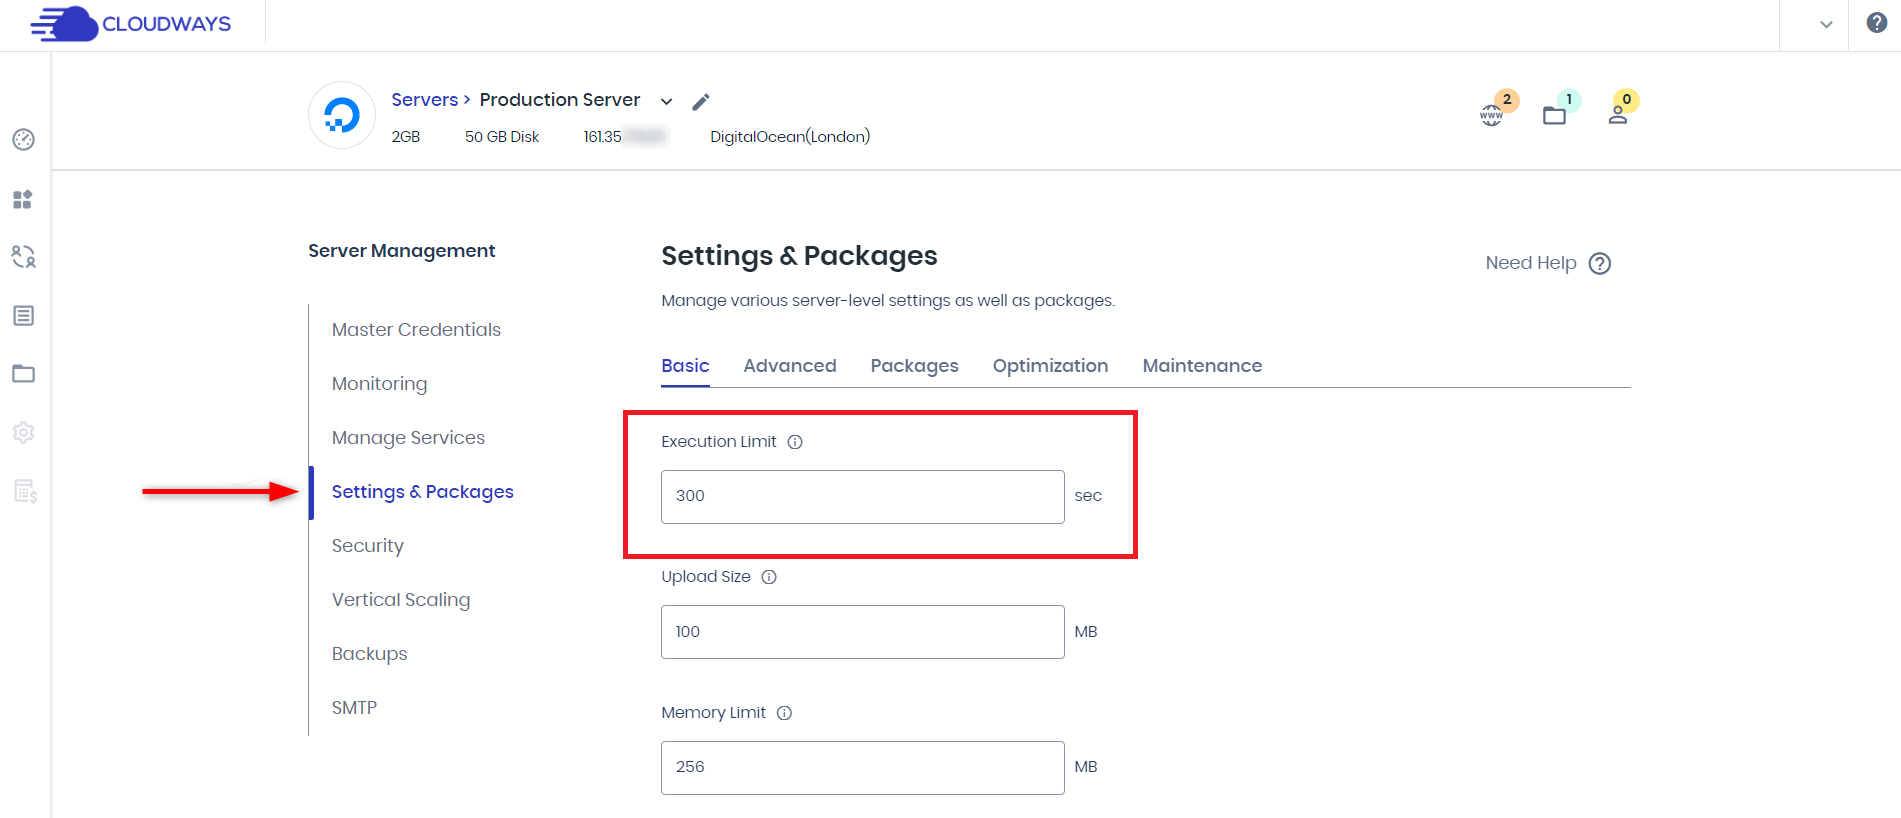
Modifying the timeout value can also be done by manually editing the website’s .htaccess file. One can access the htaccess file and add the following code: “php_admin_value[max_execution_time] = 120”.
While adjusting the maximum execution time can help to resolve some issues, it’s also important to address other common errors that may arise, such as the WordPress 404 “Not Found” Error. You can learn how to fix this error by reading our blog post on How to Fix WordPress 404 “Not Found” Error.
2. Boost PHP Memory Limit
In certain cases, PHP scripts may consume more memory than the allocated limit, causing the website to respond slowly or result in errors. To address this issue, you can increase the memory limit, provided it does not exceed the maximum available memory assigned by your hosting provider.
To increase the memory limit, you can follow these steps:
- Access the File Manager or use an FTP client to locate and open the .htaccess file for your website.
- Insert the following line into the .htaccess file, specifying the desired memory limit based on the available memory in your hosting plan: php_value memory_limit 128M.
- Replace “128M” with the appropriate value based on your requirements.
Save the changes to the .htaccess file and upload it back to the server, overwriting the existing file if necessary.
Remember that if your website requires even higher memory limits than your current plan allows, you may need to consider upgrading to a higher-tier hosting plan. Cloudways offer easy scalability options where you can adjust your resources by sliding a slider.
3. Check Server Configuration
If you are experiencing connection timeout issues, it is advisable to check the server configuration files, such as Apache’s httpd.conf or Nginx’s nginx.conf. These configuration files can contain misconfigurations or conflicts that may be causing the connection timeouts.
Reviewing these files allows you to identify potential issues and make the necessary adjustments to resolve the problem. Ensuring that your server configuration is correct can help prevent not only ERR_CONNECTION_TIMED_OUT errors but also other issues that may affect your WordPress site’s performance and stability, such as the “Error Establishing a Database Connection.”
To learn how to fix this specific error, you can read our blog post on How to Fix the “Error Establishing a Database Connection” in WordPress.
4. Deactivate Any Recent Scripts
If you encounter the “ERR_CONNECTION_TIMED_OUT” error after making modifications to the website’s script, it is possible that the new code is causing the problem. It could be due to misconfigurations or resource-intensive features impacting the site’s performance.
In such cases, it is recommended to take the following steps:
- Create a backup: Before proceeding with any changes, back up the website and its code. This ensures you have a copy of the previous working state if further troubleshooting is required. Cloudways Platform provides a reliable, automated backup system for your websites, ensuring offsite storage and the ability to restore your applications in case of unexpected incidents, offering peace of mind.
- Remove the new code: Temporarily remove or disable the recently added code or features that you suspect might be causing the connection timeout. This can help determine if the issue is related to your modifications.
- Test site accessibility: After removing the new code, try accessing the site to see if the connection timeout issue is resolved. If the site becomes accessible without the modifications, it indicates that the new code was likely the cause of the problem.
- Review and fix the code: If removing the new code resolves the issue, carefully review the modified code for any errors, misconfigurations, or inefficient resource usage. Make necessary corrections and optimizations to ensure the smooth functioning of the website.
- Reintroduce code changes gradually: If you need new features or modifications, reintroduce them gradually while monitoring the site’s performance. This way, you can identify any parts of the code that might be causing the connection timeout and address them individually.
5. Disable Plugins Temporarily
To identify problematic WordPress plugins causing the ERR_CONNECTION_TIMED_OUT error, disable them individually.
To do that:
- Use an FTP client like FileZilla to access your website files.
- Locate the wp-content directory and open it.
- Find the “plugins” folder and rename it to “plugins-deactivated”.
- Attempt to access the WordPress admin panel.
- If accessible, it indicates a plugin issue.
- Rename the plugin’s folder back to its original name.
- Inside the plugin’s directory, rename individual plugin folders to isolate the problematic one.
- Test access to the admin panel after each renaming to identify the culprit.
- If the error reoccurs, restore the original name and repeat the renaming process for other plugin folders until the website becomes accessible.
6. Activate the Default Theme
If you’re experiencing a timeout issue while trying to access your WordPress admin panel and need to activate the default theme to troubleshoot the problem, you can follow these steps:
- Connect to your website’s server using an FTP client or access the file manager in your hosting control panel.
- Navigate to the root directory of your WordPress installation. This is usually the folder where you can find files like wp-config.php and wp-admin.
- Look for the wp-content folder and access it.
- Locate the “themes” directory inside the wp-content folder and open it.
- Find the folder corresponding to your currently active theme and rename it. You can add something like “-backup” at the end of the folder name. For example, if your active theme is called “mytheme”, rename it “mytheme-backup”.
- Once you’ve renamed the active theme folder, WordPress will no longer be able to find it and will automatically revert to the default theme.
- Now, try reaccessing your website. It should load with the default theme activated.
- After you’ve resolved the timeout issue, you can revert to your original theme by renaming the default theme folder back to its original name and deleting the renamed backup folder.
By temporarily renaming the active theme folder, WordPress will fall back to the default theme since it cannot find the previously active theme. This lets you troubleshoot the timeout issue without accessing the WordPress admin panel.
Experience Hassle-free WordPress Hosting
Simplify your WordPress hosting experience with Cloudways. Benefit from easy setup, optimized performance, and scalable infrastructure.
Tips to Avoid ERR_CONNECTION_TIMED_OUT Error
The ERR_CONNECTION_TIMED_OUT error commonly occurs when a website temporarily experiences difficulty, which resolves itself within a few minutes. However, user-related factors can sometimes play a role. Here are some steps to help you avoid this error in the future:
- Keep your browser and security software updated: Outdated software can lead to compatibility issues, resulting in the ERR_CONNECTION_TIMED_OUT error. Most programs update automatically, so ensure you have the latest versions installed.
- Clean your DNS cache and renew your IP address: An incorrect DNS cache can contribute to the ERR_CONNECTION_TIMED_OUT error. To prevent this, regularly clear your DNS cache. Additionally, consider renewing your IP address as part of the troubleshooting process.
- Regularly delete browser data: It’s important to delete browser data to address potential causes of connection errors and for a smoother browsing experience. Regularly clearing browser data also helps maintain data security and privacy.
Summary
The “ERR_CONNECTION_TIMED_OUT” error can disrupt your online activities and leave you searching for solutions. However, by staying proactive in maintaining network connectivity, optimizing browser settings, and implementing preventive measures, you can minimize the occurrence of this error in the future.
If none of these steps worked mentioned in the article, you could try accessing the website from a different device or network to see if the issue is specific to their current setup. Sometimes, contacting the website’s administrator or internet service provider may be necessary to resolve the issue.
Q1. How do I fix this site took too long to respond?
To resolve the issue of a site taking too long to respond, you can follow these steps:
- Ensure you have a stable internet connection by checking your network connection settings.
- Attempt to access the web page from a different device to determine if the issue is device-specific.
- Perform an internet speed test to evaluate your network’s speed and stability.
- Verify the availability of sufficient server resources for your website, as inadequate resources can cause delays.
- Clear the DNS cache on your device to refresh the stored domain information.
- Delete browser data and temporary internet files, which can sometimes interfere with website loading.
- Consider reinstalling your browser or updating its drivers to eliminate any potential software conflicts.
By following these troubleshooting steps, you can address the problem of a site taking too long to respond and improve your browsing experience.
Q2. How do I stop timeout error?
To resolve the timeout error, you can try the following solutions:
- Refresh the web page to see if it was a temporary issue.
- Restart your modem or router to ensure a stable internet connection.
- Temporarily disable your computer’s firewall and antivirus protection, as they may be blocking the connection.
- Turn off any VPN or proxy settings that could be interfering with the connection.
- Clear the cache on your browser to remove any stored data that may be causing conflicts.
- Consider switching to different DNS servers to improve the speed and reliability of your internet connection.
Q3. How do I fix connection timeout on Android?
To resolve a connection timeout issue on your Android device, you can try the following steps:
- Restart your device to refresh the network connections and settings.
- Open the Settings app on your Android device and locate the “Network & internet” or “Connections” section. The exact wording may vary depending on your device.
- Toggle off Wi-Fi and turn on mobile data to see if the issue is resolved. Check if you can establish a connection without experiencing a timeout error.
- If the problem persists, toggle off mobile data and turn on Wi-Fi instead. Test the connection again to see if the timeout error is resolved.
Customer Review at 
“Beautifully optimized hosting for WordPress and Magento”
Arda Burak [Agency Owner]
Abdul Rehman
Abdul is a tech-savvy, coffee-fueled, and creatively driven marketer who loves keeping up with the latest software updates and tech gadgets. He’s also a skilled technical writer who can explain complex concepts simply for a broad audience. Abdul enjoys sharing his knowledge of the Cloud industry through user manuals, documentation, and blog posts.
