
By default, Magento is quite extensible with a range of powerful features. But its real power stems from Magento extensions that add custom functionality to stores on the platform.
Such extensions help ecommerce businesses build a cost-effective and user-friendly Magento store. You can install, activate, and begin using Magento extensions in a matter of minutes to achieve the goal.
In this piece, you’ll learn how to install Magento extensions based on your business needs.
Need of Magento Extension to Improve Your Ecommerce Store
Installing Magento extensions can have the following benefits:
- It adds more functionality to your Magento store
- It enhances user experience for improved store traffic and more engaged customers
- It helps store owners manage stocks, customers, orders and other store management tasks
- It improves store visibility and sales by integrating SEO, marketing, automation, and sales tools
- Installing a Magento 2 extension is less expensive than getting a custom solution developed
Prerequisite to Install Magento Extension
To install a Magento extension, it is recommended to switch to the development environment – don’t install Magento extensions directly in the production environment. Fulfill the following prerequisites before installing a Magento extension on your ecommerce store:
- Choose a reliable extension partner: Always install Magento extension from a reliable source to avoid conflicts and issues.
- Back up your Magento store: Make sure to take the latest backup of your Magento production store.
Run the following command:
php bin/magento setup:backup --code --media –db
Or you can also take a manual backup by copying your Magento directory.
- Check the PHP version: Some extensions require a higher or lower PHP version.
Check your current PHP version by running the command:
php -v
- Enable Maintenance Mode: Enable maintenance mode before installing the extension to avoid any user issues.
To enable maintenance mode run below command
php bin/magento maintenance:enable.
How to Download Magento 2 Extension
Before learning how to install Magento extensions, let’s see where you can download them.
Magento Marketplace
Magento Marketplace by Adobe Commerce offers multiple extensions from different providers to help grow your business.
GitHub
Magento 2 extensions are also available to download from GitHub. You can also install Magento 2 extensions from GitHub via the Composer.
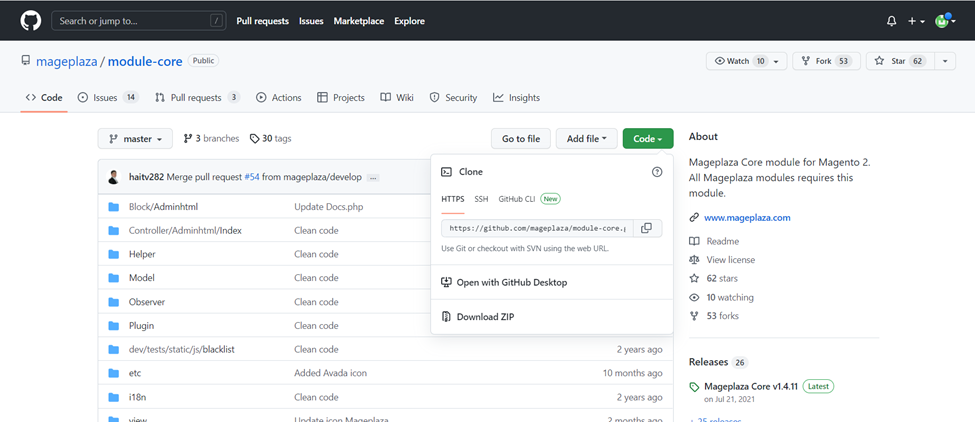
A Third-Party Extension Provider
The most common way to download a Magento 2 extension is via the software toolkit Composer and Packagist, which is the main Composer resource repository. Some third-party service providers also provide guidelines to install any extension that you purchase, or provide links to download the source code.
Methods To Install Magento 2 Extension
Though installing a Magento 2 Extension is a technical process, this article will show you the simplest ways to install them. However, for the dependencies, you will need to hire a developer to avoid conflicts.
Install Extension Through Composer
This requires complete shell SSH access to your server. If you don’t have this, please ask the service provider for it, or you can run it through the terminal on your local machine.
In this guide, we are going to install the Mageplaza Ajax Layered Navigation extension through Composer. Let’s review the steps:
Step 1: Connect to SSH
After getting the SSH credentials, login to the terminal or command line through SSH. You can also use Putty to connect to SSH.
Step: 2 Run the composer command
Check the Composer version. Some extensions have dependencies with Composer versions. Run this command to check:
composer -v
or
composer –version.

If your Magento version is below 2.4.2, the Composer version should be v1.
For Magento 2.4.2 and above, Composer v1 and v2 are allowed.
In this guide, we are working with Magento 2.4.4. Install the required Composer version following the guide on getcomposer.org.
Start the Composer installation. Replace the information for the particular extension with your extension provider. You can get it through GitHub or a third-party installation guide.
composer require vendor name/module-name
composer require cloudways/blog_review
Some extension versions are compatible with Magento 2.4 or Magento 2.3, so make sure to specify the extension’s version compatibility with your Magento store version to avoid conflicts.
Example:
composer require mageplaza/module-google-recaptcha 4.0.0
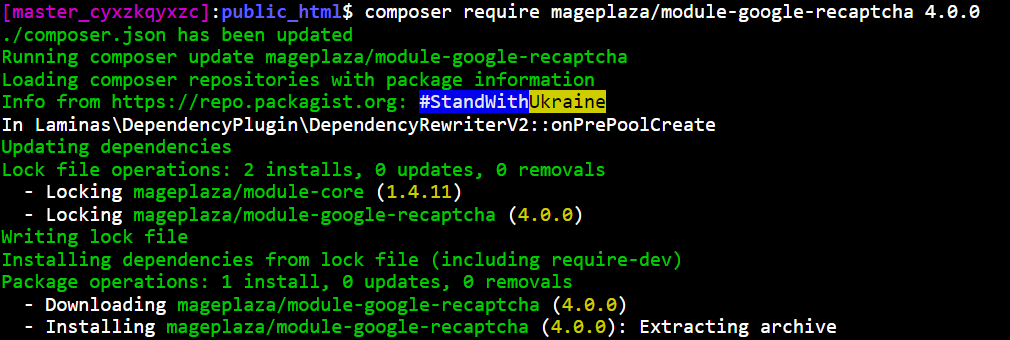
If your extension requires a Marketplace account, log in with the credentials as shown below. If it doesn’t, run the Composer Update command and go to Step 3 directly.
Sign in to the Marketplace or create an account if you don’t have one. Go to the My Profile -> Marketplace tab and click Access keys:
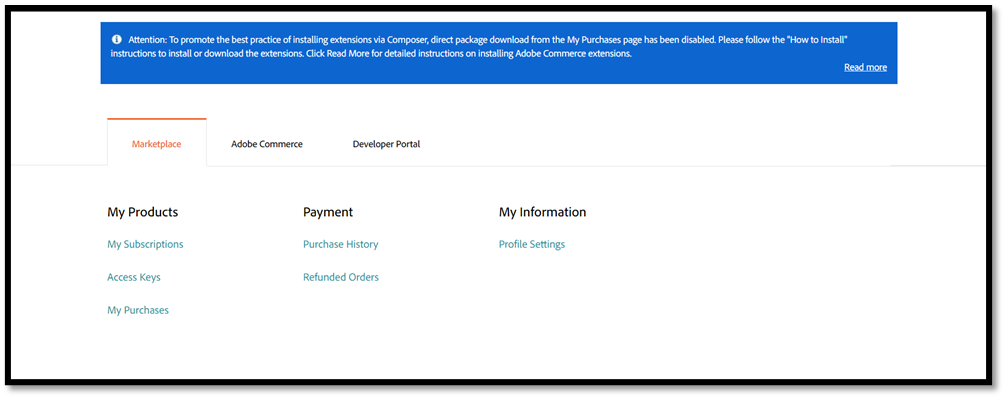

If you don’t have any keys, generate them. Make sure the status of the keys is enabled.
Public key is the username.
Private key is the password.
Copy the public key and paste it to the username. You will be asked to save the credentials for later use. Please type “Y” if you want to save the settings.
Let the extension install completely. Run “composer update” after installing the Magento extension.
Step: 3 Run all commands to update the changes
php bin/magento setup:upgrade

php bin/magento setup:di:compile

php bin/magento setup:static-content:deploy -f

php bin/magento cache:flush

Check to see if your admin and front store are working properly.
Upload via ZIP/Archive
This is the most common method of installation. It requires the files to be uploaded to the server through an SFTP connection or FileZilla. Or directly open cPanel -> File Manager to upload the files.
Make sure you have downloaded the extension files that you are going to install. In this guide we will review the Magefan Blog extension.
Perform the following steps:
Step 1: Connect to FileZilla
Do this through SFTP or FTP connection, or cPanel->Fil if you have direct access. For FTP or SFTP connection on FileZilla, create a new connection with the following details:
Protocol: Select Protocol FTP or SFTP
Host: Your host
Logon Type: Normal, select the key file or password for SFTP connections if you have provided them.
Username: your username
Password: your password
If you don’t have these credentials, ask your service provider to provide these details.
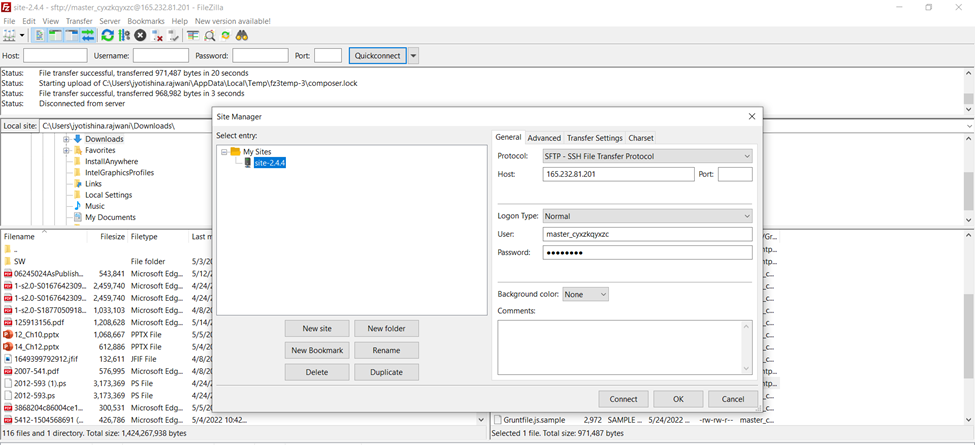
Step: 2 After connecting, go to your application Magento root directory where you will install an extension: var/www/html/magento.
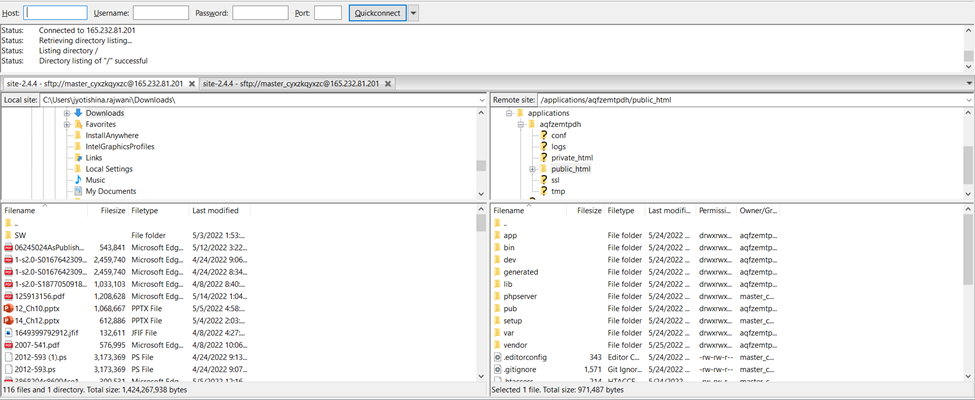
Step:3 Unzip the folder to your local directory.
From the left menu, locate the folder. In our example the extracted folder is in the “Downloads/magefanblog2”.
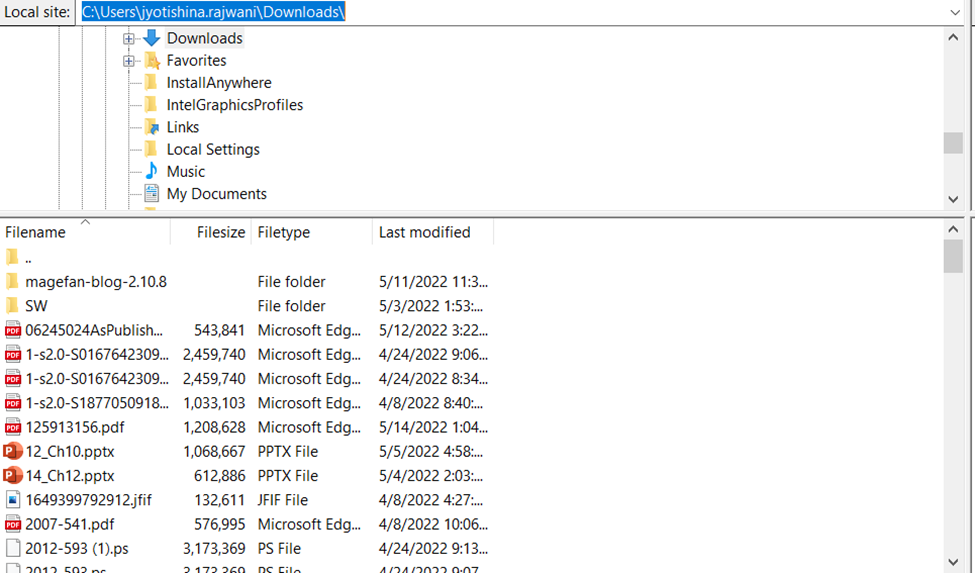
Step: 4 Go to the app/code folder from your unzipped folder and check the directory structure.
If a directory structure is app/code:
You will see the directory with the vendor’s name “VENDOR”. Upload it to the application folder: public_html/app/code.
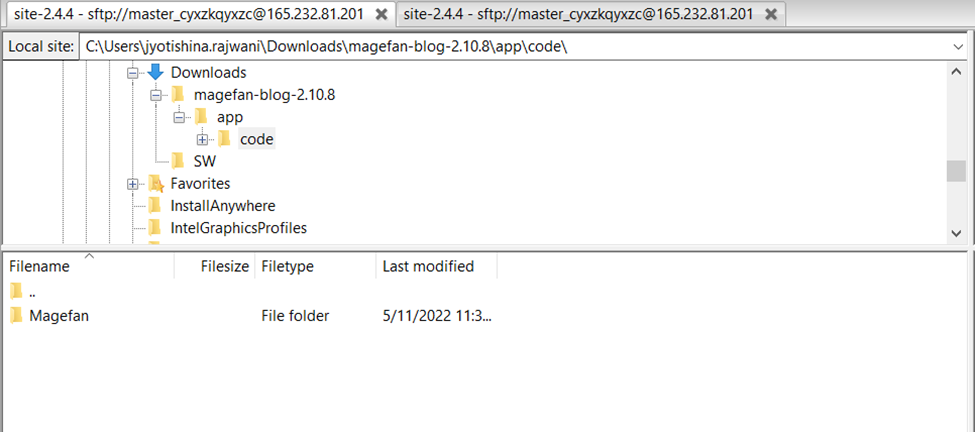
If a directory structure has a Vendor/Module name:
The directory can have the vendor’s name “VENDOR”, such as “Magefan/Blog“. The directory structure will then look like “Blocks, Controller”. Upload it to your application folder: public_html/app/code.
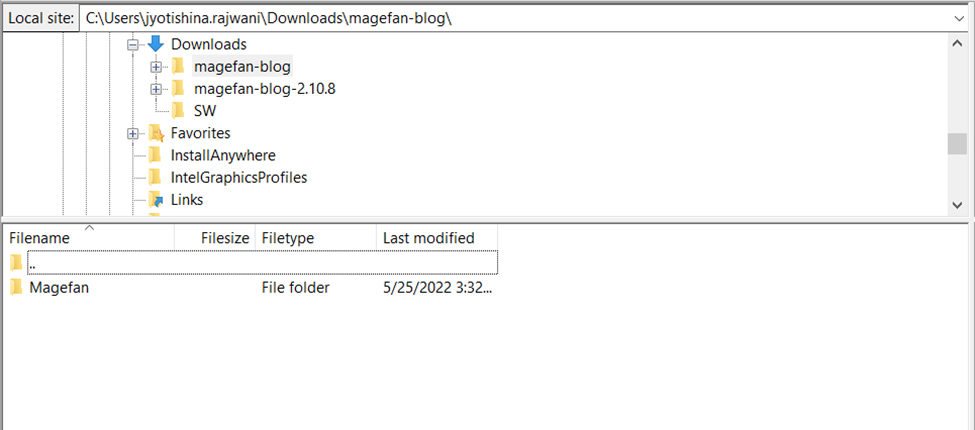
Step 5: Upload the unzipped folder to the public_html/app/code directory.
If you can’t see the code folder or haven’t installed any extensions yet, create a new folder “code” manually and put the content into it. All third-party Magento extensions are installed into the code folder.

Step 6: Connect through SSH to go to the Magento root folder and run the following commands:
php bin/magento setup:upgrade

php bin/magento setup:di:compile

php bin/magento setup:static-content:deploy -f
How to Uninstall an Extension
Don’t need an extension anymore? Let’s uninstall it quickly.
To uninstall a Magento 2 extension, you can either disable it for the time being, or completely remove the module in a few simple steps:
Step 1: Disable the Module
Navigate to your Magento 2 installation root directory and run the following command:
php bin/magento module:disable VendorName_ModuleName
=> If you stuck because of a version, you can also specify the PHP version:
php7.4 bin/magento module:disable VendorName_ModuleName
Step 2: Uninstall Extension via Composer
For a complete uninstall, run the command below:
composer remove [-r|–remove-data] <component-name>
Example:
composer remove mageplaza/magento2-seo-extension
The –remove-data option removes database data and schema defined by the module’s Uninstall class.

Step 3: Uninstall the Extension Install Via zipping/archive
To remove an extension that installs via manual zip, first disable it. Then remove its directory from the app/code, and remove its records in the database tables. Specifically, remove the module record from the table setup_module.
Step: 4 Uninstall the Module by uninstalling the command line. Follow these steps:
Connect to SSH -> Navigate to the Magento root directory
Run the command:
php bin/magento module:uninstall [–backup-code] [–backup-media] [–backup-db] [-r|–remove-data] VendorName_ModuleName.
Example:
php bin/magento –remove-data module:uninstall mageplaza/blog2
Step 5: Run the following commands:
php bin/magento setup:upgrade

php bin/magento setup:di:compile

php bin/magento setup:static-content:deploy -f
Check the store environment if everything is working properly. If, at any point, the store displays an error, check the Magento logger for more details.
Final Words
Extensions are essential for increasing the performance and functionality of your built-in Magento 2 store. These extensions are quite easy to download, install and upgrade – just follow the steps that we have discussed above.
In this guide, I’ve provided all the technical details to do so. Make sure to back up all the files and databases before you start the installation of a Magento 2 extension.
FAQs
How do I install the Magento Marketplace extension via Composer?
Connect through SSH -> Navigate to the Magento root directory i.e. var/www/html/magento2
Run the following commands:
composer require vendor/modulename
php bin/magento setup:upgrade
php bin/magento setup:di:compile
php bin/magento setup:static-content:deploy -f
How do I install Magento extensions manually?
- Upload Zip Archive to your Magento folder:
- Connect To the FTP or Cpanel File Manager
- Navigate to the Magento root directory: var/www/html/magento2
- Unzip the folder
- Upload it to the directory app/code
- Run the following commands:
php bin/magento setup:upgrade
php bin/magento setup:di:compile
php bin/magento setup:static-content:deploy -f
Note: Please note that the Magento Web Setup Wizard is not supported by Magento version 2.3.x.
Which command is used to enable the Magento 2 module?
Navigate to the Magento root directory: magento/public_html:
php magento module:enable [-c|–clear-static-content] [-f|–force] [–all] <module-list>
Example: php bin/magento module:enable –clear-static-content Vendor_ModuleName
Customer Review at 
“Great speed, features, knowledgebase, dashboard, UX and fast, expert support. Very happy!”
Stefan [Management Consultant]
Abdur Rahman
Abdur Rahman is the Magento whizz at Cloudways. He is growth ambitious, and aims to learn & share information about Ecommerce & Magento Development through practice and experimentation. He loves to travel and explore new ideas whenever he finds time. Get in touch with him at [email protected]
