One of the best ways to ensure your business attracts many customers is to make it as accessible as possible. This philosophy of accessibility should feed into every aspect of your business, from your social media posts to the structure of your website and more.
And one great way to start increasing your customer accessibility is to include a click-to-call button.
In this blog post, we will explore the concept of a click-to-call button, its benefits, and the steps to implement it on your WordPress website.
What Is a Click-to-Call Button?
A click-to-call button takes the form of an icon that your customers can click on. Once they do, they’ll automatically be put in touch with your company by means of a phone call.
In other words, these buttons make it much easier and faster for customers to contact you.
These buttons can be set up to facilitate both cloud calling and traditional cellular phone calls, enabling you to communicate in the manner that best suits the convenience of your business and your customers.
Enhance Your WordPress Experience
Seamlessly integrate a Click-to-Call button for enhanced customer accessibility. Experience performance, security, and flexibility like never before.
What Are the Benefits of Adding a Click-To-Call Button?
Now, why should you consider adding a click-to-call button to your website? The following advantages make it a compelling choice.
Better accessibility
First and foremost, a click-to-call button makes your company more immediately accessible to your customers. While managing communications through your email client is great, some customers simply prefer to pick up the phone. Additionally, it ensures that individuals with disabilities, like Parkinson’s, who may face challenges typing your phone number manually, can still reach out to you.
VoIP compatibility
If you’d like customers to contact you via your hosted phone system that uses VoIP (Voice over Internet Protocol) instead of a cellular connection, you can do this easily with a click-to-call button. VoIP services are usually much cheaper and offer various useful features like call forwarding, voicemail-to-email, and call analytics.
Increased website traffic
When your customers know they can reach you easily from your website, they’ll be more inclined to keep visiting it. This also increases their chances of seeing new information or products on your site that intrigue them.
Reduces human error
If you’re worried about losing customers who might be entering your number wrong, a click-to-call button could be just what you’re looking for. Since it dials the number automatically, it prevents anyone from entering your number incorrectly.
Functionality across themes
A click-to-call button works with just about every WordPress eCommerce theme you can find, meaning you won’t have to get rid of it if you redesign your website. You can also use your knowledge of these buttons to install them across all your WordPress websites because of this.
How to Add a Click-To-Call Button to Your WordPress Site?
1. Adding the click-to-call button manually
The primary option is to manually insert your newly created click-to-call button using the code you’ve written. This approach does require a certain level of coding expertise and involves the following steps:
Insert the HTML code to add a clickable phone number in WordPress
You’ve got to have your HTML code ready before you start the process of manually adding a click-to-call button. Simply write your code out using the HTML link tag <a href=“tel:xxxxxxxxxxx”>Call-to-action text</a>, inserting your phone number and a call to action, such as “Call us today!”.
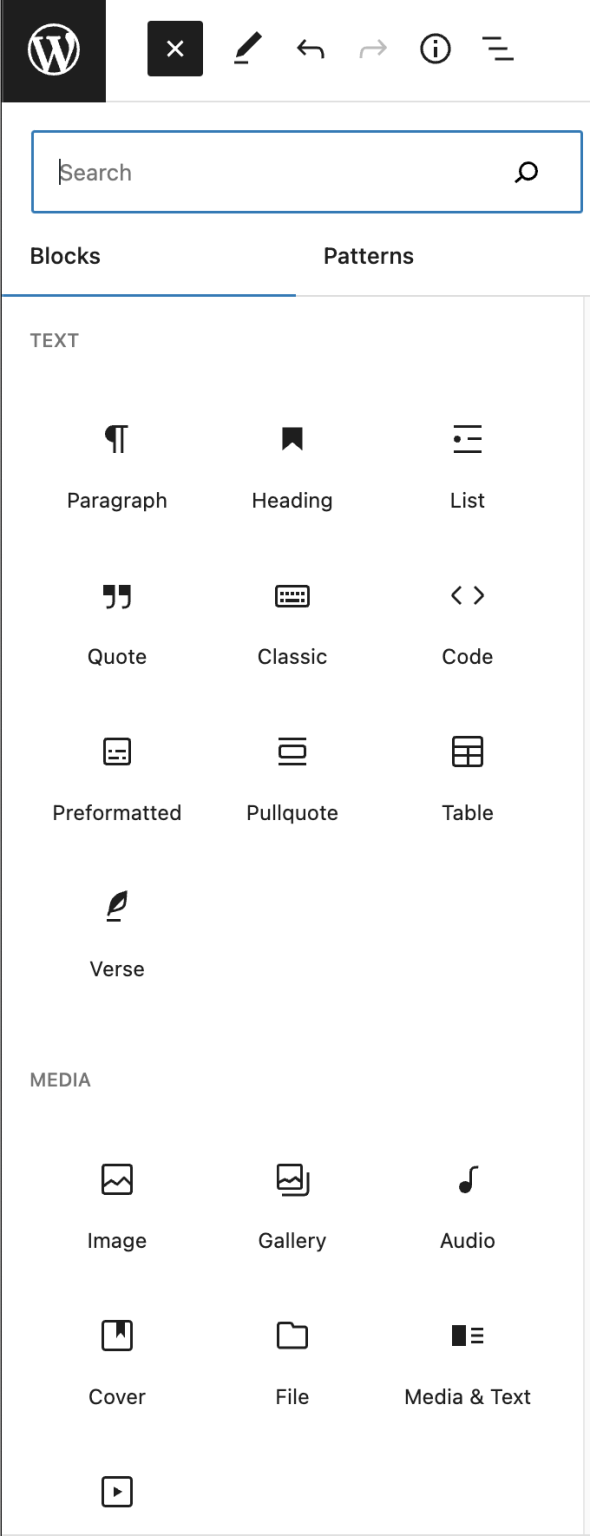
Then, go to the page you want to add your button to on the WordPress editor, and click the block inserter button (the blue plus button).

Then select the code option and copy and paste your code into the editor. Make sure your button shows up exactly where you want it.

Add an icon for your click-to-call link
Next, you’ll want to choose the icon you’ll use. It’s always a good idea to opt for a clear yet visually on theme for your website so it doesn’t stand out negatively. You can add the icon under Media → Add New. After uploading the image, you need to click on the ‘Edit’ link.
![]()
Then copy the file URL and edit the page where you want your button to be displayed. You can now add the file URL to your code. Your code should look something like this:
<a href="https://www.cloudways.com/blog/wordpress-click-to-call-integration/tel:+4487289729729"><img src="https://example.com/wp-content/uploads/2023/09/phoneicon2.png" alt="Call us now" /></a>
Once you’ve followed all these steps and published your changes, your call-to-click button should be displayed on your site.
Customize further by adding texts before or after the click-to-call button
One of the big advantages of using WordPress is that it gives you varied options for customizing your site, and your click-to-call button is no exception. You can choose to add text to your button, so it comes with a label and is accessible to anyone with visual impairments or anyone who uses a screen reader.
Additionally, you can add your click-to-call button to your navigation menu
This helps your customers find your button in two ways, making it more accessible. You can add your click-to-call button to your navigation menu by using the Appearance page and clicking Menus, then Custom Links.
Next, you’ll want to enter the phone number under “URL” by typing ‘tel:+4487289729729′ (inputting your own number) and writing the text you’d like to display under “Link Text.” Then you can click on Add To Menu.
2. Adding the click-to-call button using a plugin
Alternatively, you can choose this simpler method and use a click-to-call plugin. All you need to do is follow the steps below.
Update WordPress to the latest version
Before getting started, check to ensure you’re using the latest WordPress version. This helps reduce the chances of problems creeping up later on.
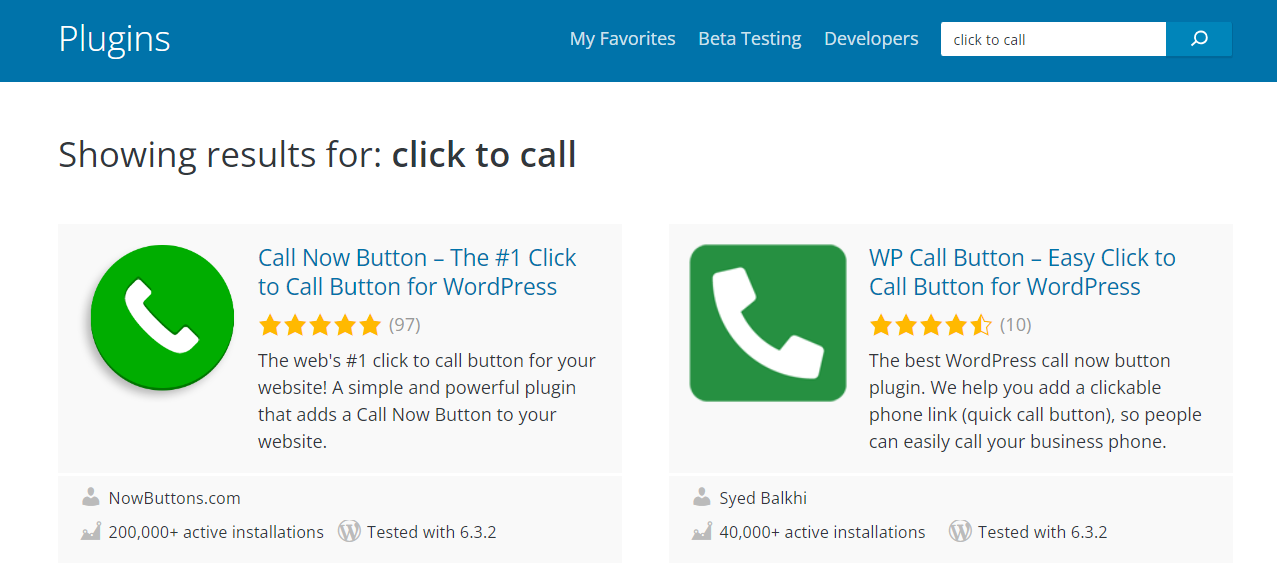
Select a plugin that suits your business requirements
Browse the WordPress plugins available, and make sure you’ve found one that suits your needs. Maybe your main priority is getting things set up quickly, for example—or maybe you’d prefer a plugin that helps you understand what’s happening behind the scenes.

Whatever the case, be sure to narrow down your selection until you’ve found the perfect plugin.
Install the chosen plugin from the WordPress plugin repository
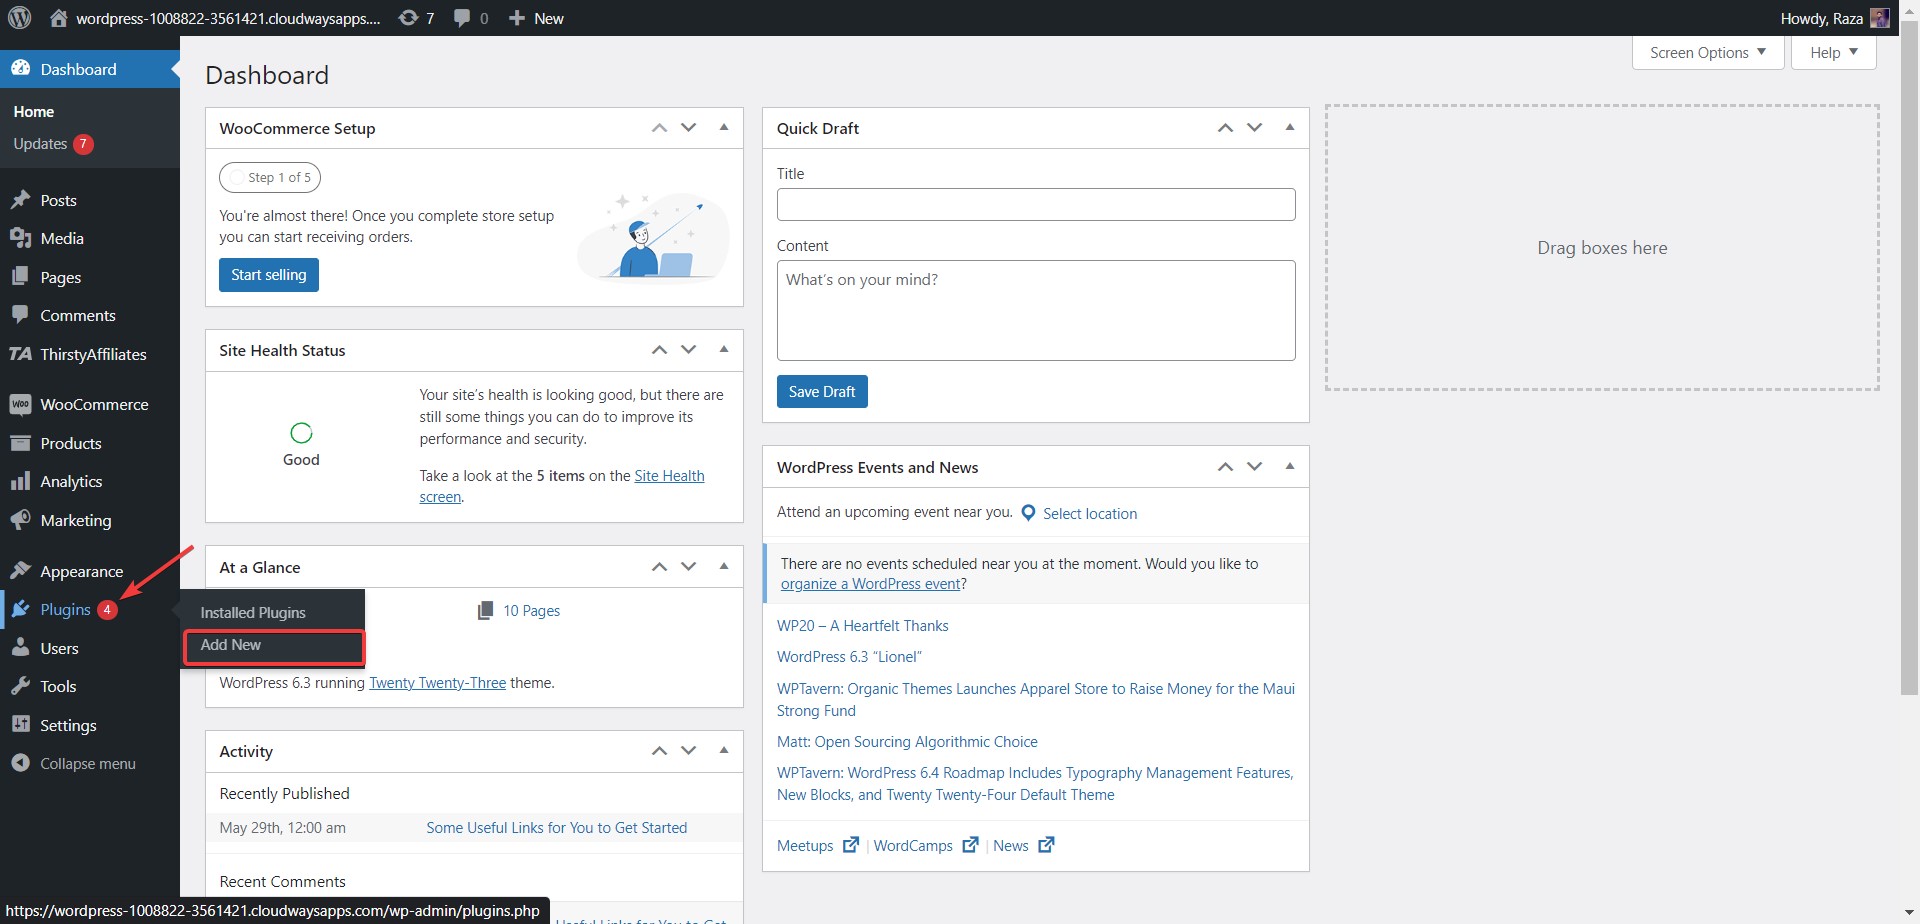
Navigate to the ‘Plugins’ button on your WordPress dashboard, then choose ‘Add new’. Next, use the search bar at the top to find the right plugin, then click on ‘install now’ to begin the installation process.

Configure the Click-to-Call button’s appearance and behavior
Most plugins will let you adjust exactly what your click-to-call button does so you can get it looking and working exactly how you want it to. Follow the instructions provided until your button is configured how you’d like it to be.
Perform thorough testing of the Click-to-Call button
Last but certainly not least, make sure you test the button extensively. That means checking to see how it works on different devices and operating systems, at different times of the day, and with different traffic levels. You’re all set once you’re sure it’s working as intended!
Optimize Your WordPress Solution
Implement the Click-to-Call button effortlessly, ensuring smooth customer interactions. With Cloudways, enjoy hassle-free hosting, expert assistance, and tailored solutions for your technical needs.
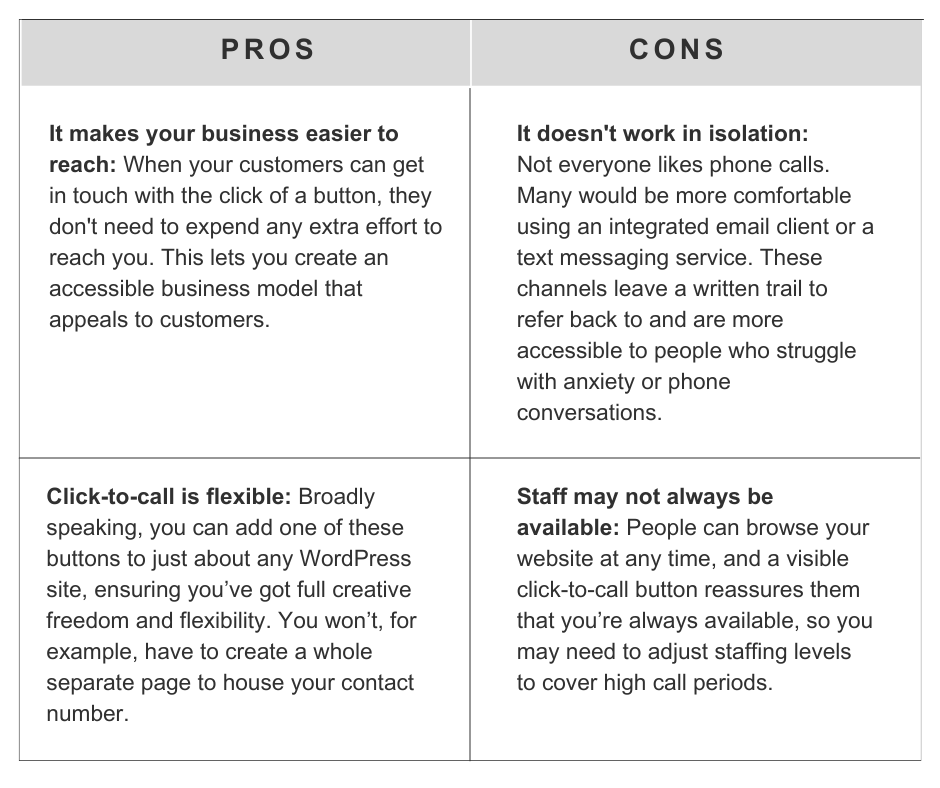
Pros and Cons of Adding a Click-to-Call Button on a WordPress Website
Lastly, we’ll examine the advantages and disadvantages of integrating a click-to-call button on your WordPress website.

Conclusion
The simple process of adding a WordPress click-to-call button helps make your company more accessible to any customers accessing your site. It ensures anyone can quickly and easily get in touch with you without needing to dial your number manually—all they have to do is tap once, and they can start reaching out.
That’s why including these buttons on your WordPress site is a great idea. We hope you found this easy guide useful. If you have any questions, feel free to reach out in the comments.
Q1. How do I add a click-to-call button in WordPress?
There are two main ways to install a click-to-call button when you’re using WordPress: you can use a plugin, or you can do it manually. Plugins are generally an easier option, though manual installation can be a good idea if you’re confident around tech or with WordPress.
Q2. How do I make a click-to-call button?
As mentioned in this guide, a plugin can do this for you if you’re not used to working with code. Alternatively, you can code the button yourself.
Many plugins will let you upload an icon of your choice for the button itself, which you’re free to design on your own—or you can use a freely available image to act as your icon.
Q3. Which call button is best for WordPress?
The best button depends entirely on your business needs. In general, the easier the click-to-call button is to spot and use, the better it is. This means you should generally opt for simple icons with clear labels over abstract depictions of a phone.
Q4. How do I add a floating call button in WordPress?
You can use a plugin to install a floating call button that moves with the page as you scroll so it’s always visible. To do this, choose a plugin for a floating call button specifically, then customize this so it links to your phone number.
Abdul Rehman
Abdul is a tech-savvy, coffee-fueled, and creatively driven marketer who loves keeping up with the latest software updates and tech gadgets. He’s also a skilled technical writer who can explain complex concepts simply for a broad audience. Abdul enjoys sharing his knowledge of the Cloud industry through user manuals, documentation, and blog posts.