

Magento 2 is a powerful ecommerce platform providing out-of-the-box features. However, there may be times when you need to extend the platform to meet specific business requirements. This is where custom GraphQL comes in!
If you’re unfamiliar with GraphQL, it’s a query language for APIs developed by Facebook (now Meta). It allows developers to get the data they need and only receive it in response to their queries. Magento 2 supports GraphQL to help you streamline your data processes.
In this article, I’ll tell you how to use GraphQL in Magento 2. I’ll start by enabling the GraphQL module in Magento 2 and accessing the GraphQL endpoint, and then make GraphQL queries to fetch data about products, categories, customers, orders, etc.
An Overview of GraphQL in Magento 2
GraphQL is an alternative to REST and SOAP in Magento 2. It allows you to specify and receive the data easily, making API responses more efficient and reducing network overhead. A simple example is Progressive Web App (PWA) with client-side rendering.
In Magento 2, GraphQL is a new feature added in version 2.3.4. The primary focus is to speed up and boost the APIs, their flexibility, and their effectiveness. It allows developers to query and mutate data in Magento’s database using a standardized syntax.
Three main operations of GraphQL are in use:
- queries (for reading and receiving information);
- mutations (needed for taking actions, creating data, and changing information. For example, a customer’s email);
- subscriptions (this operation isn’t available in Magento yet, but it provides the opportunity to get data from the server in real-time automatically after a while, for instance, for notifications).
Improvements of GraphQL in Magento 2.4.6
In Adobe Commerce 2.4.6, purchase orders functionality has also been fully exposed in the GraphQL layer by adding approval rules in the API.
Store owners and merchants will have big performance improvements due to the improved rendering process of the category tree in Magento open source 2.4.6.
The loading of category children by refactoring code has been improved by removing unnecessary method calls, improving category tree caching, and recursively loading category data.
Bulk cart operations have also been improved for query response times, specifically in situations where 500 or more products have been added to the shopping cart.
Why GraphQL Is Useful for Developers?
GraphQL is useful for Magento 2 developers for the following reasons.
- Developers can request only the data they need, which results in smaller and more efficient data transfers. This is especially important for mobile and low-bandwidth devices.
- It provides a flexible data model, which allows developers to query data more naturally and intuitively. This makes it easier to build complex data-driven applications.
- It has a simple and intuitive syntax, making it easy for developers to learn and use. This simplicity reduces the learning curve and allows developers to focus on building their applications.
- Developers can create custom GraphQL queries, mutations, and types, allowing them to extend the platform’s default schema and create custom functionality that meets their specific requirements.
- It allows for optimized queries, which can significantly improve application performance. This is because it reduces the number of API requests required to fetch data.
Compare GraphQL vs Rest API
With the rise of the PWA, getting smaller amounts of data and making fewer API requests is needed. There comes the advanced technology and need for GraphQL. Magento 2 supports both GraphQL and REST APIs for interacting with the platform.
Here are some of the key differences between REST API and GraphQL.
| REST API | GraphQL | |
| Querying | With REST APIs, you typically make separate requests for each resource or the endpoint you want to access. | With GraphQL, you can retrieve all the needed data in a single request and specify which fields and data you want. |
| Caching | REST APIs are often easier to cache than GraphQL because the URLs are used as the cache keys. | With GraphQL, caching can be more challenging because each request is unique and may require a different data set. |
| Learning Curve | REST APIs are simpler to understand and use, and a wealth of documentation and tooling is available. | GraphQL has a steeper learning curve, and it may take longer to become proficient with the technology. |
| Performance | REST APIs can be faster when only a small amount of data is required. | GraphQL can be more efficient than REST APIs for some use cases because it reduces over-fetching and under-fetching of data. |
Furthermore, one can notice that GraphQL embroils perform rate-limiting and other service denial safety measures.
Although the choice of GraphQL or REST API in Magento 2 is entirely subjective and based on the website’s needs. But the one key point to note is that when it comes to security – RestAPI gives many innate ways to impose the security of your APIs.
Requirements for GraphQL in Magento 2
You need GraphQL IDE such as GraphiQL or a browser extension to run the code samples and tutorials. If you install a browser extension, make sure it can set request headers. Altair GraphQL Client is one of the extensions on the Chrome Web Store that can do the job.
💡 Note: For the purpose of this article, I’ll use Cloudways, where my Magento store is hosted.
Access GraphQL Endpoint in Magento 2
The GraphQL endpoint in Magento 2 is /graphql. To access the GraphQL URL, set the GraphQL endpoint by entering http://<magento2-server>/graphql in the URL bar of your IDE or extension you install above.
Example: Query request
{

  countries {

    available_regions {

      code

      id

      name

    }

    full_name_locale

    full_name_english

    id

    two_letter_abbreviation

    three_letter_abbreviation

  }

}
Response: Return all the countries list

Run GraphQL Requests in Magento 2
When making a GraphQL request in Magento, the request supports the HTTP GET and POST methods. Mutations requests should be in the POST method only. You can optionally send a GET query request in a URL.
For example, http://<host>/graphql?query=%7Bproducts sent a GET request with a query string in the URL.
Request
{

  products(

    filter: { sku: { eq: "24-WB01" } }

  ) {

    items {

      name

      sku

    }

  }

}
Response
{

  "data": {

    "products": {

      "items": [

        {

          "name": "Voyage Yoga Bag",

          "sku": "24-WB01"

        }

      ]

    }

  }

}
Create Custom GraphQL in Magento 2
It’s important to note that creating a new module with GraphQL endpoint in Magento 2 requires a good understanding of the GraphQL syntax, as well as the Magento 2 platform. Please follow the steps below to create a GraphQL module in Magento 2.
Create a folder Cloudways/Graphql in the directory app/code.
Step 1: Create a registration.php File
Create a registration.php file in app/code/Cloudways/Graphql/registrattion.php.
<?php

\Magento\Framework\Component\ComponentRegistrar::register(

    \Magento\Framework\Component\ComponentRegistrar::MODULE,

    'Cloudways_Graphql',

    __DIR__

);
Step 2: Create an etc/module.xml File
Create a new module.xml file in the etc directory. This file should define the basic information about your module, such as name, version, and dependencies. Here’s an example of a module.xml file.
<?xml version="1.0" ?>

<config xmlns:xsi="http://www.w3.org/2001/XMLSchema-instance" xsi:noNamespaceSchemaLocation="urn:magento:framework:Module/etc/module.xsd">

<module name="Cloudways_Graphql" setup_version="1.0.0">

    <sequence>

          <module name="Magento_Catalog"/>

          <module name="Magento_GraphQl"/>

    </sequence>

</module>

</config>
Step 3: Define the GraphQL Schema
A GraphQL schema defines the types, queries, and mutations your API will support.
Next, create a file in app/code/Cloudways/Graphql/etc/schema.graphls directory like in the example below. Note that the etc/schema.graphqls part is mandatory.
The <module_name>/etc/schema.graphqls file will define:
- Defines the basic structure of queries and mutations.
- Defines which attributes can be used for input and output in GraphQL queries and mutations.
- Requests and responses contain separate lists of valid features.
- Points to the resolvers that verify and process the input data and response.
- Is the source for displaying the schema in a GraphQL browser.
- Defines which objects are cached.
Copy the following code:
type Query {
    products (
        search: String
        filter: ProductAttributeFilterInput
        pageSize: Int = 20
        currentPage: Int = 1
        sort: ProductAttributeSortInput
    ) : Products @resolver(class: "Cloudways\\Graphql\\Model\\Resolver\\Products")
                @cache(cacheIdentity: "Cloudways\\Graphql\\Model\\Resolver\\Block\\Identity")
}

input ProductAttributeFilterInput {
    category_id: FilterEqualTypeInput
}

type SearchResultPageInfo {
    page_size: Int
    current_page: Int
    total_pages: Int
}
Define Query
A query definition consists of one line, or it can be complex. The type is defined as a Query. In the above, we use the products object defined as a Query name, which defines the keywords used to construct a query.
You can create your custom query as:
type Query {

myCustomQuery(input: MyCustomInput!): MyCustomOutput @resolver(class: "Vendor\\Module\\Model\\Resolver\\MyCustomQuery")

}
Example
type Query {
hello: String
}
Define Input Parameters
In GraphQL query, each type definition includes all an object’s input, output, and sorting attributes. You can define each attribute that can be used as input to perform module operations.
In the above code, the ProductAttributeFilterInput object is used as the input attribute to filter.
input ProductAttributeFilterInput {

category_id: FilterEqualTypeInput

}
Similarly, the FilterEqualTypeInput object defines a filter that matches the input exactly.
input FilterEqualTypeInput {
in: [String]
eq: String
}
Results
The following example filters and results in the search for products whose category_id equals 1.
{
products(filter: {category_id: {eq: “1”}}) {
total_count
items {
name
}
}
}
Specify Output Attributes
The API response allows developers to build a custom app or integration, but sometimes the custom response is not expected to get. For example, when you specify a price in an input filter, Magento evaluates it as a Float value.
In a schema.graphqls file, the output interface defines top-level attributes. The data type of each attribute must be specified, whether it’s a scalar, an object, or an array.
In the above code, we use the products query. The page_info attribute contains the SearchResultPageInfo data type defined in the schema.graphqls file under ModuleGraphQL.
The SearchResultPageInfo provides navigation for the query response.
type SearchResultPageInfo {

page_size: Int

current_page: Int

total_pages: Int

}
Define Annotations
You can describe any attribute, type definition, or entity within a schema.graphqls file by appending the following to the line:
@doc(description: “<Text>”)
Example
SKU: FilterTypeInput @doc(description – A number or code assigned to a product to identify the product, options, price, etc.).
Step 4: Query Caching
The @cache directive defines whether the results of certain queries can be cached. Queries relating to products, categories, and CMS may be cached.
Define cachable queries in the following manner:
@cache(cacheIdentity: “Cloudways\\Graphql\\Model\\Resolver\\Block\\Identity”).
The cache Identity value points to the class responsible for retrieving cache tags. A query without a cache identity will not be cached.
Create the file in Cloudways/Graphql/Model/Resolver/Block/Identity.php and copy the following code:
<?php

declare (strict_types = 1);


namespace MyModule\CountNumberDays\Model\Resolver\Navigation;


use Magento\Framework\GraphQl\Query\Resolver\IdentityInterface;


class Identity implements IdentityInterface

{

    /** @var string */

    private $cacheTag = "my_module_custom_product";


    /**

     * Get PromoBanners identities from resolved data

     *

     * @param array $resolvedData

     * @return string[]

     */

    public function getIdentities(array $resolvedData): array

    {

        return [ $this->cacheTag ];

    }

}
Step 5: Define the Schema Resolver
Resolvers are responsible for handling queries and mutations. In Magento 2, resolvers are defined as PHP classes. You can define your resolvers in a separate directory, such as Model/Resolver.
Create a file in Cloudways/Graphql/Model/Resolver/Products.php and copy the following code:
<?php

declare(strict_types=1);

Namespace  Cloudways\Graphql\Model\Resolver;

use Magento\Framework\GraphQl\Exception\GraphQlInputException;

use Magento\Framework\GraphQl\Config\Element\Field;

use Magento\Framework\GraphQl\Exception\GraphQlNoSuchEntityException;

use Magento\Framework\GraphQl\Schema\Type\ResolveInfo;

use Magento\Framework\GraphQl\Query\ResolverInterface;

class Products implements ResolverInterface

{

    /**

     * @inheritdoc

     */

   public function __construct(

        \Magento\Catalog\Api\ProductRepositoryInterface $productRepository,

        \Magento\Framework\Api\SearchCriteriaBuilder $searchCriteriaBuilder

    ) {

        $this->productRepository = $productRepository;

        $this->searchCriteriaBuilder = $searchCriteriaBuilder;

    }

   public function resolve(Field $field, $context, ResolveInfo $info, array $value = null, array $args = null)

    {

        $productsData = $this->getProductsData();

        return $productsData;

    }

      /**

     * @return array

     * @throws GraphQlNoSuchEntityException

     */

    private function getProductsData(): array

    {

        try {

            /* filter for all the pages */

            $searchCriteria = $this->searchCriteriaBuilder->create();

            $products = $this->productRepository->getList($searchCriteria)->getItems();

            $productId = $product->getId();

            foreach($products as $product) {

                $productRecord['allProducts'][$productId]['sku'] = $product->getSku();

                $productRecord['allProducts'][$productId]['name'] = $product->getName();

                $productRecord['allProducts'][$productId]['price'] = $product->getPrice();

            }

        } catch (NoSuchEntityException $e) {

            throw new GraphQlNoSuchEntityException(__($e->getMessage()), $e);

        }

        return $productRecord;

    }

}
Step 6: Run the Commands
Run the following commands in the root directory of your Magento 2 instance to enable your module and clear the cache:
bin/magento module:enable Cloudways_Graphql

bin/magento setup:upgrade

bin/magento setup:di:compile

bin/magento cache:clean
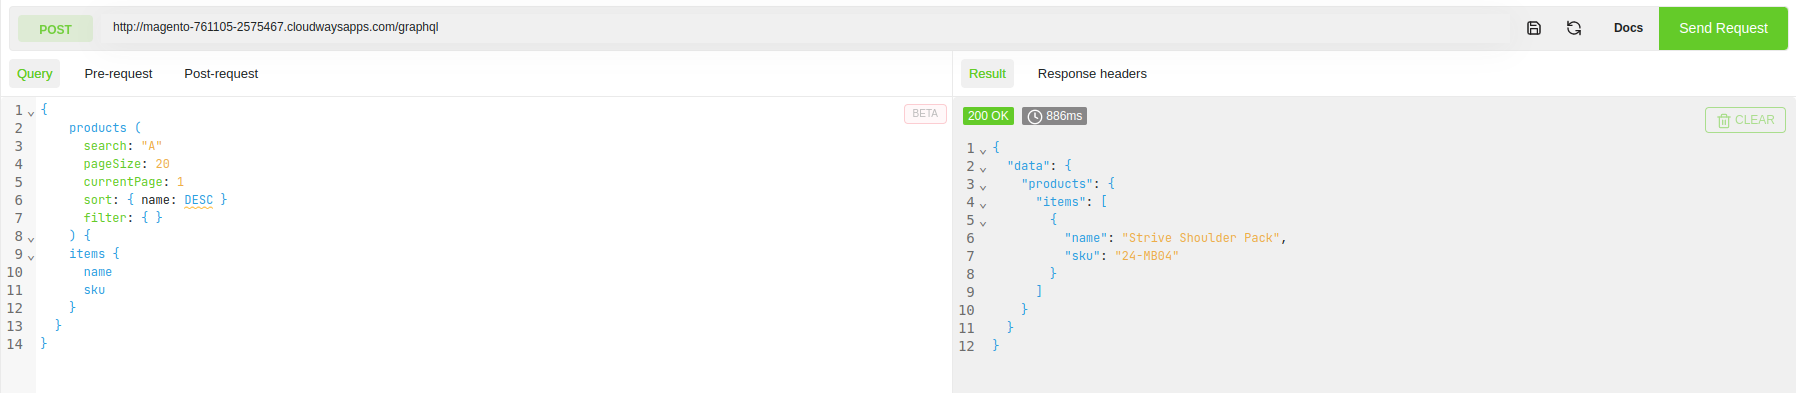
Step 7: Test and Run Graphql Query
The final step is making sure the query is mistake-free and gives proper responses. One of the many readily available extensions, such as ChromeiQl, GraphiQL, or Altair GraphQL Client, can do this.
Request Payload
{

    products (

      search: "A"

      pageSize: 20

      currentPage: 1

      sort: { name: DESC }

      filter: { }

    ) {

    items {

      name

      sku

    }

  }

}
Result
The result will be all Products collection with search string “A,” sorting descending order.
{

"data": {

"products": {

"items": [

{

"name": "Strive Shoulder Pack",

"sku": "24-MB04"

}

]

}
}
}
Create a GraphQL Mutation
In GraphQL, Mutation is a request type that performs operations like read to modify the data. A mutation can create, update, or delete objects and fields. A mutation is a request that changes data in some way, such as adding, editing, or deleting information. In REST terminology, queries operate like GET requests, while mutations are similar to POST, PUT, and DELETE.
Mutations in Magento GraphQL are powerful tools that can be used to create new entities, modify existing ones, or delete data. For example, you can use mutations to create a new customer account, add a product to a shopping cart, update order status, or delete a customer record.
Here’s an example of a Magento GraphQL mutation that creates a new customer account:
Request
mutation {

  createCustomer(

    input: {

      email: "[email protected]"

      firstname: "John"

      lastname: "Doe"

      password: "[email protected]"

    }

  ) {

    customer {

      firstname

      lastname

      email

    }

  }

}
Response
{

  "data": {

    "createCustomer": {

      "customer": {

        "firstname": "John",

        "lastname": "Doe",

        "email": "[email protected]"

      }

    }

  }

}
In this example, the mutation creates a new customer account with the specified email, first name, last name, and password. The response includes the new customer’s first name, last name, and email address.
Summary
By using GraphQL in Magento 2, you can create APIs that are more efficient and flexible than traditional REST APIs. This is because GraphQL allows developers to specify exactly what data they need, rather than receiving a fixed set of data that may contain more information than necessary.
In addition to improved performance, custom GraphQL modules can also provide a more streamlined developer experience. It can help easily understand how to query the API and get the data they need. This can reduce the time and effort required to build integrations and applications on top of your Magento store.
Frequently Asked Questions
Q. Why use GraphQL in Magento 2?
A. GraphQL provides a definite and understandable description of the data required in the API. You can create APIs that are more efficient and flexible than traditional REST APIs. GraphQL uses types to ensure channels only ask for what’s possible and provide clear and helpful errors.
Q. How to set up GraphQL in Magento 2?
A. To setup GraphQL in Magento, you will need the following steps:
You need GraphQL IDE such as GraphiQL or a browser extension to run the code samples and tutorials. If you install a browser extension, make sure it can set request headers. Altair GraphQL Client is one of the extensions on the Chrome Web Store that can do the job, or you can also use Postman.
Customer Review at ![]()
“Great speed, features, knowledgebase, dashboard, UX and fast, expert support. Very happy!”
Stefan [Management Consultant]
Jyotishna Kumari
Jyotishina is the Magento Community Expert at Cloudways and has 4 years of experience in web development. She has worked on e-commerce sites since the turn of the millennium and was working with Magento before version 1 was released. She loves to travel and explore new ideas whenever she finds time. Get in touch with her at [email protected]