
Sometimes, a website shows annoying errors confusing users while browsing. If browsing other sites makes you annoyed when it comes to your site, things are very different. Many types of website errors occur, some generic and others specific to WordPress. One such error is 413.
Error 413 belongs to the family of HTTP 4xx status codes, which identify errors connected to the request made by the client. In this article, you will see what the “413 Request Entity Too Large” error is and how you can fix it in your WordPress.
What Is the “Error 413 Request Entity Too Large” Error?
HTTP Error 413 indicates that the request made cannot be managed by the server, and this is because it involves a file or a block of data or, again, a group of files that are too large compared to the maximum limit that the server can manage.
The browser window generally displays the message “413 Request Entity Too Large”. This problem can occur if you try to upload too large files via the browser, exceeding the limits imposed by the webmaster for security reasons or others.
Why Does the “413 Request Entity Too Large” Error Occur?
Error 413 Request Entity Too Large occurs when you try to upload a file that exceeds the maximum upload limit set on your web server. In other words, when you try to upload a file that is too large, the web server returns an error message informing the user that “413 Request Entity Too Large”.
The message shown to the user may vary depending on the web server and the client. The following are the most common messages that indicate the occurrence of this error:
- Error 413
- HTTP Error 413
- HTTP Code: 413
- Request Entity Too Large
- 413. That’s an error.
Fixing the “413 Request Entity Too Large” Error in WordPress
As you know, error 413 usually occurs when you upload a large file to your web server, and your hosting provider has set a limitation on file size.
One of the common problems webmasters encounter when managing WordPress is allowing the webserver to allow file uploads via the Media Library. However, if your Nginx-powered website is not configured to allow the uploading of large files, the upload process will mostly fail.
I will show you some of the easiest methods to increase the file upload size and fix the 413 Request Entity Too Large error in WordPress.
- Reset File Permissions
- Manually Upload the File via FTP
- Increase Upload File Size
- Modify Your Functions.php File
- Modify Your .htaccess File
- Modify Your nginx.conf File
- Contact Your Hosting Provider
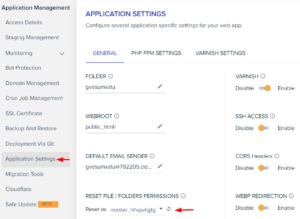
1. Reset File Permissions
It might be possible that you are encountering this error due to limited access to a file and upload permission. So, it would be great to check the WordPress file/folder permissions and set the recommended permission, then try uploading the file to your site.
You can set the permissions from an FTP Client like FileZilla, and if your hosting provider offers any file permission reset option, then you can fix it from there.
2. Manually Upload the File via FTP
It’s a good idea to consider FTP to upload your large file, but please note that if you are uploading a file via FileZilla, it takes more time.
Here, you will need to access your web server and upload the file by drag and drop. Therefore, first, you need to check whether your hosting provider offers server credentials or SFTP access to your web server.
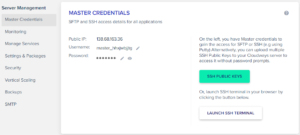
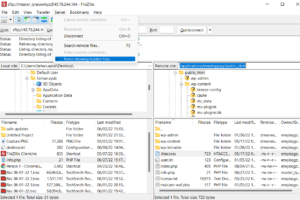
Now, you need the FileZilla FTP Client to access your web files, so download it if you don’t have one. Then, open FileZilla and fill the respective fields; Host, Username, Password, and Port. You can see in the below screenshot that I pasted my server IP, Username, Password, and 22 as a port number.
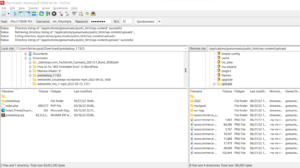
Next, drag the file you want to upload to your website from your local desktop (left-side) and drop it into your web server’s folder. In my case, the webserver folder path is /applications/dbname/public_html/wp-content/uploads. If you want to upload any plugin then the folder path is /applications/dbname/public_html/wp-content/plugins.
3. Increase Upload File Size
Many good WordPress hosting providers offer the file size settings feature on their platform that lets users increase the maximum upload size value, maximum execution time, post max size, and more.
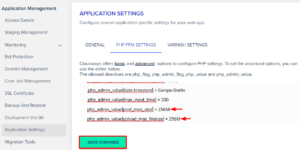
Now, let’s look at how you can increase your upload file size from the hosting dashboard. Cloudways offers application and server settings from which you can increase your file upload settings. From the Application Management panel, I have to remove comment “;” from three values and increase the upload and post max size to 256M & execution time to 300.
php_admin_value[post_max_size] = 256M

php_admin_value[upload_max_filesize] = 256M

php_admin_value[max_execution_time] = 300
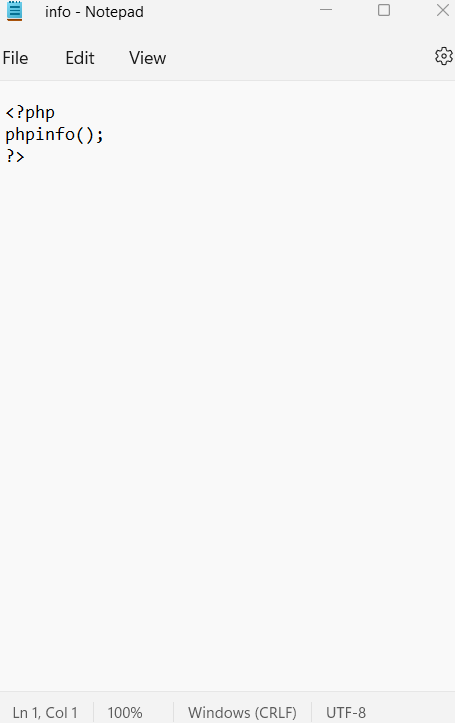
To check whether the file size value is updated or not, you need to create an info.php file on your desktop and upload it to your website folder via FileZilla. Now, open any file editor like Notebook, paste the following code, and save it as info.php.
<?php

phpinfo();

?>
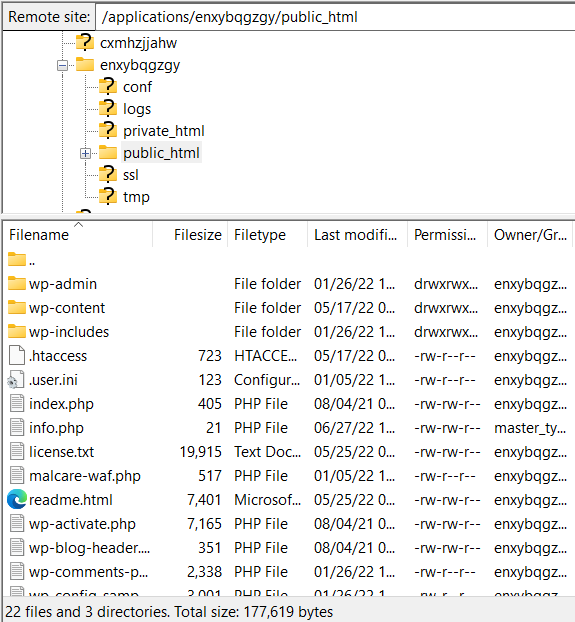
Now, upload it to your site’s public_html folder.
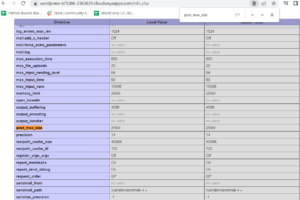
In the next step, open your browser and run this URL “www.yoursite.com/info.php”. In my case, the URL is https://wordpress-675386-2363839.cloudwaysapps.com/info.php. Search for the PHP admin values that you updated; if the values are changed, you have successfully increased the file size. After this, try to upload your file and check whether the issue has been resolved or not.
If your hosting provider doesn’t offer any feature to modify the file upload size, move to the next method.
4. Modify Your Functions.php File
You can edit your theme’s functions.php file and increase the file upload size. But before that, you will need to create a backup of your entire WordPress site for data recovery. Backups help you recover your web files if something goes wrong.
You need an FTP Client like FileZilla to access your site’s file. So, connect your server via FileZilla and go to your active theme folder. You will find the theme files in the wp-content folder and in my case, the source path is “/applications/enxybqgzgy/public_html/wp-content/themes/twentynineteen”. Next, find the functions.php and click View/Edit.
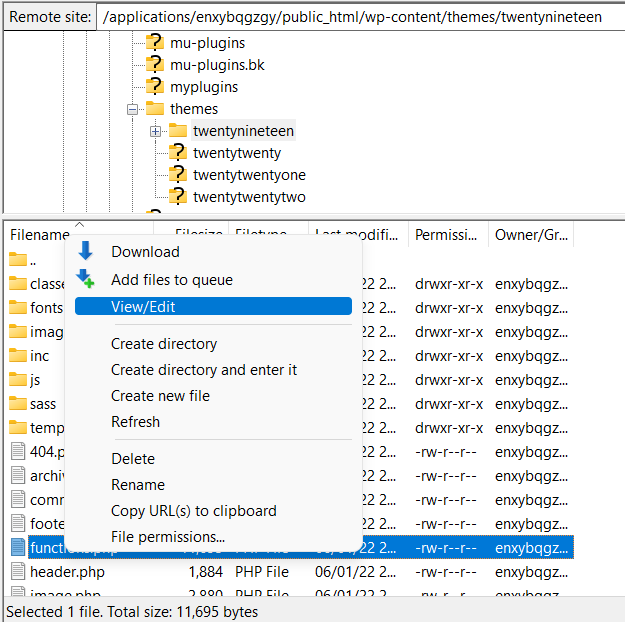
Next, paste the following lines of code into your file and save it. This will define the max upload size in Megabytes. Replace the numbers as per your requirement.
@ini_set( 'upload_max_size' , '256M' );

@ini_set( 'post_max_size', '256M');

@ini_set( 'max_execution_time', '300' );
After this, check open info.php on your browser “www.yoursite.com/info.php” and check whether the values are updated or not, then try uploading your file.
In case this doesn’t work, then move to the next method.
5. Modify Your .htaccess File
If your website is hosted on LAMP Stack (using Apache web server and PHP), you can increase the max upload size from your .htaccess file.
Again, you need to access your .htaccess file from an FTP client like FileZilla and go to the public_html folder. Search for the .htaccess file, and if you do not see the .htaccess file, it’s probably hidden. Hence, navigate to FileZilla menus > Server and click Force Showing Hidden Files.
Now View/Edit the .htaccess file in a code editor or Notepad and add the following lines.
php_value post_max_size 256M

php_value memory_limit 256M

php_value max_execution_time 300
Choose a number and size that is suitable for your site and file. Next, open info.php ““www.yoursite.com/infor.php”” on your browser to check the updated sizes as we did in the previous step.
6. Modify Your nginx.conf File
The above troubleshooting method is for Apache web server, but if you are running your website on LEMP (NGINX as a web server and PHP), you need to edit nginx.conf i.e., located in /etc/nginx/ and add the following line of code to the file.
http {

client_max_body_size 100M;

}
7. Contact Your Hosting Provider
If you tried all the above and are still facing the issues, then it would be good to contact your hosting support and ask them to fix this issue ASAP. Several hosting providers offer 24/7 support chat and ticket assistance to help their customers.
Summary
Error 413 Request Entity Too Large is related to the size of the client request. There are multiple ways to fix this error you have read in this article. The most common way is to reduce the file size or to change the web server settings to increase the upload file size. If you know any other methods that can help fix the HTTP 413 Error, then please comment in the section below.
Q. How do I fix Error 413 Request Entity Too Large?
A. The most common way to fix the HTTP 413 Error is to increase the media file maximum upload size. Other ways are: resetting file permissions, uploading files using an FTP client, and modifying your files (fuctions.php/.htaccess/nginx.config).
Q. What does “HTTP Error 413” mean?
A. If a user gets this error it is because he’s uploading a file that is too large. When a webmaster receives this report, what he can do is ask the user to reduce the file size and try to upload it again.