Have you ever wanted to teach a course online? Maybe wanted a plugin that gives you the tools to build and sell online courses. With the growing number of online top-rated LMS solutions, choosing the right LMS plugin can be the difference between success and failure.
Today, we will review the MasterStudy LMS Plugin, which can quickly and efficiently start an e-learning platform for your users and potential clients.
The real question is if MasterStudy LMS is worth all the praise and good reviews. Let’s find out in this in-depth review. Additionally, we will cover its installation and a quick how-to so that you can get this up and running on your website. Keep reading to find out more about this innovative LMS plugin.
MasterStudy LMS, without a doubt, is one of the most powerful WordPress LMS plugins for creating online courses and selling them. It has two versions, Free and Pro, with extra premium features.
The MasterStudy LMS plugin will convert any WordPress website into a specialized online portal that supports all e-learning & LMS functionality unique to the industry. More on the Free vs Pro Comparison later in this article.
MasterStudy LMS Plugin – Overview
MasterStudy is a WordPress LMS plugin that is an all-in-one tool for any e-learning business. This plugin can turn any WordPress website into a professional online platform, with all the necessary e-learning & LMS features that already have over 25 000+ Satisfied Customers.
As a comprehensive plugin, MasterStudy LMS Plugin allows for a structured view for both lessons and courses to help students and teachers alike. Create efficient courses, and provide videos, course certificates, quizzes, and other course material in multiple formats which are simple to use.
MasterStudy LMS Plugin – Key Features
MasterStudy LMS has numerous features that will assist you in creating interactive, interesting, and engaging courses for your learning platform/website. This section will focus on the major features and how they can help you build an innovative e-learning website/community.
Course Builder
Course Creation has never been easier! There is no need to type a single line of code with the use of the front-end course builder. While using the builder is a convenient, transparent, and functional drag-and-drop tool making it as easy as possible. All you need is a few simple steps to get your course ready.
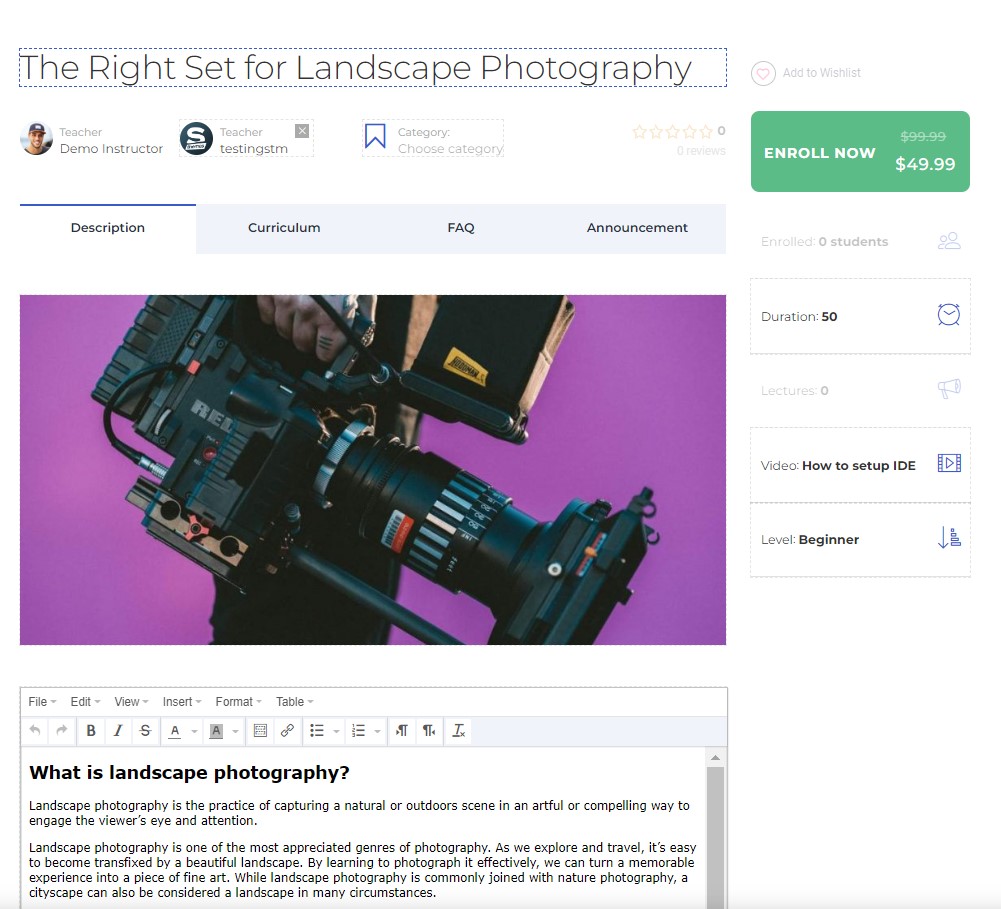
However, MasterStudy also offers a backend course builder that allows users to create practical online courses/lessons with the course editing page that gives you access to content, course curriculum, course settings, and publishing options.
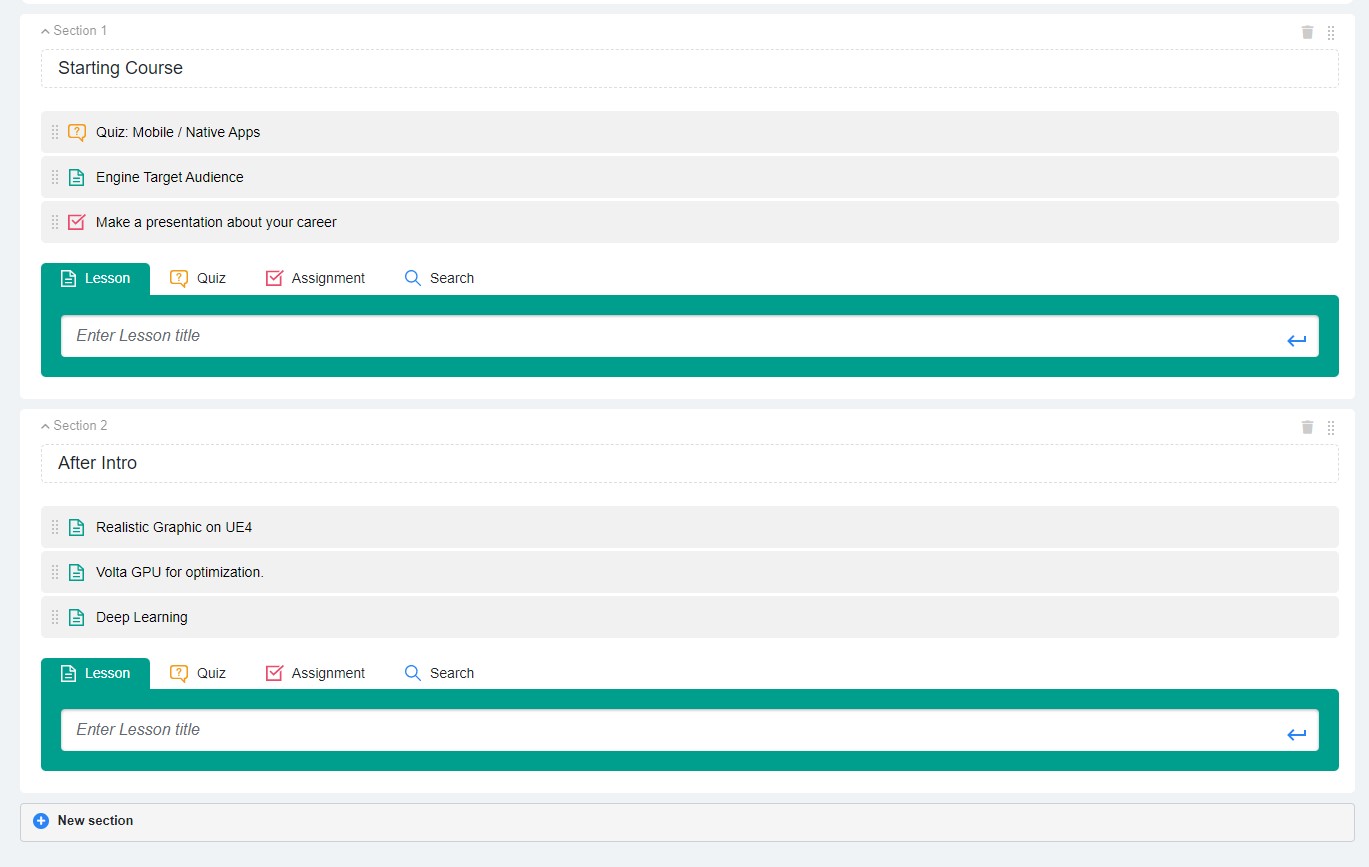
The builder comes with publishing and managing options so that you can control your courses at every stage and any time. Once you finish building your course, publishing it and making it available for purchase is as simple as clicking a button. Course drafts also allow you to save your courses when they are not ready. Changing their status from draft to complete is the last step to launching your course forward.
Multimedia files support allows you to use the builder with different types of images, videos, slides, documents, audio, and more. Upload them as course materials with additional attachments or use them within the content to make courses more interactive.
Course materials also allow you to upload various files to the course to make the learning content more interesting by simply uploading the files of any format directly from your device to the webpage.
There are also FAQ + Announcements that support your courses with additional information to provide students and site visitors with important information about ongoing assignments or events. Make courses more communicative with this simple yet efficient feature.
Advanced Quizzes
We will start with the advanced interactive quizzes feature that MasterStudy has made simple yet efficient.
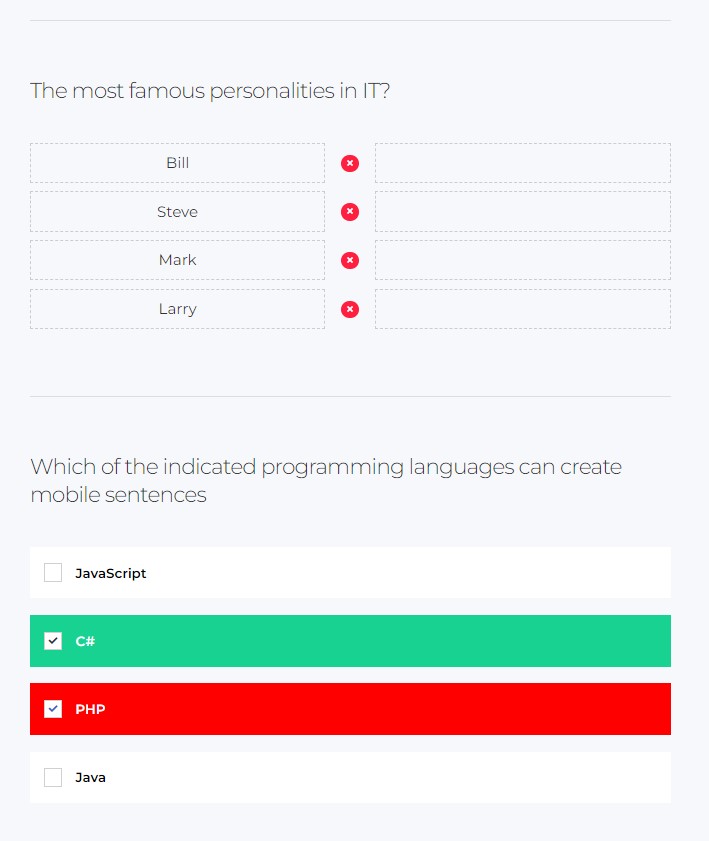
Advanced quizzes offer various options that can be added and combined within your quizzes in your courses among the rich number of question formats. These question formats include:
- Single choice answers
- Stem matching
- Keyword combinations
- True or false
- Multiple choice
- Fill in the gap
- Image matching
- Image choice

Student Management
Moving on, we have Student management which includes both groups and courses. This feature has quick access to your courses and students; you can control everything with a simple click. There is also automatic group creation that allows the groups to be set so new students can automatically start learning and be within a group. There is group monitoring and bulk license purchases, which allow companies to buy multiple passes instead of paying for each individual person. Each instructor can add a new or specific student to the selected course.
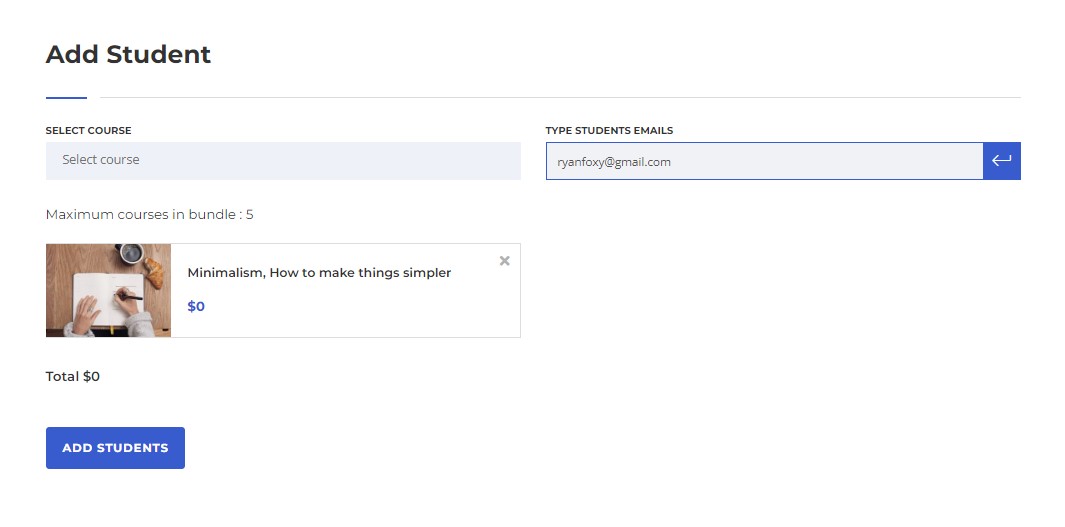
Courses can also be easily switched from one instructor to a co-lead course. This allows multiple instructors to manage their own personal part of the course, making efficiency the key factor.
Page Builder Options
Next, we have a page builder that allows you to construct pages easily. The possibilities are endless; you could make e-learning pages, blogs, or even a standalone LMS. This is built within the MasterStudy LMS Plugin using Elementor, WPBakery, and Divi.
You can use these three-page builder options to edit your website with LMS classy modules. This will help you organize and run the e-learning website in minutes.

Additionally, by syncing MasterStudy LMS with the page builders, you can create a course carousel, categories, grid, recent boxes, search fields, featured teachers, course bundles, and more. All of these features are already included, with no coding required for the user!
Free Starter Theme
One of the greatest things about MasterStudy it’s a free ready theme, which you can import in one click anytime. This is cool because you will focus more on creating courses, planning the curriculum, and teaching your students.
The starter theme comes with a fully ready landing page, and you will probably need to slightly change the data, writing, and font properties in most cases. Moreover, the theme contains all viable integrations and features to start your website immediately. This is a real education WordPress theme in the plugin, or call it 2 in 1.

Zoom & Live Streams
Our fourth feature includes seamless compatibility and incorporation of zoom/live streams anywhere on your personal website. This feature will improve your courses by using Live Webinars by connecting them with the Zoom service and MasterStudy. Create and manage online meetings directly from your LMS or use an activity where all learners can simultaneously participate. It’s real-time, highly interactive, and very social.
So if you are pursuing a live session, this might be a great solution. Because all you need to do is register in Zoom, switch on the Zoom Conference add-on, which is available in the Pro version, and install the free eRoom plugin. Thus you can create unlimited Zoom meetings or webinars with countdowns on specific pages.
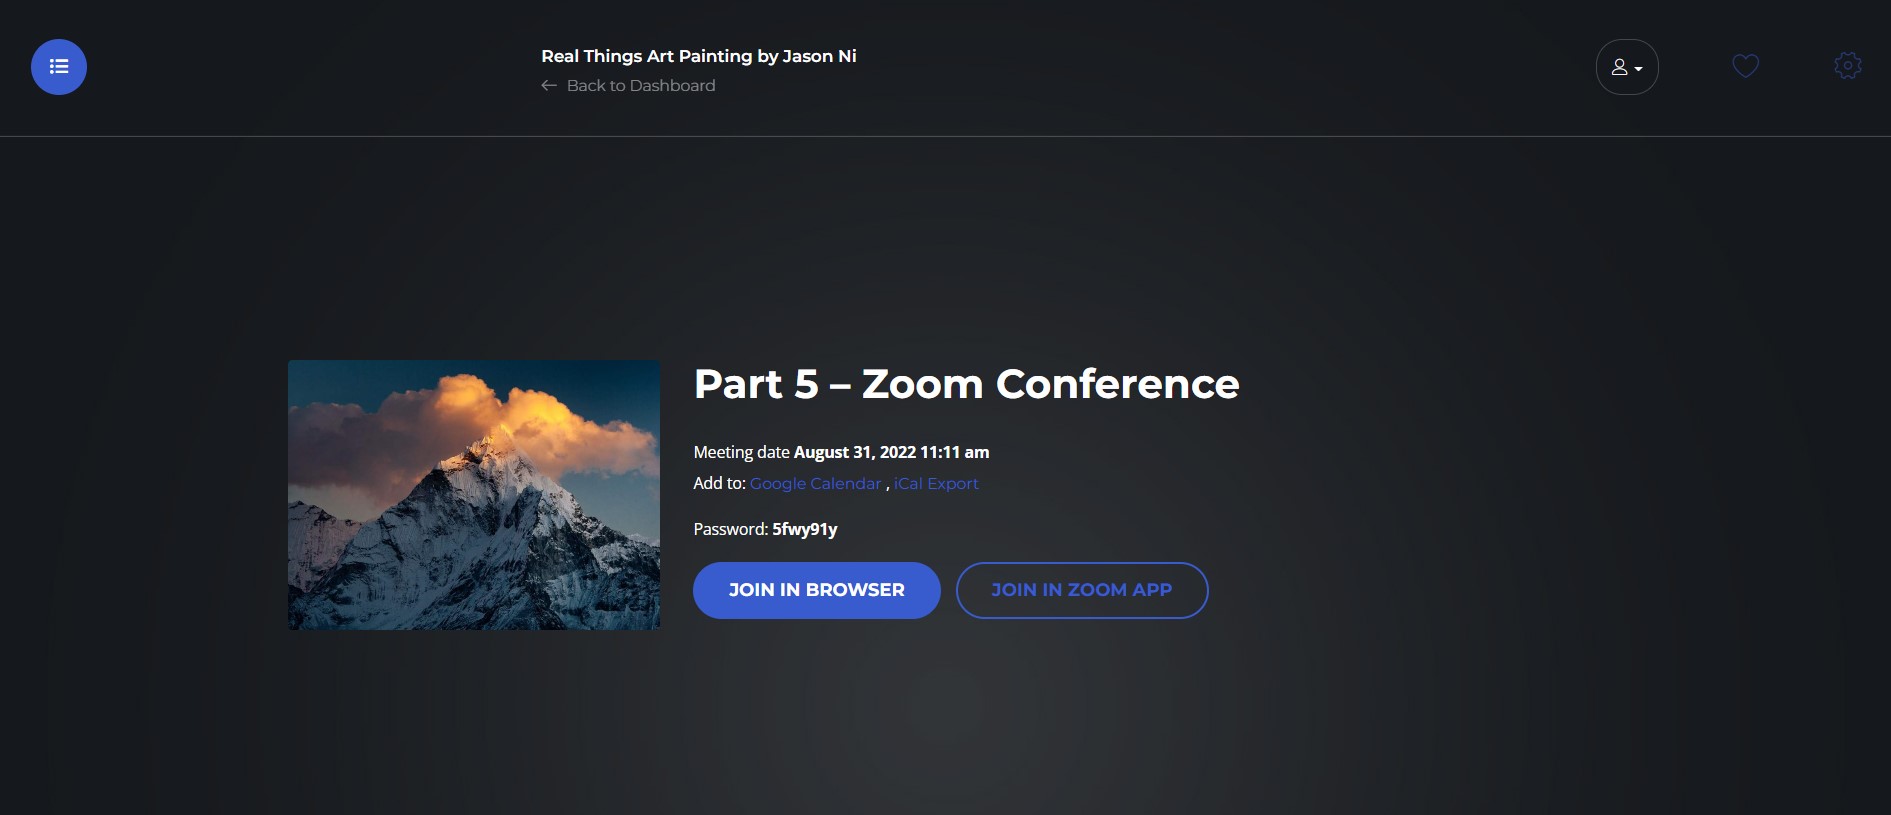
This feature also includes a live chat option. Students can ask questions from the instructor in real time while the lecturer explains the topic. This allows hands-on assistance from the instructor, further motivating a positive learning experience.
Drip Content
The fifth feature is called Sequential Drip Content. Drip Content allows the user to quickly set a time and date that has your assignments/classes posted with a simple click. This allows for a consistent release of the content with many lessons and quizzes that can vary in difficulty level as the student progresses.
This also allows the student to progress at a comfortable pace. The delivery of bite-sized content makes it easier for students to digest lessons by “dripping” the content of the courses so the instructor can evenly distribute the workload.
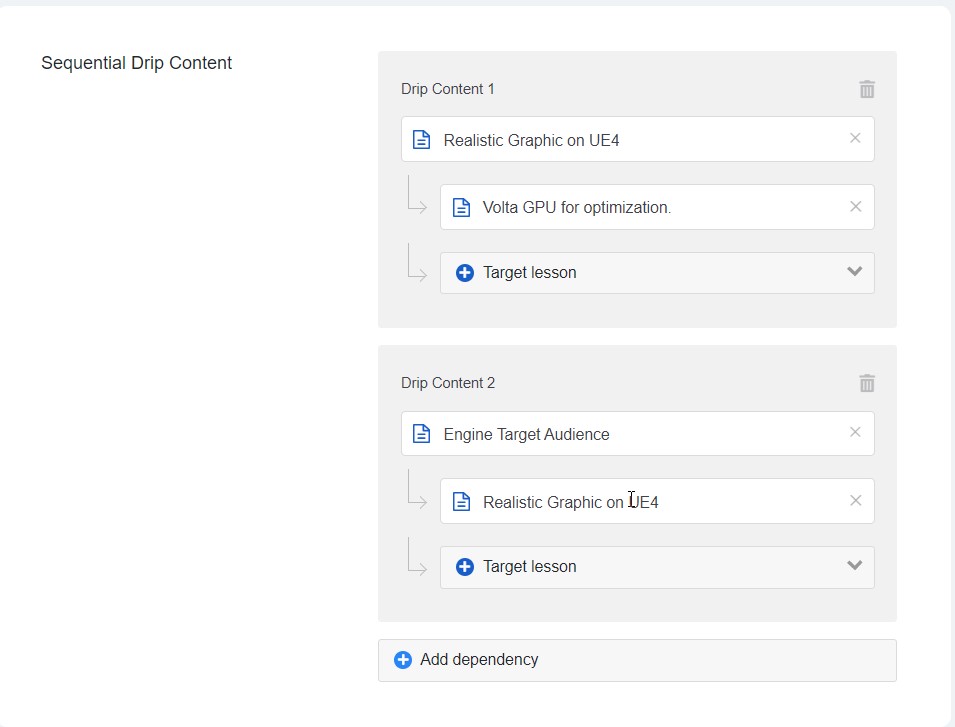
This feature will be super-useful for those who are going to provide the gradual completion of lessons.
Monetization & Payment Methods
As an online instructor, entrepreneur, or business owner, you are most likely interested in the ability to sell courses and the function of creating your own online e-learning marketplace. Well, MasterStudy LMS has such an opportunity!
You have several monetization methods to choose from:
- One-time purchase
- Membership Plans
- Course Bundles
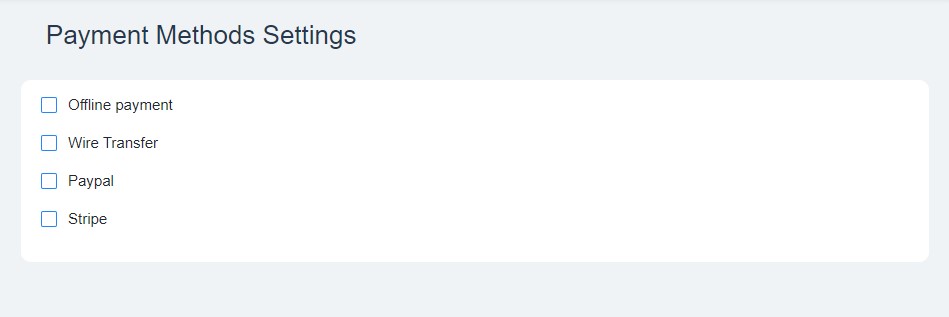
A one-time purchase is simple as it means you pay only once, and with the completion of this purchase, you receive the course. MasterStudy LMS has PayPal and Stripe integration so that you can choose between these payment methods. You can also enable the option of bank transfer (wire) or payment in person (offline payment).
There are also monthly or annual subscription plans available at any time. MasterStudy offers a Membership Plan that allows users to review all the benefits of their membership plans quickly. Membership plans can be easily created with Paid Membership Pro plugin, which is a great choice if you are going to run a subscription model.
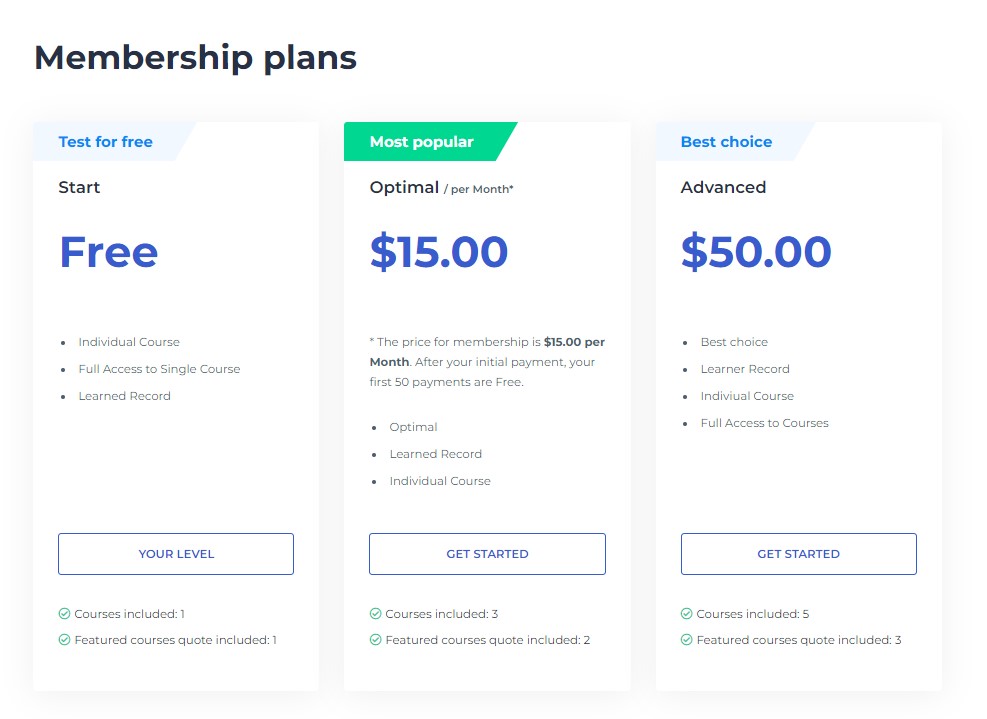
Get started with this by enabling the subscription within your courses that makes your course accessible to students and gives them the active member role for a specific period, entitling them to specific benefits that you offer.
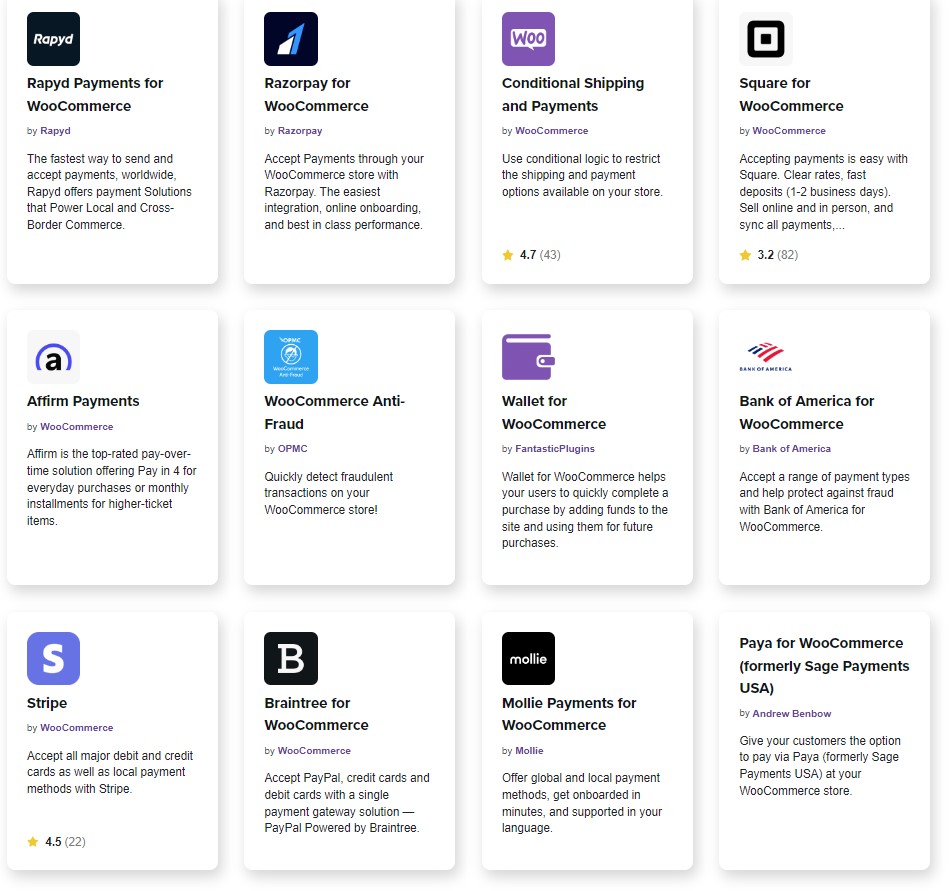
If you need more options and you might need to set up, let’s say, Razorpay or Braintree, which is not presented in MasterStudy by default, you can always install WooCommerce and choose Razorpay from a bunch of payment options integrated into WooCommerce. In other words, WooCommerce is compatible with MasterStudy as well.
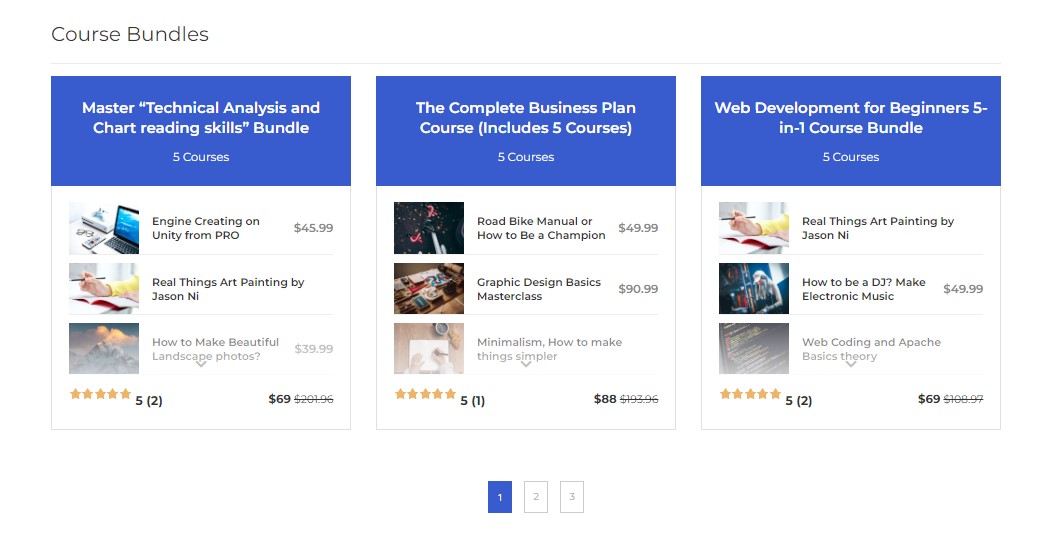
And finally, you are not limited to selling the courses one by one. Course Bundles feature allows you to pack your specific on-topic courses into one product (bundle) and run it on your store.
In sum, these payment options are integrated and used as payment gateways to charge for your courses & lessons.
Custom Certificate Builder
MasterStudy also provides you with a fully-equipped Certificate Builder, where you can save certificates as pre-made templates for future specific courses. This saves both times and lets you efficiently send certificates to your students. The instructor may optionally upload his own certificates instead of building a customized one from scratch using the Certificate Builder.
The builder lets you create personalized, fully custom, and unique certificates that will be awarded to the students for their achievements/accomplishments.
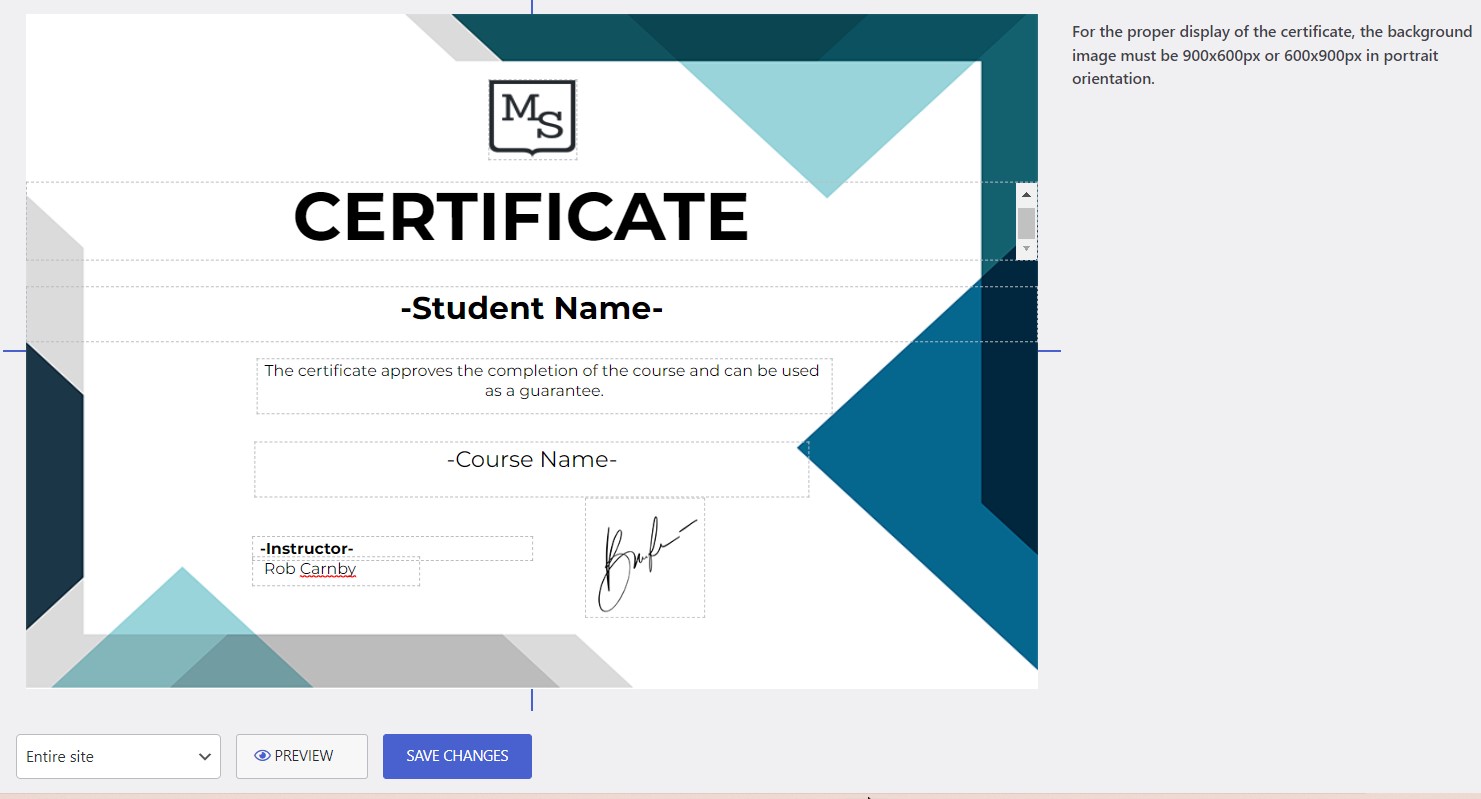
For security and reliability reasons, every certificate has a unique code generated in the system. That way, anyone can easily verify the certificate’s authenticity using the code checker on your website, proving their accomplishments swiftly.
Third-Party Integrations
MasterStudy is integrated into many famous plugins and applications. You can easily extend your online education by connecting with your favorite WordPress tools. These include:
- Elementor Page Builder
- WP Bakery
- Divi Builder
- WooCommerce
- Paid Membership Pro
- H5P
- GamiPress
- Zoom
- Google Classrooms
- MailChimp
- Contact Form 7
- WPML
- GrassBlade
- Uncanny Automator
- Automator WP

One of the most useful premium options of the PRO Version is the full WooCommerce Integration. WooCommerce is one of the best solutions for selling your courses online. The system brings the ability to create LMS course products, set up a store, apply coupons/discounts, and manage bundles. WooCommerce integrated with MasterStudy LMS brings you a complete engine for running an eCommerce platform on your LMS website.
You may not need to activate the payment options (PayPal, Stripe) for monetizing courses. And here, you will need WooCommerce, which can give you the opportunity to set up one of the thousands of payment systems from around the world.
As we mentioned, MasterStudy LMS is fully integrated with page builders: WPBakery, Elementor, and Divi. Many people use one of these popular page builders so that you won’t have any problems with page customization.
MasterStudy LMS Plugin – Pro Versus Free
MasterStudy LMS Pro allows you to apply tons of beneficial options. But are they worth it? I would say they are the perfect add-on and are the right choice for anyone looking to boost their website to a new level. Many additional options are included with the PRO version that will allow your courses to shine through the clutter.
There are nineteen add-ons are available with the PRO version of the plugin:
- Udemy Course Importer
- Prerequisites
- Online Testing
- Statistics and PayoutsTrial Courses
- Sequential Drip Content
- The Gradebook
- Lessons Live Streaming
- Group Courses
- Assignments
- Point System
- Course Bundle
- Multi-instructors
- Google Classroom
- Zoom
- Conference
- SCORM
- Email Manager
- Certificate Builder
- LMS Forms Editor
MasterStudy LMS Plugin – System Requirements
So if you are impressed by the highlighted features and power of MasterStudy, you might be curious about where and how to start with this plugin. Before diving into the details, you need to be sure the system requirements match your side to use the MasterStudy LMS plugin and avoid any technical issues.
Let’s see what we need to run the plugin without a problem.
- WordPress 4.6 and higher. Here is one good thing the developers of the plugin constantly update it, and in the present time, it works well in the new WordPress 6.1
- PHP 7.2 and higher
- MySQL database 5.6 and higher
- WordPress Memory Limit 128 MB and higher. But the most optimal is 256 MB because it’s a complex e-learning suite with many integrations.
If these requirements suit your hosting system parameters, you will be fine. MasterStudy LMS will work excellently on your website.
MasterStudy LMS Plugin – Installation Prerequisites
Installation for MasterStudy LMS Plugin is quite simple!
The Free Version can be installed like any other WordPress plugin. There are two ways of installation shown in this review.
The first way, download the plugin from the default repository of WordPress using this link: https://wordpress.org/plugins/masterstudy-lms-learning-management-system/.
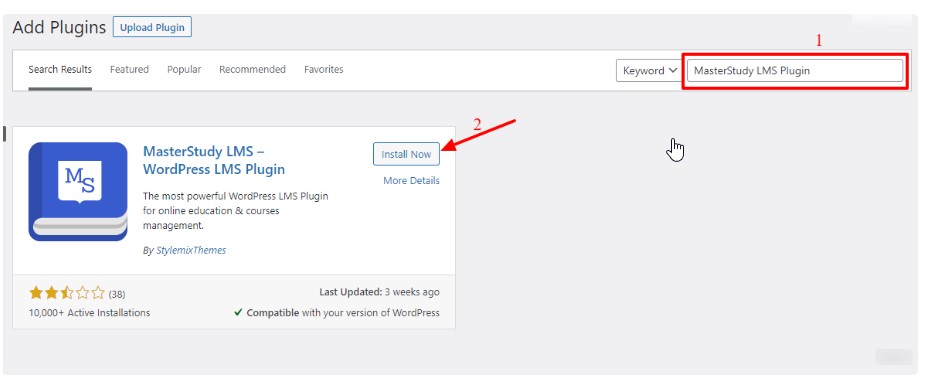
Click on the Upload Plugin button (1), select the MasterStudy LMS Plugin, downloaded from your local folders (2), click the Install Now button (3), and wait for the installation to finish.
On the opened page, search for the MasterStudy LMS Plugin (1), Install the plugin (2), and Activate it once it’s installed.
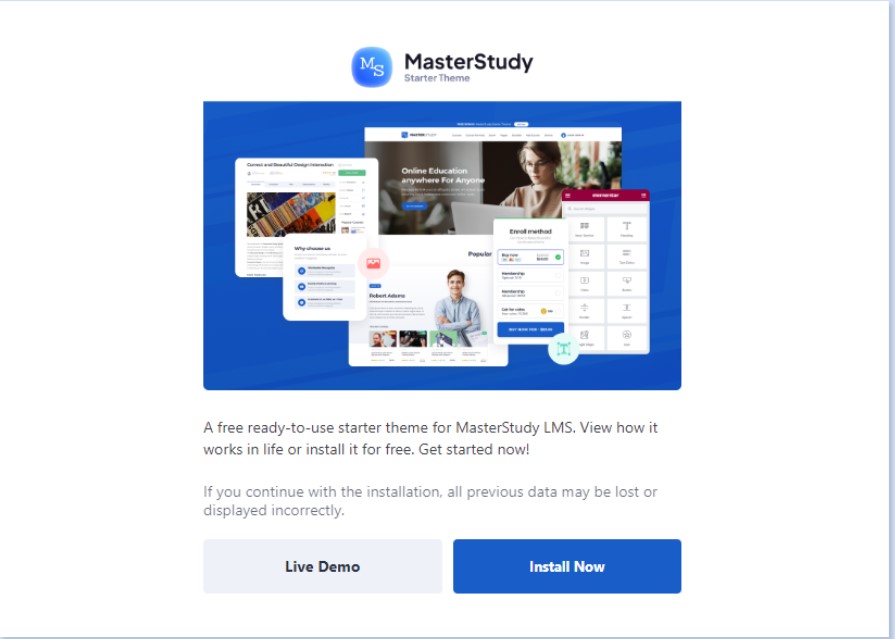
There is also MasterStudy’s free WordPress theme called MasterStudy Starter. This free LMS theme for MasterStudy has a fully customizable and pre-built home layout with the inner pages completed. All it takes is to demo the import, so no coding is required.
The theme is fully compatible with Elementor and unique widgets that can build even better layouts than imagined. Different Header and Footer templates with advanced typography settings give you the power to create any WordPress site for your educational company within minutes.
The Pro Version of the plugin can be purchased from our official website.
The link is: https://stylemixthemes.com/wordpress-lms-plugin/.
After purchasing the plugin, you will get an email from Freemius with the link to the plugin zip package, your license code, and instructions on how to set up the LMS Pro.
Once you get the package, follow the Dashboard → Plugins → Add New path. Click on the Upload Plugin button(1), upload the plugin from Freemus(2), click the Install Now button(3), and wait for the installation to finish.
After clicking on Activate Plugin, you will be redirected to another page to activate your license. Use the License Key you received with your email and enter it in the field provided. This should allow you to use the amazing plugin, which is MasterStudy!
How to Add Quizzes
Setting up the quizzes is simple. Choose one page or pagination. Divide your quizzes into pages or show all quiz questions and tasks on one page.
You can then simply create the quiz you want your students to take.
A simple step-by-step process would include the following:
Going to the STM LMS → Quizzes menu. Each Quiz may include unlimited Questions. You can add either existing questions to your Quiz or create a new one via Add new question field.
Next, you would select the Quiz Frontend Description, allowing you to write a Description of the Lesson quickly. Quiz duration is next with how long you want the quiz to last in minutes/hours/days. Show correct answer is third, and this displays the correct answer at the end of the given Quiz. Passing grade is the minimum percentage of correct answers for passing the quiz, which is calculated instantly. Points total cut after re-take allows you to regrade a Quiz based on if the student reattempts the quiz and can cut the percentage.
Lastly, we have Randomize Questions that allow the quiz to be automated in how it is ordered.
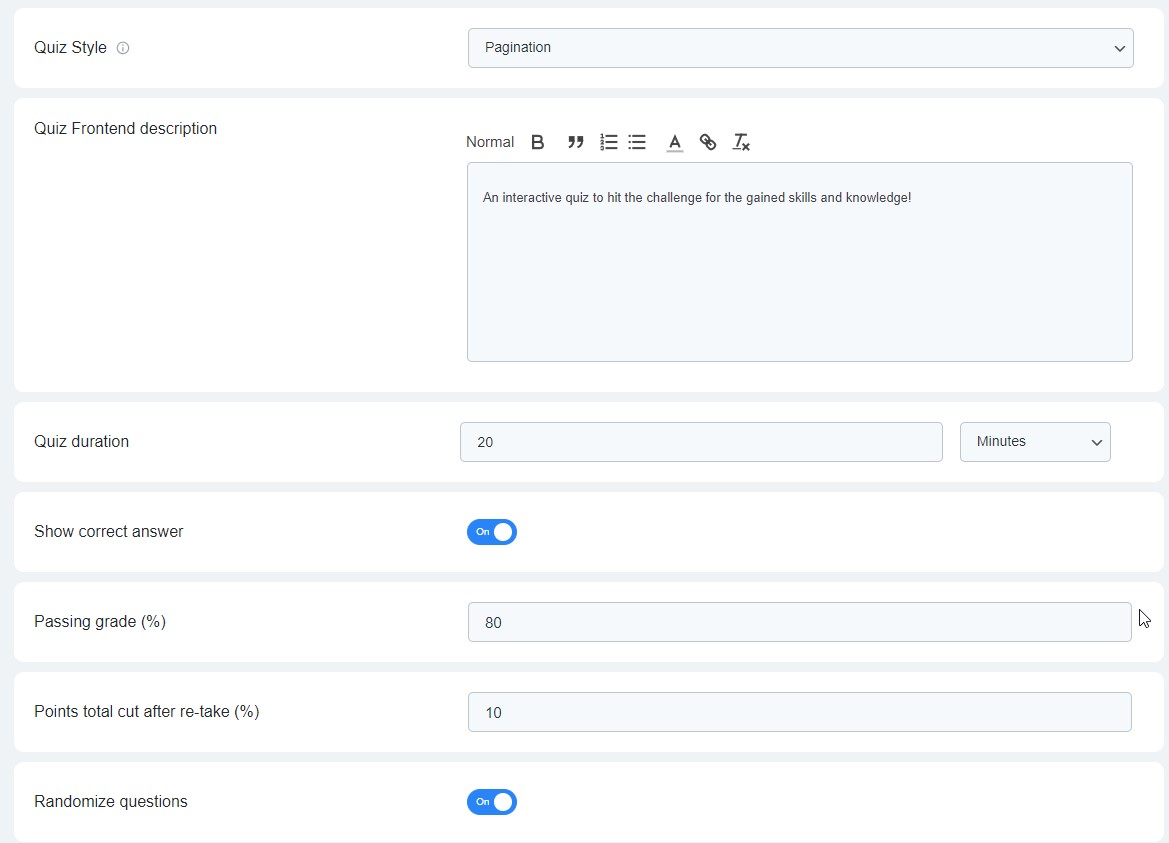
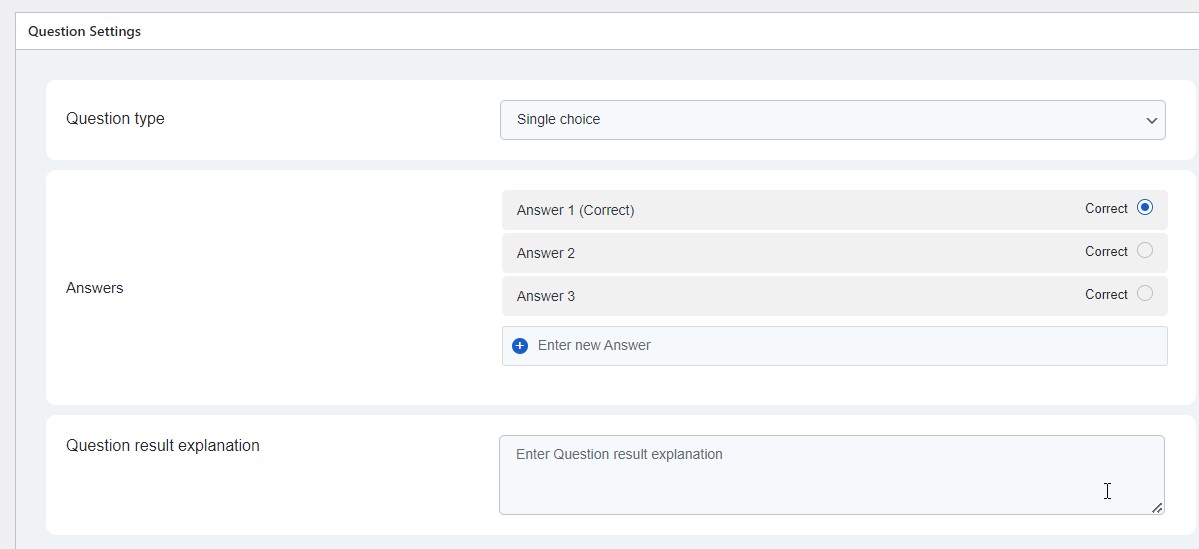
Next, we would go to the Quiz Question section and select what type of question is asked, like single choice, multiple choice, and so on. You can also use the search field to look up questions and select questions from a previous list. Just check the needed items and click Add selected questions.
Checking the Quizzes results after completion is also simple. Simply go to Manage students,
Click on the required quiz to see the data, and you can see every student’s answer for the quiz. The correct answers are colored in green, and incorrect answers are indicated in red.
You can also see the number of attempts and the passing percentage they received. These are some options that are included in the quiz selection:
- Quiz review
- Quiz timer
- Limited attempts
- Passing grade
- Quiz retake
- Automated quiz results
- Question bank
- Question randomizer
How to Add Online Courses
Setting up courses is not a hassle.
In MasterStudy LMS, you can add courses in the frontend or directly in the WordPress admin panel.
To add the course in the frontend, you must be logged in and, upon it, go to your Profile. Right on your profile, you can see plus button on the sidebar.
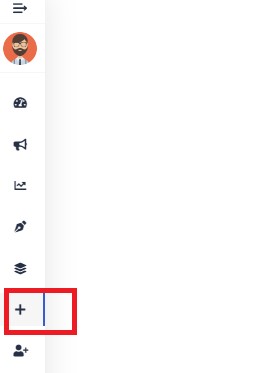
So the frontend course builder will come up, and you can fill it up with the necessary data, add the lessons and determine the properties.
Well, adding the course via the backend is quite simple as the first way. The builder there is almost identical to the frontend.
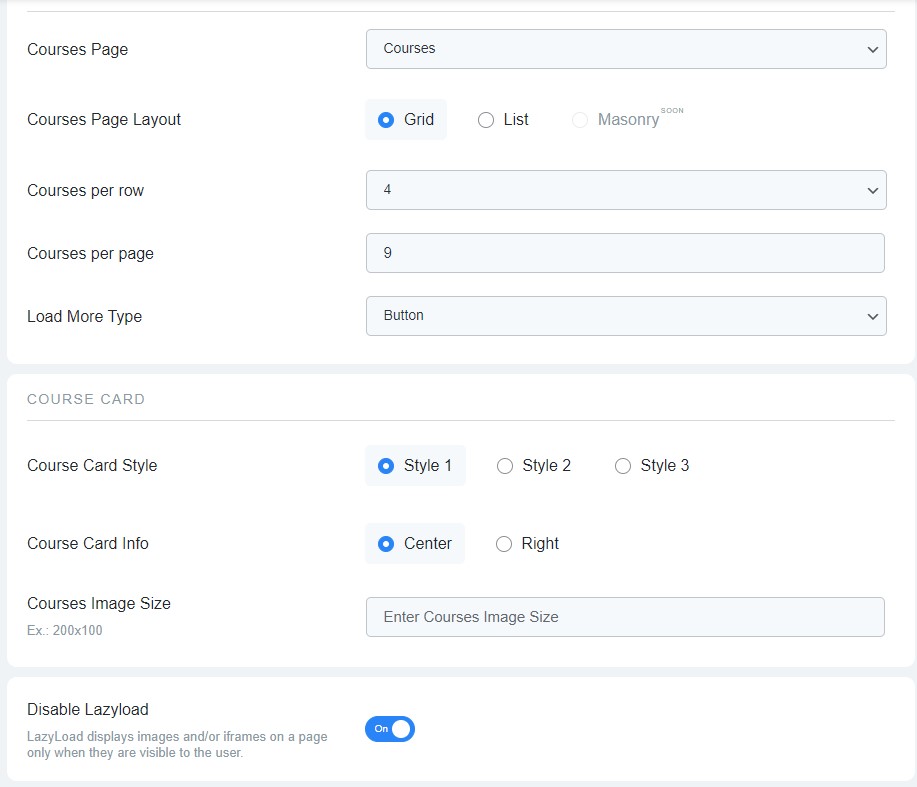
If you wish to change some appearance settings specifically for the Courses page (with a list of available courses on your website), you can definitely do it in the special section.
In WordPress, go under the Courses tab, where you can manage the appearance. There will also be features you can click that include:
- Import Demo Courses, where you can import course demo content, including quizzes and lessons.
- Courses Page is the main page where all courses are displayed for students.
- Courses Page Layout is where you can choose the course page layout as either Grid or List.
- Courses per page is where you can set the number of courses to display on one page.
- Сourses per row is where you can set the number of courses to show per row.
- Course card info can be used to specify where to place the course card info: right or center.
- Course card style will allow you to select the display style for the course card.
- Course category parent slug allows you to specify the slug for the category’s archive page.
- Courses Image size enters the size for the course image.
- Load more type chooses how to display the Load More option with either a Button or infinite scrolling.
- Disable lazy load simply disables the lazy load script on the website
- Disable Featured Courses Top Block on the Course List Page allows disabling the display of the featured courses placed on the top of the course list page.
- Number of Featured Courses on Archive Page easily specifies the number of featured courses to display on Archive Page.
How to Add Lessons to the Course
Lessons are next with a simple click to MS LMS → Lessons menu on the WordPress dashboard will take you to the editor where you can use Gutenberg, WPBakery, or Elementor to set up a featured image and parameters.
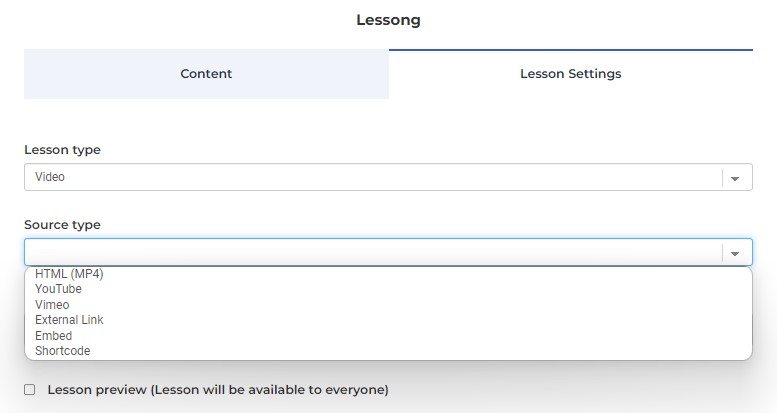
Clicking on the Lesson settings section allows you to choose the Lesson Type, be it Text, Video, Slide, or Zoom Conference.
Each lesson type contains its unique fields and properties. For example, video lessons give you a number of video sources, which you can use for performing a player in your lesson:
- HTML (MP4)
- Youtube
- Vimeo
- External Link
- Embed
- Shortcode
- Presto Player (available only if you have this plugin. It’s free)
Lesson Duration is next, and it allows any information about the duration of the lesson.
Lesson Preview gives the lesson open/private for visitors, with Lesson Frontend Description allowing for a description of the Lesson that will be visible in the Course Curriculum.
Finally, Lesson Materials show the files that can be used during the lesson.
Building and Importing the Certificate
Building certificates, whether premade or from scratch, is not a hassle.
First, you will go to STM LMS → Addons and enable the Certificate builder addon. With this, you can click on the Gear icon or follow the Certificate builder menu from your dashboard, where you can see Certificate, General, and Workspace.
You will choose the orientation of one of these options and add an element to the certificate by dragging and dropping or clicking the plus sign. To add a background to the certificate, simply click Choose Background and upload any image from your PC.
When adding text content to your certificate, editing tools can change the font, size, color, and alignment. Then, save the template you created or apply the certificate to the whole website or a specific course category. The student name, course name, and instructor will be changed automatically to the relevant names depending on the student the certificate is awarded.
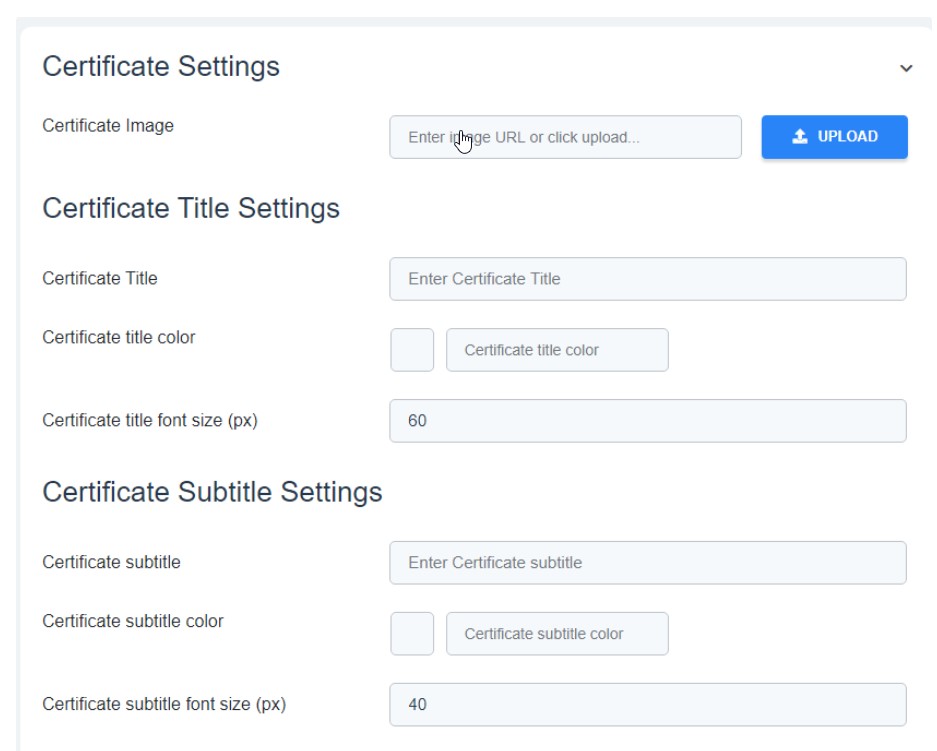
You can also import your ready-made certificate into the course. This can be done in Certificate Settings.
MasterStudy LMS Plugin – Pros and Cons
No matter how incredible or user-friendly a plugin is, it always has both positives and negatives; MasterStudy LMS Plugin is no exception. Yet there are far more pros than cons, so take that into consideration.
Pros
- Intuitive drag-and-drop builder
- Advanced quiz creation
- Insightful reports
- Easy to use
- Free Starter Theme
- Unlimited courses
- Feature-enriched LMS plugin
- Easily administered and integrated
Cons
- Limited payout options
- WordPress-only tool
- Advanced add-ons and extra features are available only in the Pro version.
MasterStudy LMS Plugin – Pricing Plans
The pricing for MasterStudy is very affordable for not only a single website but for quite a variety. The user would want an LMS solution that assures high performance and is pocket-friendly. This is the MasterStudy LMS Plugin in a nutshell.
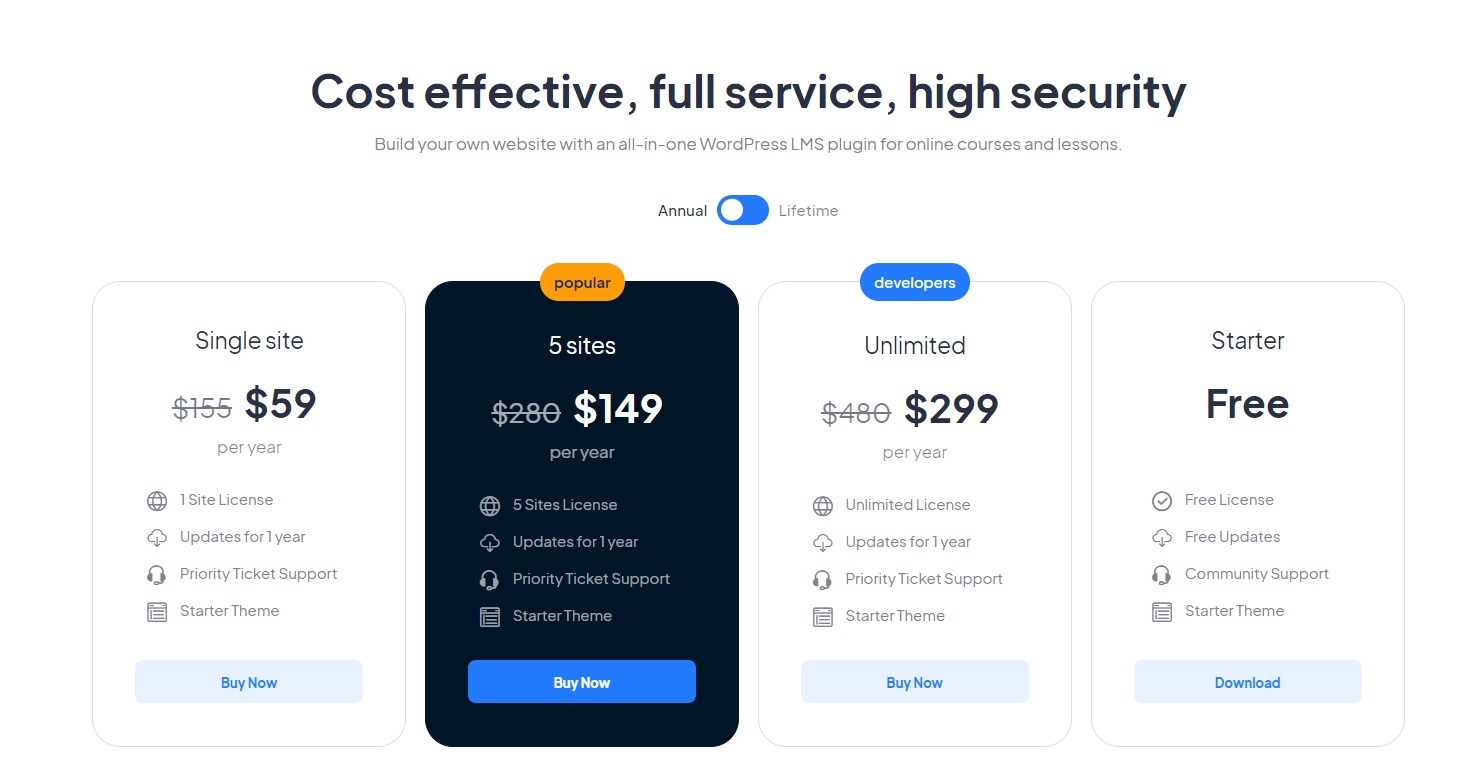
MasterStudy LMS offers you both annual and lifetime plans and has separate plans for individuals and developers and a free version for starters!
Annual
- The individual plan is priced at $59 (annually), which includes a single-site license.
- For 5 sites, the cost is $149 (annually), which is the most popular.
- These annual plans come with free updates for a year.
- The developer/unlimited plan is priced at $299 (annually), including the unlimited license for as many sites as you want.
- There is community support for the free version and Priority Ticket Support for all the other versions.
- There is a 14-day money-back guarantee which can be checked out here: https://stylemixthemes.com/subscription-policy/.
Lifetime
- The single site plan is priced at $149 (lifetime), including one site license.
- The 5-site plan comes to be priced at $399.
- The unlimited 1-time payment comes out to be $799 for an unlimited number of sites.
- This will include Priority and Community Support as well.
- This includes Lifetime Updates and a starter theme for each option.
Summary
All things considered, MasterStudy LMS certainly is an excellent LMS plugin, given its rich features and ease of use for the customer.
After closely inspecting the features, I could see why this plugin is one of the most talked about greatest in the space. With the simplicity of the course and lesson creation process and the unlimited types of files that can be uploaded, there is no reason for any user to struggle.
The free starter theme in the plugin also allows users to test things out whenever possible. The flexible pricing and free version are convincing enough for tutors and entrepreneurs to at least give it a try. So I would wholeheartedly recommend this plugin with its simplicity and efficiency!
Q. Who can use the education WordPress plugin?
A. Who is targeting users of the WP Online Course Plugin? First, this could be individuals who want to build markets for online course distribution, such as Udemy or SkillShare. Then, companies are willing to set up their own training system to go internal.
Also, a big percentage of LMS users are customers creating free or premium online courses for sale. And finally, different educational institutions provide online programs in addition to offline classes.
Q. How easy is MasterStudy?
A. We have carefully tested the plugin, and we can say the design of the plugin is intuitive, neat, and tidy. Creating courses, lessons, and quizzes are straightforward and fast. And if one of the targets is to sell online courses, MasterStudy simplifies the whole process.
Q. Which theme should I use with MasterStudy LMS?
A. MasterStudy LMS greatly works with most of the working themes. Especially with the featured ones. Apart from it, MasterStudy gives you its own free Starter theme, which is speedy customizable, and on point.
Q. Does MasterStudy work only in WordPress?
A. Yes, since MasterStudy was designed for WordPress initially, it can be run only in this CMS.
Customer Review at 
“Beautifully optimized hosting for WordPress and Magento”
Arda Burak [Agency Owner]
Mansoor Ahmed Khan
Passionate about technology, entrepreneurship, and marketing, Mansoor Ahmed Khan is in computing since he knows how to type on a keyboard. His daily life is rocked by his family, projects, and his screen. Probably in this order, he likes to be convinced at least. You can reach out to him at [email protected]
